Light Graffiti With Servos And Python

servo-laser-light-graffiti

Light Graffiti is can be lots of fun if you have a decent amount of artistic ability, and a keen sense of timing. If you don’t have the necessary skills, you can always compensate by using Python-controlled servos to move everything automatically. The Python code can be found here, and makes use of the Python Image Library to process the images into a “drawable” form. A [pyMCU] with firmware capable of simultaneous servo control was used to move the laser fixture around.

One of the more difficult aspects of this experiment was getting the timing correct between each laser pulse. The timing routine involes a bit of geometry, calculating the distance between each using trig. As explained in the article, this may be a bit of overkill.  It still didn’t compare to the trig involved in a previous experiment drawing a circle with this laser-servo fixture.  Be sure to check out the video of this laser-setup in action after the break.  I’ve been quite pleased with the results, and look forward to what can be done with it in the future!

Thanks to [pyMCU] for letting me have a few of these boards to play with!

Continue reading “Light Graffiti With Servos And Python”

Stapler Hack Fastens Infinitely Large Sheets Of Paper

infinity-stapler

It’s not called the infinity stapler, but we think it should be. This magnetic hack allows you to use a plain old stapler to fasten very large pieces of paper.

The limiting factor has always been the distance between the stapler’s hinge and where the staples come out. To get around this, the crimped connections between the base and the dispenser were drilled out. Larger holes were then drilled in both the top and bottom halves to accept a set of magnets. These were held in place temporarily with some tape while the super glue had time to set up.

The result is two halves which are placed on either side of the over sized paper. The magnets are responsible for aligning the staples with the die which bends them to their final shape. The whole process is shown in the video clip after the break.

Continue reading “Stapler Hack Fastens Infinitely Large Sheets Of Paper”

H-bot Style 3D Printer Moves Bed For Z-axis

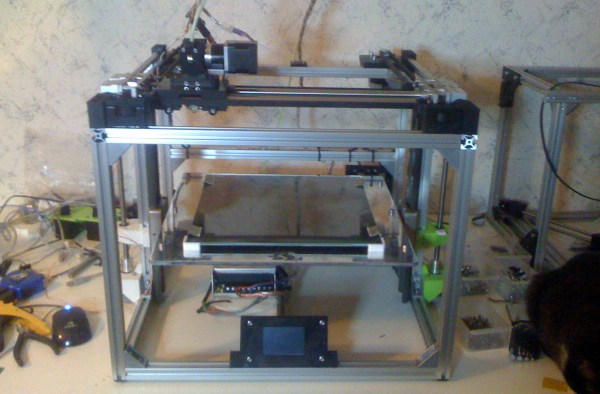
Check out this 3D printer (translated) which [Arkadiusz Śpiewak] has been working on. When sending in the tip about his project he made the important distinction that it isn’t finished, but he has reached that critical threshold where he has printed items with it.

He decided to go with a design that is sometimes referred to as an H-bot. If you’re completely unfamiliar with it, you may find this H-bot design article helpful. The gist of it is that this technique makes it so that the motors used to move the extruder along the X and Y axes are themselves stationary. One large timing (toothed) belt makes a circuit around the top of this cube in the shape of the letter H. This is a bit easier to see in [Arkadiusz’s] rendered image found after the jump along with video of an early print test.

The Z axis uses two motors mounted along the bottom of the cube. These raise and lower the bead, instead of moving the extruder itself. All-in the printer should have a maximum object size of 30x30x30 centimeters. It’s being driven by a Smoothieboard, which was mentioned quite a bit when we were discussing using the RA driver board with a 3D printer.

Continue reading “H-bot Style 3D Printer Moves Bed For Z-axis”

Electric Tricycle Build Log Is Like Hacker Crack

This tiny little scratch-built electric tricycle is a insanely powerful. Some might think you don’t need a crash helmet for testing a trike, but seeing the video after the break where [Ben Katz] is flying through a parking garage while slaloming between the support beams proves that this ride has some pep to it.

Looking through the presentation post linked above is fun, but when we started digging though the six build log posts we felt ourselves getting sucked into the project. It’s a delight every step of the way. It started with an aluminum box which will host the two rear wheels, drive train, motor, and battery. [Ben] decided to go with A123 Lithium cells, and after testing to see how many he could fit in the space available he started making choices on the motor and driver circuit. When he finally got his hands on the actual cells for the project he took on the fascinating process of constructing his own battery. Dozens of them were hot glued, then soldered together before being encased by placing them in soda bottles and hitting the plastic with a heat gun. And we haven’t even gotten into the bicycle hub-gear transmission system, disc brakes, differential, chain-drive, and motor… you see what we mean about sucking you in.

Oh, and in case you’re wondering this is not [Ben’s] first electric vehicle build. Last year he was showing off his all terrain scooter.

Continue reading “Electric Tricycle Build Log Is Like Hacker Crack”

Snowboard Goggle HUD Displays Critical Data While Falling Down A Mountain

snowboard-google-hud

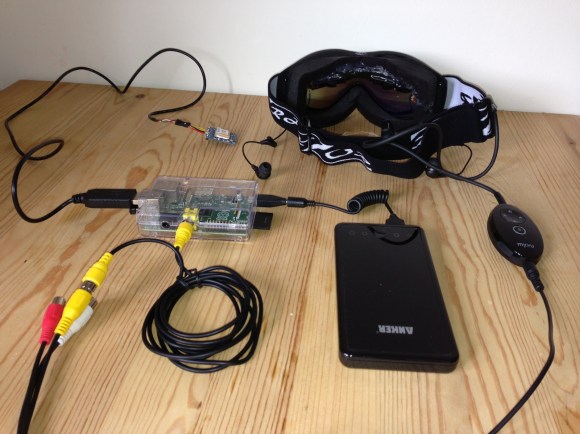
[Chris] has been hard at work building a Heads Up Display into some Snowboarding goggles. We’re used to seeing the components that went into the project, but the application is unexpected. His own warning that the display is too close to your face and could cause injury if you were to fall highlights the impractical nature of the build. But hey, you’ve got to start somewhere when it comes to prototyping. Perhaps the next iteration will be something safe to use.

A set of MyVu glasses were added to the top portion of the goggles, which lets the wearer view the LCD output by looking slightly up. The display is fed by a Raspberry Pi board which connects to a GPS module, all of which is powered by a USB backup battery. In the video after the break you can see that the display shows time of day, speed, altitude, and temperature (although he hasn’t got a temperature sensor hooked up just yet). His bill of materials puts the project cost at about £160 which is just less that $250.

Continue reading “Snowboard Goggle HUD Displays Critical Data While Falling Down A Mountain”