Causing Trouble At RedBull Creation 2013

Skullduggery systems (a first time participant) came up with an extremely ambitious idea for their instrument. It was to be a jug, that would have a changing pitch based on water being pumped in and out. Ultimately, they ran into a few issues that meant that the effect wasn’t quite what they were looking for. They shouldn’t feel too bad, a bunch of teams didn’t succeed in making things the first year they participated.

What their instrument did do, however, I found simply delightful. The jug sounded just like feedback from the sound system. The contest was happening during a big music festival called the NorthSide festival.  There was a stage and a huge crowd most of the time.  They were testing their jug and we noticed that the band on stage (with a full crowd at the time), had stopped playing and was checking all their equipment. The sound guys were running around like crazy. They thought they were getting feedback.

We held off for a while and decided we would wait till sound checks to mess with them. While we wanted to cause trouble, we didn’t want to ruin the show for an entire crowd.  As you can see in the video, the sound is very much like feedback. They would begin to play, then stop to track down this mysterious feedback. We even tricked [Tyler] the announcer that was talking over our local sound system in the Redbull tent (by accident, I assure you).

Modifying A CRT Television For Use As An Arcade Monitor

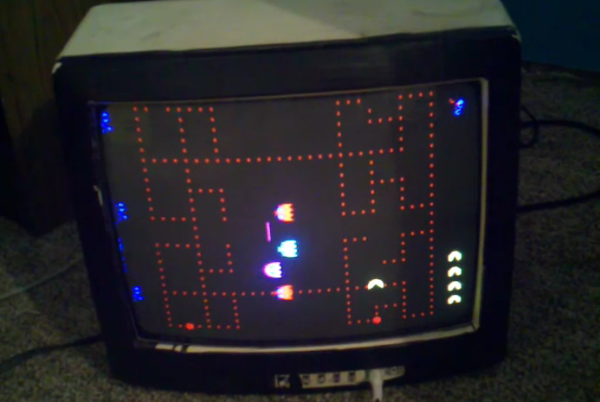
Finding himself in need of an arcade monitor [Eric Wright] turned to this ancient CRT television. The problem is that arcade monitors and televisions didn’t operate in the same way, differing in both resolution and refresh rate. [Eric] modified the television to work like an arcade monitor, but only with limited success. He’s hoping a few more alterations will lead him to a complete solution.

The image above shows him testing a Pac-Man machine on the altered Sharp television. Those familiar with the game will immediately notice that there is something wrong. We see most of the tracks upon which Pac-Man and the ghosts travel, but he maze itself is completely missing. To get to this point [Eric] consulted the television and arcade schematics to figure out how to connect the composite sync and three color channels directly to the arcade machine. This way the CRT timing is forced to conform to the game standard. The problem is that there is no way to adjust the drive and cutoff of the individual color channels. This is something [Eric] hopes to fix in the next iteration of his experiments.

If you already have a working arcade monitor but no gaming cabinet why not use a Raspberry Pi?

Continue reading “Modifying A CRT Television For Use As An Arcade Monitor”

Coopering Wine Barrels

The process of making a high quality wine barrel is still done very much by hand. Each piece of wood is hand selected, even from the point of purchasing specific logs at auctions.  In this video he is using many power tools and modern techniques, but still performing everything himself. I couldn’t find any videos of coopers using only hand tools, let me know if you find one.

This video is rather poor quality, but many more hand tools are used in the process.


Just in case you’re curious, here’s what the factory style production of these things is more like.

Raspberry Pi Replaces A Volvo Nav System

rpi-replaces-volvo-nav

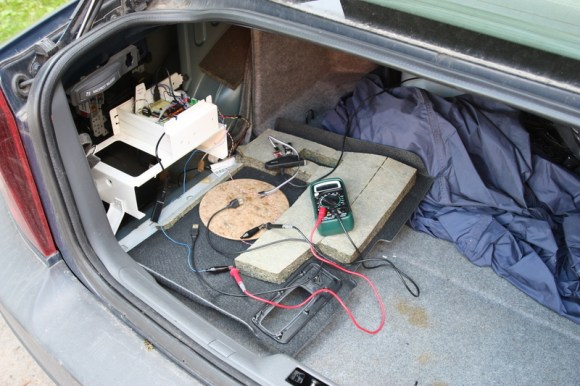
[Reinis] has a Volvo S80. One of the dashboard features it includes is a 6.5″ LCD screen which periscopes up to use as a navigation system. The problem is that Volvo stopped making maps for it around five years ago and there are no maps at all for Latvia where he lives. So it’s worthless… to you’re average driver. But [Reinis] is fixing it on his own by replacing the system with a Raspberry Pi.

That link leads to his project overview page. But he’s already posted follow-ups on hardware design and initial testing. He’s basing the design around a Raspberry Pi board, but that doesn’t have all the hardware it needs to communicate with the car’s systems. For this he designed his own shield that uses an ATmega328 along with a CAN controller and CAN transceiver. The latter two chips patch into the CAN bus on the car’s On Board Diagnostic system. We didn’t see much about the wiring, but the overview post mentions that the screen takes RGB or Composite inputs so he must be running a composite video cable from the trunk to the dashboard.


Adding WiFi To A Kid’s Tablet

tab

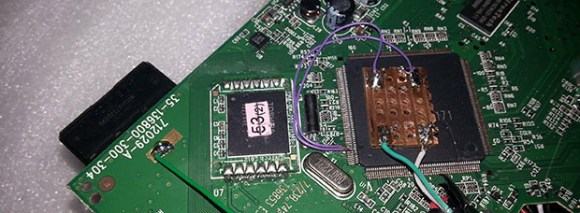
[Mick] has been playing around with the VTech Innotab – a $70 tablet computer aimed at kids – for a while now. He’s successfully turned this tablet soon to be found at yard sales the world over into a Linux tablet and can play everything from those magical LucasArts SCUMM adventure games to Angry Birds. What his tablet is missing, though, is any sort of Internet connection. He recently fixed this by soldering a USB WiFi adapter directly to the CPU of his InnoTab.

In all fairness, there’s not a terrible amount of software hackery going on here. VTech’s InnoTab 2s uses the same chipset as the cheaper InnoTab 2 but has an additional board soldered directly to the mainboard. This additional board provides a WiFi connection with an RT5370 chipset; soldering a WiFi dongle onto the InnoTab 2’s CPU D+ and D- USB lines effectively turns it into the WiFi enabled InnoTab 2s.

It’s an impressive piece of work for a low-power tablet that one can safely assume is both bullet and childproof. [Mick] was also able to mount a USB thumb drive on his upgraded kid’s tablet, so if you’re looking for a cheap tablet that doesn’t need much horsepower, you might want to check out your local Toys ‘R Us.

Letting Bluetooth Take The Wires Out Of Your Headphones

bt-wireless-headphones

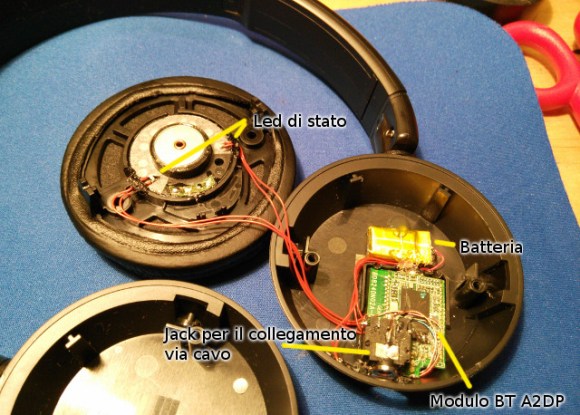
This picture shows the gist of [Alan’s] hack to transition his wired headphone to internalize a Bluetooth audio receiver (translated).

He starts with a pair of wired “ear muff” style headphones and an aftermarket Bluetooth audio adapter that he’s been using with them. But if you’re not going to plug them into the audio source why have six feet of extra wire hanging about? [Alan] ditched the plastic case surrounding the Bluetooth hardware and cracked open the earpieces to find room for it. It’s a tight fit but there was just enough room.

It is unfortunate that the headphone design doesn’t already have a wired crossover hidden in the arc connecting the earpieces. Alan strung some of that red wire himself to connect the two speakers. The board is mounted so that the USB port is located where the wires used to enter the plastic body. This makes it a snap to plug them in when they need a recharge.

You can play a little “Where’s Waldo” with this one by trying to spot the Raspberry Pi in his build log.


Giving The VirtualBoy A VGA Out

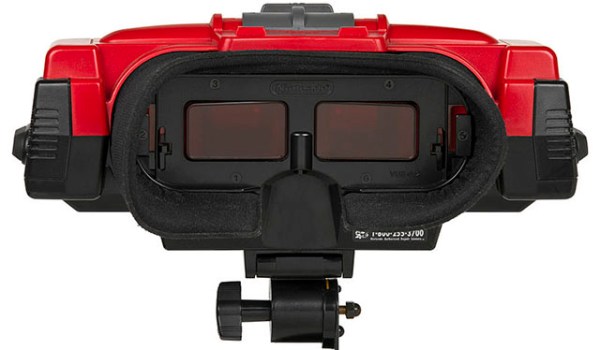
Nintendo’s VirtualBoy – the odd console-inside-a-pair-of-goggles  and arguable ancestor of Nintendo’s 3DS – was a marvelous piece of technology for its time. In a small tabletop unit, you were able to play true 3D video games at an impressive 384 x 224 pixel resolution. Of course the VirtualBoy was a complete failure, but that doesn’t mean hardware tinkerers are leaving this wonderful system to video game collectors. [furrtek] has been playing around with his VirtualBoy and managed to add VGA out.

As a 3D system with two displays, any sort of video out was rightfully ignored by the VirtualBoy system designers. Still, [furrtek] wanted some sort of video out on his system, so he began poking around with a small FPGA board to generate some VGA signals.

The two displays inside the VirtualBoy aren’t your normal LCD display – as seen in this iFixit teardown. they’re really two linear LED arrays that generate a single line of 244 pixels, with mirrors scanning the line in the in the Y axis. These LED arrays are controlled by the VirtualBoy CPU through a series of shift registers, and by carefully tapping the lines of each LED array, [furrtek] was able to copy all the image data into the RAM of an FPGA.

After stuffing an XESS XULA-200 FPGA board inside the case of his VirtualBoy, [furrtek] wired up a few resistors for a DAC and installed a VGA out port on the underside of his console. Everything worked the first time he powered it up, and he began playing his VirtualBoy on his big screen TV.

Because [furrtek] is only reading one of the VirtualBoy’s displays, all the 3D data – and the main feature of the VirtualBoy – is lost when it’s displayed on a TV. 3D TVs do exist, though, and we’d love to see an improved version of this that captures data from both of the VirtualBoy displays.

You can see [furrtek]’s video of his mod in action below.

Continue reading “Giving The VirtualBoy A VGA Out”