Raspberry Pi Replaces A Volvo Nav System

rpi-replaces-volvo-nav

[Reinis] has a Volvo S80. One of the dashboard features it includes is a 6.5″ LCD screen which periscopes up to use as a navigation system. The problem is that Volvo stopped making maps for it around five years ago and there are no maps at all for Latvia where he lives. So it’s worthless… to you’re average driver. But [Reinis] is fixing it on his own by replacing the system with a Raspberry Pi.

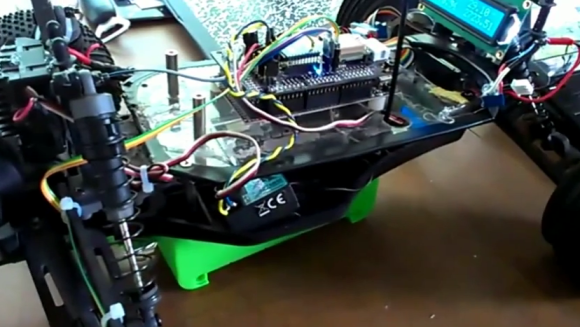
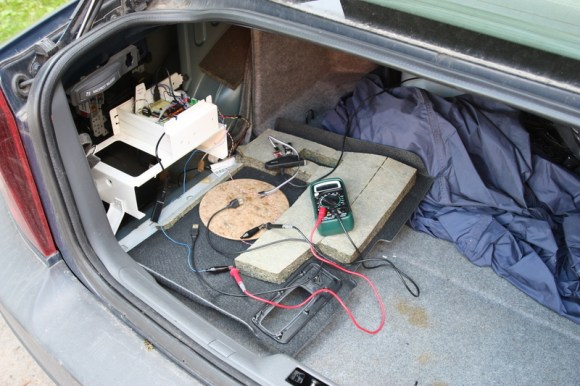
That link leads to his project overview page. But he’s already posted follow-ups on hardware design and initial testing. He’s basing the design around a Raspberry Pi board, but that doesn’t have all the hardware it needs to communicate with the car’s systems. For this he designed his own shield that uses an ATmega328 along with a CAN controller and CAN transceiver. The latter two chips patch into the CAN bus on the car’s On Board Diagnostic system. We didn’t see much about the wiring, but the overview post mentions that the screen takes RGB or Composite inputs so he must be running a composite video cable from the trunk to the dashboard.


Adding WiFi To A Kid’s Tablet

tab

[Mick] has been playing around with the VTech Innotab – a $70 tablet computer aimed at kids – for a while now. He’s successfully turned this tablet soon to be found at yard sales the world over into a Linux tablet and can play everything from those magical LucasArts SCUMM adventure games to Angry Birds. What his tablet is missing, though, is any sort of Internet connection. He recently fixed this by soldering a USB WiFi adapter directly to the CPU of his InnoTab.

In all fairness, there’s not a terrible amount of software hackery going on here. VTech’s InnoTab 2s uses the same chipset as the cheaper InnoTab 2 but has an additional board soldered directly to the mainboard. This additional board provides a WiFi connection with an RT5370 chipset; soldering a WiFi dongle onto the InnoTab 2’s CPU D+ and D- USB lines effectively turns it into the WiFi enabled InnoTab 2s.

It’s an impressive piece of work for a low-power tablet that one can safely assume is both bullet and childproof. [Mick] was also able to mount a USB thumb drive on his upgraded kid’s tablet, so if you’re looking for a cheap tablet that doesn’t need much horsepower, you might want to check out your local Toys ‘R Us.

Letting Bluetooth Take The Wires Out Of Your Headphones

bt-wireless-headphones

This picture shows the gist of [Alan’s] hack to transition his wired headphone to internalize a Bluetooth audio receiver (translated).

He starts with a pair of wired “ear muff” style headphones and an aftermarket Bluetooth audio adapter that he’s been using with them. But if you’re not going to plug them into the audio source why have six feet of extra wire hanging about? [Alan] ditched the plastic case surrounding the Bluetooth hardware and cracked open the earpieces to find room for it. It’s a tight fit but there was just enough room.

It is unfortunate that the headphone design doesn’t already have a wired crossover hidden in the arc connecting the earpieces. Alan strung some of that red wire himself to connect the two speakers. The board is mounted so that the USB port is located where the wires used to enter the plastic body. This makes it a snap to plug them in when they need a recharge.

You can play a little “Where’s Waldo” with this one by trying to spot the Raspberry Pi in his build log.


Giving The VirtualBoy A VGA Out

Nintendo’s VirtualBoy – the odd console-inside-a-pair-of-goggles  and arguable ancestor of Nintendo’s 3DS – was a marvelous piece of technology for its time. In a small tabletop unit, you were able to play true 3D video games at an impressive 384 x 224 pixel resolution. Of course the VirtualBoy was a complete failure, but that doesn’t mean hardware tinkerers are leaving this wonderful system to video game collectors. [furrtek] has been playing around with his VirtualBoy and managed to add VGA out.

As a 3D system with two displays, any sort of video out was rightfully ignored by the VirtualBoy system designers. Still, [furrtek] wanted some sort of video out on his system, so he began poking around with a small FPGA board to generate some VGA signals.

The two displays inside the VirtualBoy aren’t your normal LCD display – as seen in this iFixit teardown. they’re really two linear LED arrays that generate a single line of 244 pixels, with mirrors scanning the line in the in the Y axis. These LED arrays are controlled by the VirtualBoy CPU through a series of shift registers, and by carefully tapping the lines of each LED array, [furrtek] was able to copy all the image data into the RAM of an FPGA.

After stuffing an XESS XULA-200 FPGA board inside the case of his VirtualBoy, [furrtek] wired up a few resistors for a DAC and installed a VGA out port on the underside of his console. Everything worked the first time he powered it up, and he began playing his VirtualBoy on his big screen TV.

Because [furrtek] is only reading one of the VirtualBoy’s displays, all the 3D data – and the main feature of the VirtualBoy – is lost when it’s displayed on a TV. 3D TVs do exist, though, and we’d love to see an improved version of this that captures data from both of the VirtualBoy displays.

You can see [furrtek]’s video of his mod in action below.

Continue reading “Giving The VirtualBoy A VGA Out”

Hackaday Links: Sunday, June 16th, 2013

hackaday-links-chain

Summertime means mowing the grass and now [Everst X] can do so in 7.1 channel delight thanks to his wireless headphone antenna hack which extends the range.

[Kevin] is trying to build a better reverse geocache box. It’s not the GPS that he’s improving, it’s the latching mechanism. He’s got four linear latches actuated by a single servo.

What’s a links post without some blinky lights? This week we take a look at [Daniel’s] hack which connects the Ikea Dioder to a router.

It’s a pretty early prototype but we like where [Shae] is going with his spouse-friendly silent alarm. It’s a wristband you wear to bed that wakes with vibration rather than sound.

[Leland] wrote in to share his multi-console emulator. It’s built using a Raspberry Pi and he plans to fit everything inside an original Game Boy case.

Fans of the game Candy Crush may want to take a look at this hack for the iPhone version. It attacks the game by accessing the file system of a jailbroken device.

Water Tank Level Meter Prevents Overflow

roof-water-tank-level-meter

Most of the homes in the area where [Raikut] lives have tanks on the roof to hold water. Each is filled from a well using a pump, with gravity serving as a way to pressurize the home’s water supply. The system isn’t automatic and requires the home owner to manually switch the pump on and off. [Raikut] made this process a lot easier by designing an LED bar indicator to monitor the water level.

The sensor is very simple. Each LED is basically its own circuit controlled by a transistor and a few resistors. A 5V signal is fed from 7805 linear regulator into the tank. The base of each transitor is connected to an insulated wire, each extending different depths in the tank. As the water rises it completes the circuit, illuminating the LED.

[Raikut] is conservation minded and built a buzzer circuit which is activated by the LED indicating the highest water level. If someone walks away from the pump switch while it’s filling the alarm will sound as it gets to the top and they can turn it off before it wastes water.

[via Reddit]

Autonomous RC Car Navigates By Waypoints

autonomous-rc-car

Check out this autonomous RC car which [Jason] built for the chipKIT design challenge. It’s been able to successfully navigate a planned route taking just a few waypoints as inputs.

Obviously this uses a chipKIT as the controller, the max32 to be specific. [Jason’s] write-up shows off all of the components of the design, but you’ll have to head over to his recently posted update to hear about the custom board he had spun to host them all. It starts with a GPS module, but that’s only accurate enough to give the rover the big picture. To handle getting from one waypoint to the next successfully he also included a gyroscope which provides very accurate orientation data, as well as optical encoders on the wheels for on-board distance traveled information.

We hope he’ll keep refining the design and make a trip to next year’s Autonomous Vehicle Competition.

Continue reading “Autonomous RC Car Navigates By Waypoints”