USB Fume Extractor Takes Stink Out Of Soldering Sessions

usb-powered-fume-extractor

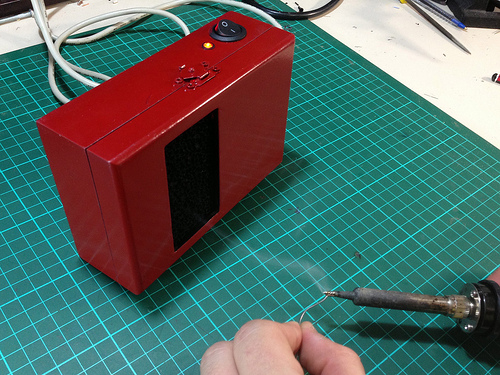
Our homemade shop tools rarely reach this level of finished quality. We probably would have stopped with assembly of this USB powered fume extractor. But [X2jiggy] went for style points by adding a coat of paint.

There are several nice features included in his build. He wanted it to be very easy to power the device so he settled on the 5V USB standard. But a PC fan running at 5V won’t pull much air. He used a boost converter board to ramp that up to 12V. The enclosure is a wooden hobby box. He drilled mounting holes and an airflow opening in the bottom of the box for the fan. The lid of the box has a rectangular opening which accepts a carbon filter meant for aquariums. The rocker switch and LED seen above are also nice touches, but not strictly necessary if you build this for yourself.

We’re still in the habit of gently blowing the fumes away from us as we solder. So the question is, will this device save us from a gruesome disease down the road, or is it mostly to capture the odor of the solder fumes?

Looking for a more permanent setup? You should build a solder hood for your workbench.

Continue reading “USB Fume Extractor Takes Stink Out Of Soldering Sessions”

A Black Box For A Motorcycle

ecu

[Lukusz] has a new motorcycle – a Yamaha XJ6SA – and since it hasn’t been in an accident yet, he thought building a black box to record telemetry from the last 30 minutes of riding would be a good idea. While the project isn’t complete yet, he’s already reading data coming straight from the engine control unit.

After figuring out most of the pinout for his bike’s ECU connector, [Lukasz] found one wire that didn’t actually do anything. This was his ECU’s K line, a serial output that is able to relay the state of the gauges to external devices. The electronic spec of the K line is a bit weird, though, but luckily after finding a chip to convert the signal into something a logic analyzer can understand.

With a logic analyzer connected to the K line – and setting it to receive on at 16064 baud – [Lukasz] was able to get a whole lot of data directly from his bike. In the future he plans to pass data such as speed, indicator lights, RPMs, and the current gear to a Raspberry Pi for logging.

Building A Miniature X-ray Tube

tube

We’ve seen homemade x-ray devices and we’ve seen people making vacuum tubes at home. We’ve never seen anyone make their own x-ray tube, though, and it’s doubtful we’ll ever see the skill and craftsmanship that went into this build again.

An x-ray tube is a simple device; a cathode emits electrons that strike a tungsten anode that emits x-rays. Most x-ray tubes, though, are relatively large with low-power mammography tubes being a few inches in diameter and about 6 inches long. In his amazing 45-minute-long video, [glasslinger] shows us how to make a miniature vacuum tube, a half-inch in diameter and only about four inches long.

For those of you who love glass lathes, tiny handheld spot welders and induction heaters, but don’t want your workshop bathed in x-rays, [glasslinger] has also built a  few other vacuum tubes, including a winking cat Nixie tube. This alternate cat’s eye tube was actually sealed with JB Weld, an interesting technique if you’d ever like to make a real home made tube amp.

Delta-type 3D Printer Built Using Extruded Rails

delta-3d-printer-extruded-rail

From concept to completion this delta-style 3D printer (translated) is a sweet build. The quality of the work comes as no surprise. We’re familiar with [Arkadiusz Spiewak’s] craftsmanship from that H-bot type 3D printer we saw from him back in April.

Planning started off with a render of the design using Blender 3D. Not only did this give him a 3D model to use as his building reference, but the animation framework allowed him to test the kinematics of the design. After ordering an extruded rail system and assembling the frame he found the pillars had too much flex to them due to the rails used on the top and bottom. The fix was to mill a top and bottom plate to stiffen things up. After testing out the motors and the extruder head mount he made one final design change. He exported his Blender design as dxf files to cut and weld an aluminum replacement for the extruder mounting platform. As you can see in this video, the preliminary results are looking good!

Continue reading “Delta-type 3D Printer Built Using Extruded Rails”

Off The Shelf EEG Hardware Records Your Dreams

band

Over the past few years, we’ve seen [Michael]’s adventures in electronics and lucid dreaming. With commercial EEG hardware, [Michael] is able to communicate from inside his dreams with Morse code and record his rhythmic blinking for data analysis when he wakes up. His project is called Lucid Scribe, and now it’s open to just about everyone – including brain experimenters with OpenEEG hardware.

OpenEEG is a project that aims to reduce the cost of EEG hardware by providing the hardware, electrodes, software, and documentation to build your own EEG headset. It’s a great tool in the field of biofeedback, but [Michael] is going one step further; he’s busy writing an algorithm that will detect REM sleep and play an audio track while he’s in a dream state to trigger a lucid dream.

[Michael] points out that anyone with OpenEEG hardware including the DIY Olmex board can contribute to his Lucid Scribe database. You might also get some lucid dreaming time in, but then you’ll have to wake to the crushing reality of real life.

TP-Link Router Turned Into A DALI Automated Lighting Controller

dali-control-in-tplink-router

The members of Shackspace continue to put up impressive hacks based around the tiny TP-Link routers. This time around [Timm] has shoehorned a DALI controller inside the router case. This is a protocol we don’t remember hearing about before. The Digital Addressable Lighting Interface is a control network for commercial lighting. That way people responsible for taking care of large buildings can shut off all the lights at night (to name just one use). The new room at Shackspace has this style of controllers in its lights.

The two brown wires coming into the router make up the data bus for the DALI system. It connects to the add-on PCB which uses an Atmel AT90PWM316 microcontroller. The chip is specifically designed for DALI networks which made the rest of the project quite easy. It talks to the lights, the router talks to it, bob’s your uncle, and you’ve got network controlled lighting. Get this in a big enough building and you can play some Tetris.

In case you were wondering. Yes, this project has already been added to their TP-Link firmware generator.

Complicated IPhone Garage Door Opener

iphone-garage-door-opener

The round-about way this iPhone garage door opener was put together borders on Rube Goldberg. But it does indeed get the job done so who are we to judge? Plus you have to consider that the Apple products aren’t quite as hacker friendly as, say, Android phones — so this may have been the easiest non-Jailbreak way.

The main components that went into it are the iPhone, a Wemo WiFi outlet, and a 110V rated mechanical relay. But wait, surely it can’t be that simple? You’re correct, just for added subterfuge [Tall-drinks] rolled IFTTT into the mix.

You may remember hearing about If This Then That from the Alert Tube project. It’s a web-based natural language scripting service. Throw everything together and it works like this: The iPhone sends a text message which IFTTT converts to a Wemo command. A power cord connects the Wemo outlet to the 110V electrodes on the relay. The normally open connection of the relay is attached to the same screw terminals of the garage door opener as the push button that operates it. When the relay closes, the garage door goes up or down.

The biggest problem we have with this is the inability to know if your garage door is open or closed.