Polishing Optics Milled From Acrylic

acrylic-optics-finish-testing

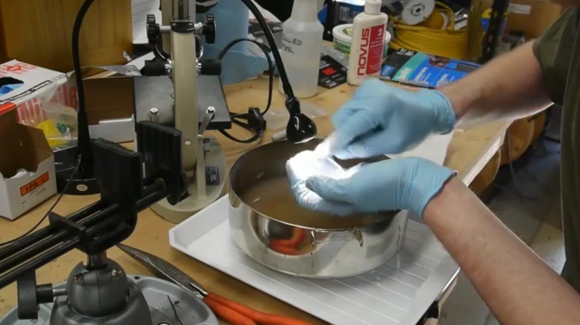
[Ben Krasnow] milled some lenses out of cast acrylic and needed a way to get an optical finish on the tool-marked surface. He tested several acrylic finishing methods to achieve a crystal clear finish. The tests were done using flat chunks. A regiment of sandpaper, from coarse to fine, was used as the first stage of the operation. From there [Ben] sought out the best finishing step, starting with hand polishing tests, flame polishing, and methylene chloride vapor polishing (which is something along the lines of acetone vapor polishing for 3D printed ABS parts).

Flame polishing and vapor polishing are not really exact sciences… at least in the tests he performed. It was difficult to know exactly how long to expose the acrylic. Too short or too long resulted in poor clarity. Watch his video to get a look at all results. We’d say the the easiest way to make milled acrylic clear without achieving an optical finish is to flame polish it as it doesn’t really require that you sand it ahead of time. But [Ben’s] tests prove that you can’t beat hand polishing with 600 then 2000 grit sandpaper before finishing up with a liquid plastic polish.

Continue reading “Polishing Optics Milled From Acrylic”

Popup Book Includes A Playable Piano Keyboard

pop-up-book-has-playable-piano

This popup book contains several interactive electronic elements. It’s the creation of [Antonella Nonnis] using mostly scrap materials she had on hand. Of course there are some familiar players behind the scenes that take care of the electronic elements.

Her photo album of the build process sheds light on how she pulled everything together. Instead of adding switches for interactivity she built capacitive touch sensors on the backs of the pages. Strips of copper foil serve as flexibly traces, moving the connections past the binding and allowing them to be jumpered to the pair of Arduino boards which control the show. That’s right, there’s two of them. One is dedicated to running the pop-up piano keyboard seen above. The other deals with Art, Math, and Science elements on other pages.

This continues some of the multimedia work we saw popping up in popups a few years back.

Continue reading “Popup Book Includes A Playable Piano Keyboard”

Anachronistic Hard Drive For The Apple II

applefile

Not wanting too many disks lying around his Apple II battlestation, [NeXT] started looking into hard drive solutions. There is the old-time solution – a ProFile hard drive initially designed for the Apple /// and Lisa, but those are rare as hen’s teeth, and just as expensive as newer Compact Flash adapters. [NeXT] had another option – SCSI, with an adapter card, but most of the SCSI devices of the era didn’t fit in with the cool ‘stackable’ aesthetic of AII peripherals.

With a bit of Bondo and some paint, [NeXT] modded an old dual disk drive into a retro-looking hard drive perfect for storing and running hundreds of old games.

[NeXT] began his build by taking an old Apple DuoDisk (the two-disk drive seen above) and Bondoing over the holes in the front. A drive activity light was added above the Apple logo, and the old drives saved for another day. Inside the new enclosure, an old 40MB hard drive, tested on a Macintosh SE/30, was installed along with a small power supply for the drive. With a few custom SCSI cables, the drive will be ready for it’s grand debut. We think it looks awesome just sitting there, and is sure to be the pride of [NeXT]’s collection.

Building A Blinky Infinity Mirror

This infinity mirror prototype is small enough to test out the theory before committing to the full project. And the full project that [Kevin] and [Edward] have in mind is a huge infinity portal that they will showcase at this year’s Alchemy festival.

It’s called an infinity mirror because it has the illusion of being much deeper than the physical enclosure. The trick is accomplished by placing two mirrors parallel to each other with a light source in between. One of the mirrors is two-way, letting a portion of the light pass through to the viewer rather than reflecting it.

The video demo of the prototype shows that it’s just a 2×4 wooden frame which holds both mirrors. In between is an LED string. The nice thing about the prototype is that adding a bit of tempered glass on top will make it an infinity bar top for the Hackerspace.

Another mirror trick you might incorporate in your own projects is adding an LED display behind the glass.

Continue reading “Building A Blinky Infinity Mirror”

DIY Pick And Place Just Getting Under Way

diy-pick-and-place

It’s not totally fair to say that this project is just getting under way. But the truth is it neither picks nor places so there’s a long road still to travel. But we’re impressed with the demonstrations of what [Daniel Amesberger] has achieved thus far. Using the simplest of CNC mills he’s finished the frame and gantry for the device. You can see some of the parts on the left after going though an anodizing process that leaves them with that slick black finish.

The demo video shows off the device by driving it with a joystick. It’s fast, which gives us hope that this will rival some of the low-end commercial pick and place machines. He’s already been working on the software, which runs on a mini ITX form factor computer. This includes a gerber file interpreter and some computer vision for a visual check on part placement. He hasn’t gotten around to building the parts feeders but we’ll keep you updated as we hear back from him.

Continue reading “DIY Pick And Place Just Getting Under Way”

Scratch Built Camera Tripod

scratch-built-camera-tripod

We’re used to seeing hacked camera mounts but [CroBuilder] mentioned to us that nobody is really making plain old tripods themselves. He loves to work in his shop so he spent about ten hours building this tripod for himself.

We’d say it’s built to last, but that comes at the cost of weighing a lot. He used square tubing for the legs, which are tripled up in order to allow them to telescope. Each leg has two pipes mounted to the central hub that he fabricated out of hexagonal pipe. A bolt and wing nut acts as hinge and clamp. On the bottom section of the leg there’s a tab spanning the two pieces and another clamping mechanism to hold the adjustable bottom portion of the leg in position.

He finished up the project with black paint on many of the pieces, with the legs themselves polished until shiny. Will rust be a problem if he doesn’t use a clear coat?

The nice thing about a quality tripod is that you can use them for more than just cameras. For instance, add some components to make your own laser level.

Multiple Raspberry Pi Boards Used To Create Video Wall

Five Rasberry Pi’s are used to drive this four-display video wall. This screenshot shows the system playing back some BBC documentaries. The sync, alignment, and video quality all seem to be spot on which makes it quite easy for your eye to assemble the images into one picture.

Each screen has its own Raspberry Pi which generates the HDMI video shown on the screen. These are fed from one central RPi board which acts as the controller. Video is pushed between the boards using the Real Time Streaming Protocol (RTSP) available through the Linux GStreamer package. Synchronization between the different video boards is taken care of using network time. [Samer] mentions that this system is scalable — each additional screen simply requires one more RPi to drive it.

The team also did some experiments with live video. They added a sixth RPi board with the camera module in order to display a live feed.