Building New, Weird CPUs In FPGAs

CPU

The popularization of FPGAs for the hobbyist market means a lot more than custom LED controllers and clones of classic computer systems. FPGAs are also a great tool to experiment with computer architecture, creating new, weird, CPUs that don’t abide by the conventions the industry has used for 40 years. [Victor] is designing a new CPU that challenges the conventions of how to access different memory locations, and in the process even came up with a bit of example code that runs on an ARM microcontroller.

Most of the time, the machine code running on your desktop or laptop isn’t that interesting; it’s just long strings of instructions to be processed linearly. The magic of a computer comes through comparisons, an if statement or a jump in code, where the CPU can run one of two pieces of code, depending on a value in a register. There is the problem of reach, though: if a piece of code makes a direct call to another piece of code, the address of the new code must fit within an instruction. On an ARM processor, only 24 bits are available to encode the address, meaning a jump in code can only go 16 MB on either side of its call. Going any further requires more instructions, and the performance hit that comes along with that.

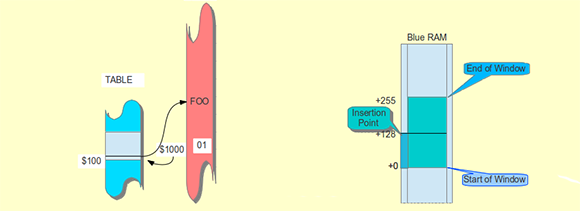
[Victor] decided a solution to this problem would be to create a bit of circuitry that would be a sliding window to store address locations. Instead of storing the literal address for jumps in code, every branch in the code is stored as a location relative to whatever is in the program counter. The result is an easy way to JMP to code very far away in memory, with less of a performance hit.

There’s an implementation for this sliding window token thing [Victor] whipped up for NXP’s ARM Cortex M3 microprocessor, and he’ll be working on an implementation of this concept in a new CPU over on his git.

Laser Toting Robot Taunts House Cat

laser-toting-robot-taunts-house-cat

[Rodney Lederer] and his cat were bored after moving to a new city. He fixed that for both of them by taking on this project which turns a Wowwee robot into feline entertainment.

It’s no secret that cats have a weakness for the little red dot produced by a laser pointer. [Rodney] put that trait to work by automating the movement of a red laser pointer. After mounting it on a servo motor he got down to work programming an Arduino to move it in a playful manner. But it wouldn’t have been much fun if the this was only capable of preprogrammed patterns, so he also included an IR proximity sensor to help give the thing interactivity. Add to that the treaded robot base and you’ve got mobile cat entertainment. The proof is in the video after the break… the cat is certainly having fun chasing the dot. [Rodney] plans to work a bit more on his code so that the motions of the laser dot include a lot of different patterns to keep things exciting.

Continue reading “Laser Toting Robot Taunts House Cat”

Coffee Pot Aquarium Keeps Fish Warm Without Cooking Them (hopefully)

coffee-pot-aquarium

Beta fish are one of the easiest pets to care for. So when [Derek] gave his girlfriend one for Valentine’s day he thought the job was done. Turns out these tropical pets want 75-80 F water and that’s not going to happen in a plain old bowl when you keep your home thermostat in the mid sixties during the winter. While looking for a simple heating solution he stumbled across the idea of using a cheap drip coffee maker as an aquarium.

The two main components are already in place: a clear glass vessel for the water and a way to heat it. The real trick is to use the heating element to gently warm the water to the appropriate temperature. Perhaps the key piece of the project is that the device already had a timer that shut off the heating element. This translates to easy control with his MSP430 microcontroller as it means there’s a relay present. He also patched into the two seven-segment displays to give him feedback on the temperature currently being read by the RL1003 thermistor which is submerged in the water. You’ll also note that he added a few LEDs to the lid to give the aquarium some inner glow.

Launching A Glider From Space

We get a ton of tips about weather balloon launches taking hobby electronics into space. But every once in a while one of them stands out from the rest. This project does send an electronic payload into space, but it also lets [David] fly his hardware back from near-space using an RC airplane.

The return vehicle is unpowered, but that shouldn’t be a problem as launching from a weather balloon will provide plenty of altitude for the flight. Because the temperature experienced in that part of the atmosphere is so cold [David] had to take several things into account. Obviously you want your batteries and control electronics to be insulated from the cold. But something that doesn’t usually pop into mind are issues with the servo motors which run the glider’s flaps. They usually have some white grease on the gears. At temps as low as -50C that grease will harden and make the servo stop working so he made sure to clean the gears thoroughly before the flight.

Unfortunately [David] had several problems capturing images and recorded video from the ground station. But his write up is still a fun read and the clip after the break gives a general overview of the entire project from the nose camera of the glider.

Continue reading “Launching A Glider From Space”

Makerbot Shows Off 3D Scanner

scan

We’ve said our piece over Makerbot and their interpretation of what Open Source means, but the fact remains if you’re sourcing a 3D printer for a high school shop class or a hackerspace, you really can’t do much better than a Makerbot Replicator. Apparently Makerbot is looking to expand their 3D design and fabrication portfolio; they just announced an upcoming 3D scanner at SXSW. It’s called the Makerbot Digitizer, and it takes real, 3D objects and turns them into CAD files.

Since Makerbot and [Bre Pettis] didn’t give out much information about the 3D scanner they’re working on, the best information comes from Techcrunch. The Makerbot Digitizer uses two lasers to scan real objects and turns them into 3D CAD files. The hardware isn’t finalized, and the prototype is made of a few pieces of laser cut plywood. No details are available on how much the Digitizer will cost, when it will be available, or what its resolution is.

Of course 3D scanning of real objects to translate them into CAD files is nothing new for Hackaday readers. We’ve seen our fair share of desktop 3D scanners, including one that was built in a day out of junk. Even the Kickstarter crew has gotten into the action with a few desktop 3D scanners, some of which scan in full color.

Another Salvo In The PIC Vs. AVR Holy War

Ah, PIC vs. AVR, the never-ending battle of electronic design supremacy. Some people swear by Atmel’s AVR microcontrollers, while others are wrong. [majenko] is firmly planted in Microchip’s PIC camp, so he wrote up a nice comparison of Atmel’s AVR versus Microchip’s PIC family of microcontrollers. The results aren’t that surprising; PIC microcontrollers come out as a better product that no hobbyist uses because no hobbyist uses them.

Atmel and their series of AVR microcontrollers has seen a huge increase in popularity in the hobbyist market in the last few years, no doubt thanks to the Arduino and other AVR-powered dev boards. This isn’t to say Microchip and PIC haven’t seen their time in the lime light; there was a time when you could actually buy electronic components at Radio Shack, including kits containing Microchip’s very popular but somewhat outdated Basic Stamp.

After going over the capabilities of the Atmel AVR ATMega328p, the similarly equipped Microchip’s PIC PIC18F25K80, and TI’s MSP430G2533, [majenko] found the perennial favorite, the AVR, lacked in some very important categories. The AVR has a lower resolution ADC, fewer PWM pins, fewer 16-bit timers, while costing about $0.75 more.

Of course [majenko]’s analysis doesn’t take into account the intangibles of choosing a PIC over an AVR. Thanks to the Arduino’s adoption of the AVR, there are many, many more code and schematic examples floating around on the Internet for just about every project imaginable. The development tools for PIC are a bit more expensive than their AVR equivalents; A PICkit2 runs about $50 while AVR ISP programmers can be found just about everywhere for pocket change.

It’s a lazy Sunday, so all ‘yall can go on and argue in the comments.

DIY Lighting Solutions

pvc-lights

With daylight savings time starting up, you might not have quite as much need for lighting, but this pair of hacks should keep everything well lit whether outside or indoors.  Check out the videos of both in action after the break.

The first lighting solution comes to us from [Ben]’s Youtube channel. It’s a simple solution, press-fitting a clamp light into a 1 inch PVC Tee to attach the light to a pipe. The base is made with PVC shaped into three feet for a (hopefully) sturdy rest.  Several lights can be used as needed, and would probably work well for making his next video.

The second light also comes to us from Youtube, and is about converting a stock LED light into one that is much brighter. Skip to around 7:00 to see the outdoor comparison.  You may or may not want to do this exact hack, but you never know when you might want to swap out your blinkenlights for something that will scare the neighbors!
Continue reading “DIY Lighting Solutions”