RFID Emulator Card Includes A Learning Mode

rfid-emulator

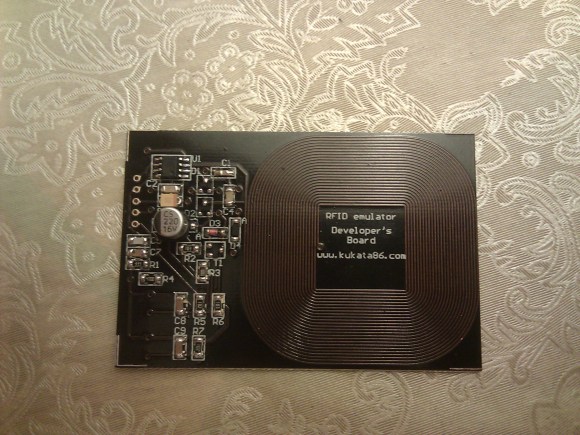
This RFID card has a lot of nice features. But the one that stands out the most is the ability to learn the code from anther RFID tag or card.

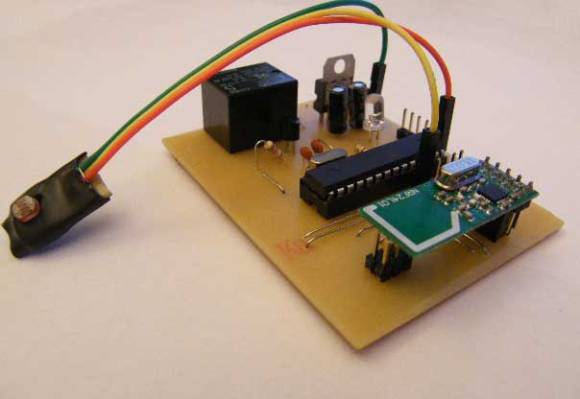
You can see that the board includes an etched coil to interact with an RFID reader. This is the sole source of power for the device, letting it pick up enough induced current from the reader to power the PIC 12F683 seen on the upper left of the board. The underside of the PCB hosts just three components: an LED and two switches. One of the switches puts the device in learning mode. Just hold down that button as you move the board into the magnetic field of the reader. While in learning mode a second RFID tag is held up to the reader. It will identify itself and the emulator will capture the code sent during that interaction. This is all shown of in the video after the break. We wonder how hard it would be to make a version that can store several different codes selected by holding down a different button as the emulator is held up to the reader?

If you want to build your own card reader too here’s a project that does it from scratch.

Continue reading “RFID Emulator Card Includes A Learning Mode”

A Guide And Helper Script For ARM Cross Compiling Toolchain On A Mac

mac-arm-toolchain-script

[Mitchell Johnson] wanted to develop for the STM32F4 Discovery board on his Mac. There are a few ready-to-use options when it comes to the ARM toolchains, but he couldn’t find one that satisfied all of his needs. After working out all the kinks he wrote a guide and tweaked a script to install the ARM tools on a Mac.

The problem he had with some of the pre-packaged tool chains is that they didn’t support the hardware floating point functionality of STM’s Cortex-M4 chips. To get around this without doing his own ground-up build (which can be quite a challenge) he forked the Summon Arm Toolchain script and modified it to include ST-Link support in the build. One of the things that we like about that script is it installs the tools in a sub-directory of your home directory. This way if you already have another ARM toolchain you can switch between the two by tweaking your PATH variable.

Humble Beginnings Of A Home Automation Project

humble-beginnings-to-a-home-automation-project

This board is the start of [Steven Pearson’s] quest to automate his home. The module will be used to prototype the rest of the project. Right now it uses an ATmega328 chip running the Arduino bootloader. This connects to one mechanical relay which we would wager is mains rated. The module will be controlled wirelessly via the wireless module seen in the foreground. That is a nRF24L01 board which he chose because of it’s bargain basement price tag of around $1.50.

There is much room for expansion in the system. You can see that a light-dependent resistor has been added to some of the microcontroller’s breakout pins. We would guess that [Steven] will use the hardware to develop for many different functions and will design more task-specific modules as the project progresses.

If you’re a fan of PCB milling and population you won’t want to miss the video after the break. [Steve] posted a fast-motion video of the entire process.

Continue reading “Humble Beginnings Of A Home Automation Project”

TP-Link TL-WR703N Specialized Firmware Generator

Seen at the center of this image is a TP-Link TL-MR3020 which is basically a TL-WR703N wireless router with a few extra LEDs. We’ve seen a lot of projects using this hardware and that’s because it’s cheap and ripe for hacking. The devices can run OpenWRT, a Linux distro for routers that greatly extends the functionality when compared to the stock firmware. Now a couple of members of Shackspace — a hackerspace in Stuttgart, Germany — have written a script that automatically generates specialized firmware for the router. That link goes to their wiki page about the script, but you may find this overview post to be an easier read.

The concept is that gathering specialized hacks into easy to flash packages does away with a lot of configuration headaches. For example, if you just want to play around with an NFC reader for a day-long event you can connect hardware like what is seen above and use the NFC-gate option of the script to flash firmware meant to drive it. So far there’s also support for streaming a USB webcam, serving as a USB network bridge, and a few others. But the whole point of this is to make it simple to roll new firmware mods into the script that make it easy to preserve the work for use at a later time.

[Thanks Hadez]

Breathing Life Into An Old LCD

panel

Out of the depths of a junk drawer, [Alex]’s friend pulled out an old monochrome LCD display. This is an older low-resolution display from ancient electronics that unfortunately doesn’t have its own controller chip. No worries, though, because with the help of an FPGA [Alex] figured out how to drive this display.

On the back of this display are eight Hitachi LCD drivers, six column shifters and two row shifters, allowing the LCD to display a 256×128 pixel image. Without an LCD controller, though, [Alex] couldn’t just send a static image to the LCD. Instead, he had to continuously refresh the display just like a VGA monitor.

With the help of a 1500-page PDF titled Hitachi LCD Controller/Driver LSI Data Book, [Alex] was able to dump pixels into the ICs on the display with the help of a Papilio One FPGA board. A lot of work just to display the beautiful [Lena], but she wouldn’t have it any other way.

Building An Automatic Bicycle Transmission In A Week

1

Every year, the ECE department of Carnigie Mellon University hosts Build18, an engineering festival intended to get students out of the classroom and into the workshop. [Andrew Toth] along with team members [Jenna MacCarley], [Peter McHale], and [Nicolas Mellis] have been busy this last week putting together an automatic bicycle transmission.

Most cyclists agree that a cadence of 80 RPM is just about right for most cycling. The team’s transmission uses Hall effect sensors to sense the cadence of the rider and will change to a higher gear if the cadence drops below 60 RPM and a lower gear if the cadence is above 100 RPM.

One of the requirements of the Build18 festival is the completed project must cost less than $250. By using an Arduino Mega and a servo to change gears, the team has a fairly low cost solution to automatically changing bicycle gears.

It’s a very cool project, and hopefully we’ll see a video once the competition is over at noon, EST today.

12secbeforehit-thumb

Operation StratoSphere

12secbeforehit-thumb

Panoramic photos are nice, however a full 360 degree x 180 degree, or spherical panorama would be even better. [Caleb Anderson] decided to take this concept much further, attempting to extract panoramic photos from video taken at 100,000 feet using a high-altitude balloon and six GoPro cameras.

The overview of this project can be found here, and gives some background. The first task was to start prototyping some payload containers, which for a device that you have little control over once out of your hands is quite critical. As well as some background, there’s a cool interactive panorama of the first test results on this page, so be sure to check it out.

The “real” hacking in this experiment wasn’t a matter of putting a balloon into the stratosphere or recovering it, however. Chaining these images together into pictures was a huge challenge, and involved a diverse set of skills and software knowledge that most of our readers would be proud to possess. There are several videos in the explanation, but we’ve embedded one with the cameras falling out of the sky. Be sure to at least watch until (or skip to) just after 1:05 where all the cameras impressively survive impact! Continue reading “Operation StratoSphere”