Developed On Hackaday: Sometimes, All You Need Is A Few Flags

The development of the Hackaday community offline password keeper has been going on for a little less than a year now. Since July our beta testers have been hard at work giving us constant suggestions about features they’d like to see implemented and improvements the development team could make. This led up to more than 1100 GitHub commits and ten thousand lines of code. As you can guess, our little 8bit microcontroller’s flash memory was starting to get filled pretty quickly.

One of our contributors, [Miguel], recently discovered one compilation and one linker flags that made us save around 3KB of Flash storage on our 26KB firmware with little added processing overhead. Hold on to your hats, this write-up is going to get technical…

Many coders from all around the globe work at the same time on the Mooltipass firmware. Depending on the functionality they want to implement, a dedicated folder is assigned for them to work in. Logically, the code they produce is split into many C functions depending on the required task. This adds up to many function calls that the GCC compiler usually makes using the CALL assembler instruction.

This particular 8-bit instruction uses a 22-bit long value containing the absolute address of the function to call. Hence, a total of 4 flash bytes are used per function call (without argument passing). However, the AVR instruction set also contains another way to call functions by using relative addressing. This instruction is RCALL and uses an 11-bit long value containing the offset between the current program counter and the function to call. This reduces a function call to 2 bytes and takes one less clock cycle. The -mrelax flag therefore made us save 1KB by having the linker switch CALL with RCALL instructions whenever possible.

Finally, the -mcall-prologues compiler flag freed 2KB of Flash storage. It creates master prologue/epilogue routines that are called at the start and end of program routines. To put things simply, it prepares the AVR stack and registers in a same manner before any function is executed. This will therefore waste a little execution time while saving a lot of code space.

More space saving techniques can be found by clicking this link. Want to stay tuned of the Mooltipass launch date? Subscribe to our official Google Group!

Minicut2d And Omniwheel Robot

You’d think we would be done with the World Maker Faire posts by now, but no! We keep looking at our memory cards and finding more awesome projects to write about.

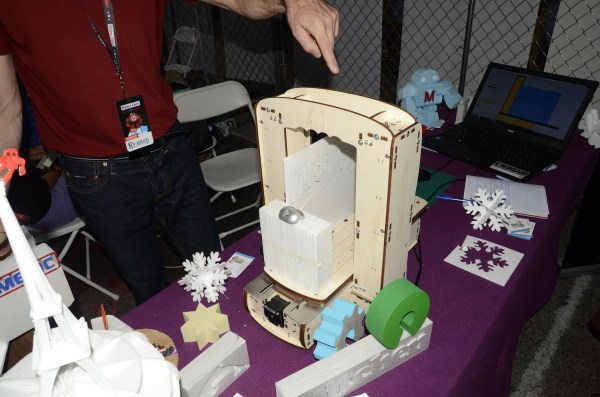
[Renaud Iltis] flew over from France to show off MiniCut2D, his CNC hot wire foam cutter. MiniCut2D uses X and Y, and Z stMINICUT2epper motors much like a 3D printer. Rather than print though, it pulls a heated nichrome wire through styrofoam. Foam cutting is great for crafts, but it really takes off when used for R/C aircraft. [Renaud] was cutting some models out of Depron foam in his booth. [Renaud] has set up FrenchFoam.com as a central location for users to upload and share designs in DXF format.

One of the neater features of MiniCut2D is that it can be loaded with a stack of foam boards to make several cuts at once. Not only is this a time saver when cutting repeating designs like wing ribs, but it also ensures the cut pieces are identical. Hey, even CNCs make mistakes once in a while.

 Omniwheel Robot

vic

In the MakerShed booth, we found [Victor Aprea] showing off Wicked Device’s new product, the Omniwheel Robot. Omniwheel utilizes a holonomic drive with omnidirectional wheels. The kit comes with a Nanode Zero, Wicked Devices’ own Arduino Uno clone, a motor control board, 3 motors, 3 omnidirectional wheels, and a whole list of hardware. The only thing needed to complete the kit is a radio control unit and receiver. Omniwheel may be simple, but we found driving it around to be mesmerizing – and a bit challenging. It’s a good thing [Victor] brought that plexiglass cover, as we bumped it a few times.

We’d love to see one of these little bots with a couple of sensors and autonomous control. If you build one, make sure to post it to Hackaday.io!

Strobe Remote

Reverse Engineering A Wireless Studio Lighting Remote

If you want to take a photograph with a professional look, proper lighting is going to be critical. [Richard] has been using a commercial lighting solution in his studio. His Lencarta UltraPro 300 studio strobes provide adequate lighting and also have the ability to have various settings adjusted remotely. A single remote can control different lights setting each to its own parameters. [Richard] likes to automate as much as possible in his studio, so he thought that maybe he would be able to reverse engineer the remote control so he can more easily control his lighting.

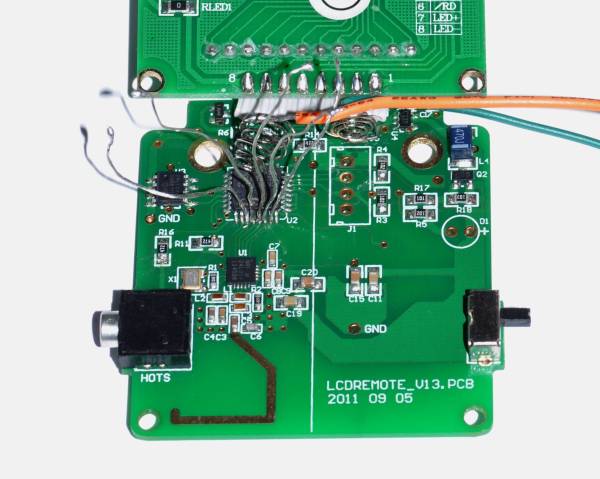
[Richard] started by opening up the remote and taking a look at the radio circuitry. He discovered the circuit uses a nRF24L01+ chip. He had previously picked up a couple of these on eBay, so his first thought was to just promiscuously snoop on the communications over the air. Unfortunately the chips can only listen in on up to six addresses at a time, and with a 40-bit address, this approach may have taken a while.

Not one to give up easily, [Richard] chose a new method of attack. First, he knew that the radio chip communicates to a master microcontroller via SPI. Second, he knew that the radio chip had no built-in memory. Therefore, the microcontroller must save the address in its own memory and then send it to the radio chip via the SPI bus. [Richard] figured if he could snoop on the SPI bus, he could find the address of the remote. With that information, he would be able to build another radio circuit to listen in over the air.

Using an Open Logic Sniffer, [Richard] was able to capture some of the SPI communications. Then, using the datasheet as a reference, he was able to isolate the communications that stored information int the radio chip’s address register. This same technique was used to decipher the radio channel. There was a bit more trial and error involved, as [Richard] later discovered that there were a few other important registers. He also discovered that the remote changed the address when actually transmitting data, so he had to update his receiver code to reflect this.

The receiver was built using another nRF24L01+ chip and an Arduino. Once the address and other registers were configured properly, [Richard’s] custom radio was able to pick up the radio commands being sent from the lighting remote. All [Richard] had to do at this point was press each button and record the communications data which resulted. The Arduino code for the receiver is available on the project page.

[Richard] took it an extra step and wrote his own library to talk to the flashes. He has made his library available on github for anyone who is interested.

The Chibi-Mikuvan, Or A Power Wheels With A Ford Fusion Battery

At all the big Maker Faires, the Power Racing Series makes an appearance, turning old Power Wheels into race cars that whip around the track at dozens of miles an hour. [Charles] is somewhat famous in the scene – there’s even a clause in the official rules named after him – so of course anything he brings to race day will be amazing. It was. It used a battery pack from a Ford Fusion plugin hybrid, a custom body, and a water cooling unit from a dead Mac G5.

A few months ago, we saw [Charles] tear into the battery pack he picked up for $300. This is the kind of equipment that will kill you before you know you’ve made a mistake, but [Charles] was able to take the pack apart and make a few battery packs – 28.8v and 16Ah – enough to get him around the track a few times.

The chassis for the Chibi-Mikuvan was built from steel, and the bodywork was built from machined pink foam, fiberglassed, and finished using a few tips [Charles] gleaned from [Burt Rutan]’s book, Moldless Composite Sandwich Aircraft Construction. The motor? That’s an enormous brushless motor meant for a 1/5th scale RC boat. The transmission is from an angle grinder, and the electronics are a work of art.

The result? A nearly perfect Power Wheels racer that has a curb weight of 110 pounds and tops out at 25 mph. It handles well, too: in the videos below, it overtakes the entire field of hacky racers in the Power Wheels Racing competition at Maker Faire NYC, and afterwards still had enough juice to tear around the faire.

Continue reading “The Chibi-Mikuvan, Or A Power Wheels With A Ford Fusion Battery”

Pain Machine Brings Pleasure, Too

Pain is a good thing. It tell us to pull our hand away from the stove and to stay off a turned ankle. But we all have different experiences of pain, and chronic pain degrades our quality of life. A person’s reports of pain will vary from one day to the next based on many factors, so the 1-10 scale isn’t universally effective in determining a person’s pain level. [Scott]’s entry into The Hackaday Prize is based on the classic cold pressor testing device, which measures changes in heart rate and blood pressure in a patient while their hand is immersed in ice water for one minute.

[Scott] has tentatively dubbed his device The Pain Machine, but it does more than the typical cold pressor apparatus; it also delivers simulated pain relief in the form of warm water when the valves are reversed. In addition, the subject under testing can push a button when they’ve had enough. While his original plan used external sources of hot and cold water, [Scott] pulled a couple of Peltier coolers from some wine chillers for a more contained design.

The Pain Machine uses an Arduino ATMega 2560 to control gravity flow solenoids, collect temperature data, and send the data cloudward. A couple of 110V pumps circulate the water. [Scott] will open up the code once he has finished commenting it and fleshed it out with use cases. For now, you can check out his two-minute entry video after the break.


SpaceWrencherThis project is an official entry to The Hackaday Prize that sadly didn’t make the quarterfinal selection. It’s still a great project, and worthy of a Hackaday post on its own.


Continue reading “Pain Machine Brings Pleasure, Too”

Add CNC To Your…Propane Tank??!?

It’s starting to be that time of year again; the Halloween-themed hacks are rolling in.

[John Lauer] needed a propane-powered flame effect for his backyard ICBM “crash site”. Rather than pony up for an expensive, electronically-controlled propane
valve, he made a custom bracket to connect a stepper motor to the propane burner’s existing valve.

With the stepper motor connected up, a TinyG stepper motor controller and [John’s] own graphical interface, ChiliPeppr, take care of the rest.

The hack is almost certainly a case of “everything looks like a nail when you have a hammer” but you have to admit that it works well and probably didn’t take [John] all that much time to whip up. Maybe everyone should have a couple spare stepper motors with driver circuitry just lying around ready to go? You know, just in case.

All the details of the build are in the video. If you’re done watching the flames, skip to around 2:50 where we see the adapter in action and then [John] steps us through its construction.

You may have seen coverage of the TinyG motor controller here before.

Additional thanks to [Alden Hart] for the tip.

The Teensy Audio Library

There are a few ways of playing .WAV files with a microcontroller, but other than that, doing any sort of serious audio processing has required a significantly beefier processor. This isn’t the case anymore: [Paul Stoffregen] has just released his Teensy Audio Library, a library for the ARM Cortex M4 found in the Teensy 3 that does WAV playback and recording, synthesis, analysis, effects, filtering, mixing, and internal signal routing in CD quality audio.

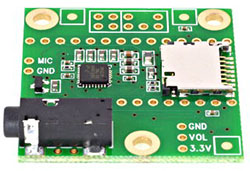
This is an impressive bit of code, made possible only because of the ARM Cortex M4 DSP instructions found in the Teensy 3.1. It won’t run on an 8-bit micro, or even the Cortex M3-based Arduino Due. This is a project meant for the Teensy, although [Paul] has open sourced everything and put it up on Github. There’s also a neat little audio adapter board for the Teensy 3 with a microSD card holder, a 1/8″ jack, and a connector for a microphone.

In addition to audio recording and playback, there’s also a great FFT object that will split your audio spectrum into 512 bins, updated at 86Hz. If you want a sound reactive LED project, there ‘ya go. There’s also a fair bit of synthesis functions for sine, saw, triangle, square, pulse, and arbitrary waveforms, a few effects functions for chorus, flanging, envelope filters, and a GUI audio system design tool that will output code directly to the Arduino IDE for uploading to the Teensy.

It’s really an incredible amount of work, and with the number of features that went into this, we can easily see the quality of homebrew musical instruments increasing drastically over the next few months. This thing has DIY Akai MPC/Monome, psuedo-analog synth, or portable effects box written all over it.