[Chris Anderson] Joins The Hackaday Prize As An Orbital Judge

[Chris Anderson] has had many labels in his lifetime: Punk rocker. Technology editor. Best selling author. UAV enthusiast. CEO. He now will also be able to add “Space Enabler” to that list as he joins The Hackaday Prize as an “Orbital Judge”. He will be on the panel choosing the Grand Prize winner (space-goer) from the list of five finalists. He joins the cast of “Launch Judges” who will be narrowing from 50 semifinalists down to 5.

Chances are that you already know [Chris] in one way or another. His book Free: The Future of a Radical New Price was an early analysis of how free and freemium models are changing the way that businesses connect with customers. On the hardware side of things he is the author of The Long Tail and Makers, both of which discuss the specialty hardware market that we so often explore around here. He has been an editor for Nature, Science, and The Economist. He served as the Editor in Chief of Wired for nearly 10 years, and most recently he started DIYdrones, the 50K+ member community that works on open source software and hardware for UAVs and RC controlled flyers. This spawned a company called 3DRobotics, of which he is the co-founder and CEO. 3DR continues to push the frontier of Open Source Hardware for hobbyists and professional drone users.

If you’ve been on the fence until now, this should convince you to take an afternoon to enter your project idea. You have until August 20th to document your concept of an Open, Connected device. Entry is easy and requires only that you outline your idea with a 2-minute video, proposed system diagram, and four project logs which may discuss different aspects of your plan. If you make the first cut of 50 in August, you’ll already be a winner of at the least a $1000 grab-bag of electronics. You’ll also be well on your way having [Chris] study your work as you advance to a functional prototype in November.

Want a step-by-step view of putting together an entry in under 4 minutes?

Scribble: Wait, Kickstarter Is Vetting Projects Now?

PenFirst rule of reading anything: if a headline is an interrogative, the answer is a resounding ‘no’. This might be the one exception to that rule.

This Kickstarter is actually fairly interesting. Not because it’s an obvious scam, mind you, as there’s very, very little to actually call a scam. It’s noteworthy because it was on track to be a highly successful campaign but it was shut down by the creators just days after its launch.

Before getting to the unsavoriness of this Kickstarter campaign, a little bit of history is in order. Several years ago and before crowd funding was a thing, a designer came up with a rather clever if completely improbable idea: a color picking pen. Simply hold the end of a pen up to an object, press a button, and using technology and/or magic the pen now writes in that color. There are obvious shortcomings in the design like using red, green, and blue ink cartridges for color mixing – a classic case of confusing additive and subtractive color models. Still, this is just a design concept and over the years the idea of a color sensing pen that mixes ink has bounced around the Internet. With enough people willing to throw money at their screens in the hopes of actually getting a product as interesting as this, you just know it’s going to be on Kickstarter sooner or later.

Enter the Scribble Pen. Yes, it’s the same idea as the 5+ year-old color picking pen, with a few of the technical challenges already addressed. They’re using a CMYK (plus White) color model that can theoretically reproduce just about any color, and do so on any color paper. How are they doing this? I have no idea, but the whole campaign is super, super sketchy.

Continue reading “Scribble: Wait, Kickstarter Is Vetting Projects Now?”

DEFCON 22: The Badge Designers

If you go to DEFCON next year (and you should), prepare for extreme sleep deprivation. If you’re not sleep deprived you’re doing it wrong. This was the state in which we ran into [LosT] and [J0nnyM@c], the brains behind the DEFCON 22 badge and all of the twisted tricks that torture people trying to solve the badge throughout the weekend. They were popular guys but wait around until late into the night and the throngs of hint-seekers subside just a bit.

Plans, within plans, within plans are included in the “crypto” which [LosT] talks about in the interview above. We were wondering how hard it is to produce a badge that is not only electrically perfect, but follows the planned challenge to a ‘T’. This includes things like holding off soldering mask from some pads, and different ones on a different version of the badge. Turns out that you just do as well as you can and then alter the puzzle to match the hardware.

Speaking of hardware. A late snafu in the production threw the two into a frenzy of redesign. Unable to use the planned chip architecture, [J0nnyM@c] stepped up to transition the badges over to Propeller P8X32a chips, leveraging a relationship with Parallax to ensure they hardware could be manufactured in time for the conference.

If you haven’t put it together yet, this is that same chip that Parallax just made Open Source. The announcement was timed to coincide with DEFCON.

A Raspberry Pi Helmet Cam With GPS Logging

20140126_222809-1 
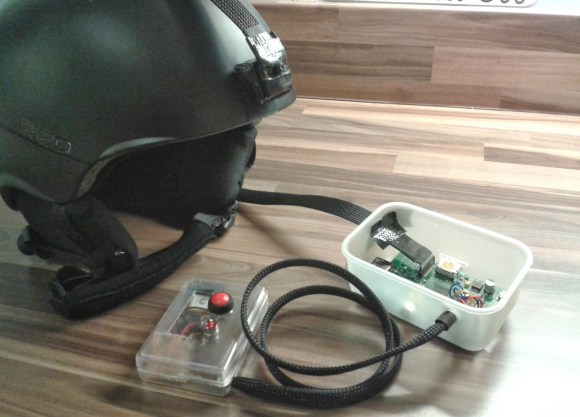
Over the last 20 years, [Martin] has been recording snowboarding runs with a standard helmet cam. It was good but he felt like he could improve upon the design by building his own version and logging additional data values like speed, temperature, altitude, and GPS. In the video shown after the break, a first person perspective is displayed with a GPS overlay documenting the paths that were taken through the snow. [Martin] accomplished this by using a python module called picamera to start the video capture and writing the location to a data file. He then modified the program to read the current frame number and sync GPS points to an exact position in the video. MEncoder is used to join the images together into one media file.

The original design was based on the Raspberry Pi GPS Car Dash Cam [Martin] developed a few months earlier. The code in this helmet cam utilizes many of the same functions surrounding the gathering of GPS data points, recording video, and generating the overlay. What made this project different though were the challenges involved. For example, a camera inside a car rarely has to deal with extreme drops in temperature or the wet weather conditions of a snowy mountain. The outside of the vehicle may get battered from the snow, but the camera remains relatively safe from exposure. In order to test the Raspberry Pi before venturing into the cold, [Martin] stuck the computer in the freezer to see what would happen. Luckily it worked perfectly.

Click past the break for the rest of the story.

Continue reading “A Raspberry Pi Helmet Cam With GPS Logging”

An Open Hardware Platform For ECG, EEG And Other Measurements

[Eric] tipped us about the OpenHarwareExG project which goal is to build a device that allows the creation of electrophysiological signal processing applications. By the latter they mean electrocardiography (ECG, activity of the heart), electroencephalography (EEG, signals on the scalp), electromyography (EMG, skeletal muscles activity), electronystagmography and electrooculography (ENG & EOG, eye movements) monitoring projects. As you can guess these signals are particularly hard to measure due to their small amplitude and therefore susceptibility to electrical noise.

The ADS1299 8-channel 24-bit analog front end used in this platform is actually electrically isolated from the rest of the circuit so the USB connection wouldn’t perturb measurements. An Arduino-compatible ATSAM3X microcontroller is used and all the board is “DIY compatible” as all parts can be sourced in small quantities and soldered by hand. Even the case is open source, being laser cut from acrylic.

Head to the project’s website to download all the source files and see a quick video of the system in action.

Interested in measuring the body’s potential? Check out an ECG that’s nice enough to let you know you have died, or this Android based wireless setup.


DIY Custom Molded Earbud Roundup

Headphones have become ubiquitous these days. Thanks to the iPod and the smartphone, it’s become commonplace to see someone wearing a pair of earbud style headphones. Earbuds aren’t always comfortable though. On some people they are too loose. On others, the fit is so tight that they cause pain.To that end, we’ve found a few great solutions for this problem.

[cptnpiccard] has documented his custom molded Sugru earbuds in an Imgur gallery. He’s molded a pair of standard earbuds into a cast of his ear. He uses them both for hearing protection and tunes while skydiving. Sugru’s FAQ states that while the cured material is safe for skin contact (and in ear use) some people are sensitive to the uncured material.

While discussing his project on Reddit, a few users chimed in and mentioned they’ve made custom molded earbuds using Radians custom earplug kits. The Radians material hardens up in only 10 minutes, which beats waiting an hour for Sugru.

The absolute top of the food chain has to be building your own triple driver in ear monitors, which is exactly what [marozie] has done. Professional custom molded monitors can cost over $1000, which puts them in the realm of professional musicians and audiophiles. [marozie] discovered that mouser stocks quite a few transducers from Knowles. These tiny speakers don’t come cheap, though; you can spend upwards of $70 just for a single driver.

[marozie] took a cast of his ear using an earmold impression kit. He used this cast to create a mold. From there it was a matter of pouring resin over his carefully constructed driver circuits and audio tubes. The resulting monitors look and sound incredible.

It goes without saying that making custom in ear monitors involves putting chemicals into you ears. The custom earmold kits come with tiny dams to keep the mold material from going in too far and causing damage. This is one of those few places where we recommend following the instructions. Click past the break to see a demo video of the ear molding process.

Continue reading “DIY Custom Molded Earbud Roundup”

Gutenberg Clock Keeps Time By Reading Books

Gutenberg clock displaying text from a book

We’ve seen a wide variety of hacks that keep time, but [ch00f]’s latest build takes a new spin on counting the seconds. The Gutenberg Clock keeps time by reading books on a scrolling LED screen.

The content for the clock is sourced from the Project Gutenberg, which releases books with expired copyright for free. The library on the clock consists of around twenty thousand such books. Read at eighty words per minute, the clock won’t repeat a passage for the next thirty-three years.

While the clock doesn’t display time itself, it is synchronized to time. Two identical clocks should display the same text at the same time. To get the time, [ch00f] first tried hacking apart a cheap radio clock, which is synchronized to NIST’s 60 kHz broadcast. After reverse engineering the protocol with great success, stray RF energy from the display turned out to cause too much interference.

With the cheap solution out the window, [ch00f] built a custom breakout for an Adafruit GPS module and used it to get the time. This was his first RF board, but it worked out fine.

Books are loaded onto a FAT filesystem on an SD card, and [ChaN]’s FatFS is used to interpret the filesystem. A microcontroller then sends the text out at a constant rate to a serial port on the display which he hacked his way into.

The project is a neat mix of art and electronics. Stick around for a video overview after the break.

Continue reading “Gutenberg Clock Keeps Time By Reading Books”