International Obfuscated C Code Contest Winners Posted

ioccc

The International Obfuscated C Contest – the contest to create the most useful, useless, or unique program in absolutely unreadable C code – has just posted the winners of the 2013 contest.

Of the entries of note, a few really stand out. The pic at the top of this post, for instance, comes courtesy of this submission. It’s an iterative ray tracer stuck inside an infinite loop that, when left running overnight, is able to produce amazing renders.

An IOCCC contest wouldn’t be complete without some ASCII art C code, and this entry fits the bill. It’s a Tetris painting tool that creates images made out of tetronomoes. Each image is built up one line at a time from the bottom up, using Tetris’ lack of physics to create a picture out of un-cleared lines.

One of the most impressive entries for this (last?) year’s contest is a tiny 8086 PC emulator/virtual machine written in only 4043 bytes of code. It’s a fully functional 80s-era PC emulator that can run vintage copies of AutoCAD, Windows, Lotus 1-2-3, and SimCity.

All the submissions are awesome, but like any IOCCC contest, there aren’t actually any winners. Or they’re all winners. The Obfuscated rules aren’t very clear in that regard.

Ninja-Drillpress-Skills Produced This Glow Plug Extruder

step5_5e1

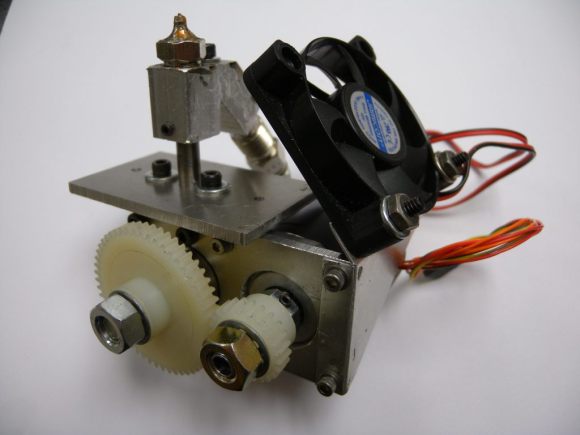
Still looking to make your own 3D printer? Don’t have many tools or a big budget? Well, [Adam Kemp] has just the hack for you — a DIY extruder that can be made with only a drill press and a few hand tools.

First, a little background. [Adam] loves the nitty gritty side of 3D printing, so he’s managed to build his own printer almost completely out of recycled parts from printers, scanners, etc. Unfortunately, there’s not much of an option when it comes to the extruder. Almost all designs online feature 3D printed parts. Not wanting to admit defeat, he came up with this clever glow plug extruder design.

As you can imagine, it requires a lot of drilling, and it would be a heck of a lot easier on a mill — but that’s not the point here. He even goes into detail on how to hob the extruder feed wheel using nothing but a tap, a drill press, some skateboard bearings, and a few washers and nuts. The entire guide is great, so if you want to feel like MacGyver for a few hours and you need a good extruder, try it out! 

To see the extruder in action, stick around after the break.

Continue reading “Ninja-Drillpress-Skills Produced This Glow Plug Extruder”

Build A Simple Audio Amp

[Ynze] has built an audio amplifier that looks and sounds great. His amplifier uses a National Instruments (now TI) LM3886 Overture series 68 Watt power amp. The LM3886 places [Ynze’s] amp squarely in the “Gainclone” catagory. Gainclone or Chipamp are terms long used by the DIY community to describe audio amps based upon highly integrated semiconductor amplifiers. The Gainclone name stems from the original Gaincard audio amplifier sold by 47 labs. The Gaincard used less than $100 USD of parts when it was introduced in 1999. It sounded good enough to command a $3300 USD price tag on the audiophile market. The low parts count and simple construction spawned the audio DIY community to build their own versions of the Gaincard. Hundreds of variants exist now, and wading through the different versions can be a bit of a daunting task. [Ynze] found a basic design that works, and built from there.

One of the interesting things about [Ynze’s] amp, as well as many of the Gainclones, is the fact that they use no circuit board. All wiring is done point to point. resistors are soldered directly to the pins of the amplifier chip. This can be some tricky soldering for beginners, but several PCB kits are available. [Ynze] built his amp in two cases. One case holds the power supply, and the other contains the amplifier itself. [Ynze] is using a large toroid transformer to drop his local 230V mains down to +25V and -25V. The amplifier circuit itself is simple – a few discrete components surround the LM3886 and it’s heat sink. [Ynze] also did some very nice carpentry work on his wood chassis. The resulting amp looks like it’s right out of the 1960’s – but hides 1990’s electronics inside.

Continue reading “Build A Simple Audio Amp”

Interfacing With The HTC Desire Display And Its Touch Panel

Part of [Linas]’ submission to last year’s Cypress Smarter Life Challenge involved using the HTC Desire display and its touch screen. This particular phone includes a full-color active-matrix OLED (AMOLED) display that has a 3.7″ diagonal and a 480×800 resolution, resulting in a 252ppi pixel density. Using a MSO2024B oscilloscope, [Linas] originally started his adventure with the touchscreen by sniffing the I2C signals. As some math was required to extract the data, he later found the HTC Desire source code and included it on his STM32F429 (so much for reverse engineering!).

After spending many hours searching for the AMOLED display and controller datasheets, [Linas] resorted to pay a company to get the resources he needed. He produced a custom-made PCB to provide the display with the required voltages, as well as offering a 0.1″ connector to interface with it. A RGB565 interface is used to communicate with the screen so only 65k out of the 16 million colors are used. You may download all the program files and datasheets in [Linas] write-up.

A Guitar From An Old Tin Box

omar-mos

[Atdiy and Whisker], collectively known as  [The Tymkrs] have been busy honing their luthier skills. They’ve created a 10 part YouTube series about the construction of their new cigar box guitar. Instead of a cigar box though, they’ve substituted a 1920’s tin cigarette box. The Omar Cigarette company gave “Project Omar” it’s name. Like [Tymkrs] previous guitar, Omar is a three string affair. The neck was cut from Black Palm, which really shined when polished with a mixture of orange oil and beeswax. They also threw in a couple of new tricks on this build. Omar is an electric guitar, with a pickup custom wound  by [Bob Harrison]. Omar also has frets, which creates a whole new set of complications. Frets are generally installed by cutting slits in the guitar neck with a fret saw. Rather than buy a new tool, [Tymkrs] created a simple jig for their mini table saw. The jig held the guitar neck perpendicular with the saw blade. This made quick work of the many fret slits to be cut. Installed frets must also be dressed and leveled, which is a time-consuming process. 

The tin cigarette box also created a new set of problems. The thin tin proved to be a bit on the weak side when the strings were tightened down. A bit too much pressure on the box while playing would cause notes to bend, much like the tremolo or whammy bar on a standard electric guitar. [Tymkrs] were able to counteract this by adding bracing inside, and a couple of black palm braces to the back of the box.

Hum was also a problem. When [Tymkrs] first plugged in, they found they had more 60Hz mains hum than signal from their strings. Omar uses a classic single coil guitar pickup. Single coils will pick up noise from any magnetic field, including the field created by the studio electrical system. A humbucking pickup uses two coils to counteract this effect. Humbuckers also have a slightly different tone than single coils. [Tymkrs] wanted to stick with their single coil tone, so they counteracted the hum by raising the pickup closer to the strings. Higher pickups receive more signal from the strings, so this is basically a free signal to noise ratio improvement. They also grounded the entire tin box, along with Omar’s metal tail stock. The final build sounds great, as evidenced by the jam session toward the end of Video 10.

Continue reading “A Guitar From An Old Tin Box”

[Fran]’s LEDs, Nixies, And VFDs.

FRAN LED

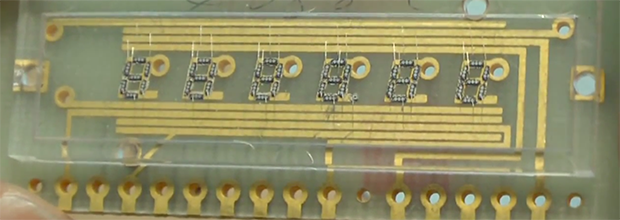
With a love of blinky and glowey things, [Fran] has collected a lot of electronic display devices over the years. Now she’s doing a few teardowns and tutorials on some of her (and our) favorite parts: LEDs and VFD and Nixie tubes

Perhaps it’s unsurprising that someone with hardware from a Saturn V flight computer also has a whole lot of vintage components, but we’re just surprised at how complete [Fran]’s collection is. She has one of the very first commercial LEDs ever made. It’s a very tiny red LED made by Monsanto (yes, that company) packaged in a very odd lead-and-cup package.

Also in her LED collection is a strange Western Electric part that’s green, but not the green you expect from an LED. This LED is more of an emerald color – not this color, but more like the green you get with a CMYK process. It would be really cool to see one of these put in a package with red, green, and blue LED, and could have some interesting applications considering the color space of an RGB LED.

Apart from her LEDs, [Fran] also has a huge collection of VFD and Nixie tubes. Despite the beliefs of eBay sellers, these two technologies are not the same: VFDs are true vacuum tubes with a phosphorescent coating and work something like a CRT turned inside out. Nixies, on the other hand, are filled with a gas (usually neon) that turns to plasma when current flows through one of the digits. [Fran] has a ton of VFDs and Nixies – mostly military surplus – and sent a few over to [Dave Jones] for him to fool around with.

It’s all very cool stuff and a great lead-in to what we hear [Fran] will be looking at next: electroluminescent displays found in the Apollo Guidance Computer.

Videos below.

Continue reading “[Fran]’s LEDs, Nixies, And VFDs.”

Recliner Sofa Given The Power Of The Pi

pi-sofa

If you go to buy a sofa these days you’ll not only be greeted with the option of one or more reclining positions, but a fully modern unit comes with motorized reclining. That simply wasn’t convenient enough for [Nicki] and [Kevin] who wanted to control the feature from a smartphone rather than a physical interface (buttons) on the side of the furniture. What resulted is the PiSofa, a Raspberry Pi connected to the furniture’s electronics with the help of a relay board.

This is most certainly a hack, but no doubt one with a lot of finesse. Check out that white PCB. That’s right, it’s a factory spun board to keep things nice and neat. They went with one of our favorite tricks by housing everything inside of a food storage container. After some Ruby coding the Pi now has complete control of the sofa. We’re not overstating this. It literally is the only way to control it because the original buttons no longer work. But that’s okay, turns out not only does it work with their smartphones, but with a [Kevin’s] Pebble watch as well.

We can’t think of any past hacks that specifically targeted the couch. But here’s a hammock that you can drive down the street.