Keeping The Family Off The Net With An Undocumented Backdoor

memetics

When [Eloi] was home for Christmas, he faced one of the most difficult problems man has ever faced: his entire family, equipped with smartphones and laptops, siphoning all the Internet through a 1Mb/s connection. For any technically minded person, the fix for this problem is to limit the bandwith for all those Facebook and Twitter-heads, while leaving [Eloi]’s battlestation unaffected. [Eloi] had originally set up the Linksys WAG200G router in the family home a few years ago but had since forgotten the overly complex admin password. No worries, then, because apparently the WAG200G is open as wide as a barn door with a completely undocumented backdoor.

Without the password to the admin panel of the router, [Eloi] needed a way in. After pointing nmap at the router, he found an undocumented service running on port 32764. Googling this observation resulted in a lot of speculation, so the only option was to download the router’s firmware, look for the service, and figure out a way in.

[Eloi] eventually got a shell on the router and wrote a very short Python script to automate the process for all WAG200G routers. As for where this backdoor came from, it appears a SerComm device on the router is responsible. This means a whole bunch of routers with this specific SerComm module also have this backdoor, and we’d assume anything with a service running on port 32764 is suspect.

If you’re looking for a fix for this backdoor, your best bet is probably installing OpenWRT or Tomato. The OpenWAG200 project, an open firmware specifically designed for [Eloi]’s router, still has this vulnerability, though.

Overhauling An IC Programmer

Willem IC Programmer

[NeXT] needed an EPROM programmer to work with chips from vintage computers. Starting with a low cost programmer, he built this custom IC programmer to handle all of his programming needs.

The device is based on the Willem 5.0e programmer. [NeXT] was not satisfied with the device, noting that it had to be carefully isolated from metal surfaces during use and required setting many annoying jumpers.

To solve these problems, he started off by dismantling the programmer. The IC sockets were moved to a daughter board, which could be mounted cleanly into the metal enclosure. Replacing the jumpers was a bit more complicated, a combination of toggle and rotary switches were chosen to make changing settings easier.

Soldering the boards together looks like it was not an easy task, with 200 solder joints needed to connect the sockets and switches. After debugging some shorts and dead connections, [NeXT] managed to finish the 1.5 year project right before his Christmas deadline.

Green Light LEGO, Red Light Stop

Master LEGO craftsman [Baron von Brunk] had the same childhood passions as a lot of us—LEGO (obviously), Transformers, and Nintendo. But he also harbored a passion for traffic lights and road signs. His latest offering, a fully functional LEGO traffic light, is some pretty fantastic plastic. You might recall that we featured [Baron von Brunk]’s LEGO mosaic lamps a few weeks ago. This project is that one on steroids.

The body is made of 1700+ LEGO and Technic pieces. [Baron von Brunk] was kind enough to provide his LDD file, though he says it should be considered a rough guide to construction. The red, yellow, and green 1×1 areas are each lit with a 48-SMD LED floodlight bulb. Colored lights are available, but he used the solid white variety for greater luminescence. The lights are driven by a traffic light controller typically used for model railroads.

[Baron von Brunk] ended up lining the inside with black 1x1s and metallic reflective duct tape to keep the light from leaking out of the masonry. He used some Technic bricks on the rear door to form hinges, and Technic pins to hold the LED lamps.

Current Limiting Diode Use And Tutorial

Current limiting diode 1

Not that this happens often, but what do you do when faced with a repair where you don’t know the power source but you do know you have to drive LED backlighting? When faced with this dilemma [Eric Wasatonic’s] solution was to design for ambiguity. In this interesting hack repair [Eric] needed to restore backlighting for an old car stereo LCD display. First he guaranteed he was working with a DC power source by inserting a small full-wave bridge rectifier. Then knowing he needed 4 mA to power each LED for backlighting he used some 1978 vintage current limiting diodes designed to pass 2mA each regardless of voltage source, within limits of course.

Sure this is a simple hack repair but worthy of being included in anyone’s bag of tricks. Like most hacks there is always knowledge to be gained. [Eric] shares a second video where he uses a curve tracer and some datasheets to understand how these old parts actually tick. These old 1N5305 current limiting diode regulators are simply constructed from a JFET with an internal feedback resistor to its gate which maintains a fixed current output. To demonstrate the simplicity of such a component, [Eric] constructs a current limiting circuit using a JFET and feedback potentiometer then confirms the functionality on a curve tracer. His fabricated simulation circuit worked perfectly.

There was a little money to be made with this repair which is always an added bonus, and the recipient never reported back with any problems so the fix is assumed successful. You can watch the two videos linked after the break, plus it would be interesting to hear your thoughts on what could have been done differently given the same circumstances.

Continue reading “Current Limiting Diode Use And Tutorial”

Hackaday: The Gathering

LA2014-109x180

1/21/14 – Downtown LA
Come one, come all to a party with [Brian], me, and the Hackaday readers who live in the Los Angeles area. Tickets are free, as is the beer, food, t-shirts, stickers, and other swag which you won’t find out about unless you show up in person.

This is the first official live Hackaday meetup and is open to all ages. During the summer we talked about making Hackaday a virtual hackerspace, and this event is one part of that initiative. We’ll let you in on some stuff we’ve been planning, but in return I expect you to tell us your thoughts on how the Hackaday community can get bigger and better. We’re also using the attendance at this event to judge if we should host more live events (possibly in other cities too). So if you’re in LA get your ticket now and make sure your friends do the same!

UPDATE 3: Get your name on the waiting list… Continue reading “Hackaday: The Gathering”

Geek Group Fire Update

gg-gap2

The Geek Group is in the process of cleaning up after their fire. Their small capacitor/spark gap room sustained the most damage, with the interior nearly completely incinerated, along with some structural damage to the walls and roof.  The gap room was isolated from the much larger high voltage lab by red plastic welding curtain. The curtain was fire-retardant, but when it did finally burn, it was extremely sooty. With the curtain burning, soot covered the high voltage lab. The rest of the building escaped fire damage, but nearly all of it is covered in a fine layer of soot. The group has been and are attacking the soot problem head on, with shop-vacs, rags, and elbow grease. Several of their sponsors have also promised supplies to cover the remediation.

[Chris] and [Paul] have also been doing some sleuthing as to the root cause of the fire. While the cause will never be known beyond a shadow of a doubt, they have a pretty good idea of the chain of events. Gemini, the group’s 200 kVA Tesla coil had been run about 1/2 hour before smoke was detected. The fire was concentrated in Gemini’s spark gap room. Close inspection of the rotary spark gap showed that the stationary electrodes all seemed to have sustained a mechanical impact. It appears that either while the gap was running, or as it was spinning down, one of the flying electrodes moved enough to impact the stationary electrodes. These electrodes are 3/8″ and 1/2″ tungsten, and often glowed white-hot while the gap was in operation. One set screw held each electrode in to the 12″ rotor. The set screw of one flying electrode was found to be loose, and the electrode it retained probably impacted the stationary electrodes. It’s not a far leap to guess that hot metal from these impacts could have landed in the capacitor array, smoldered, and eventually caught aflame.

A single loose screw most likely caused the entire chain of events leading up to the fire. [Chris] and [Paul] had observed the spark gap throwing out hot bits of metal even during normal operation, and had planned an encapsulation box. However, disaster struck before it was built. This is not to say that The Geek Group operates an unsafe shop. The important thing here is that no one was hurt. Everyone in the building was evacuated quickly and safely.

A quick note about the comments – we know The Geek Group and [Chris] tend to be polarizing topics. However, we’d like to at try to keep the comments constructive.

Continue reading “Geek Group Fire Update”

Doggy DVR Alarm Sensor

2014-01-05-13.22.20

[Martin] lives in a small village about 25km from his job in a major city. Occasionally his home alarm system will trip and he will rush home to make sure everything is okay. So he decided to buy a DVR system instead… and he turned his dog’s collar into one of the main sensors.

As you may know, DVR’s also have sensor inputs in addition to loads of video cameras. These can be very handy to tell you other things that a small video clip will not, such as moisture, humidity, temperature etc. [Martin’s] DVR has 8 sensor inputs which he has configured to be the normally open type of sensors. By using a Sharp 817 optocoupler and a Funky v3 wireless module he made one of the sensor inputs wireless.

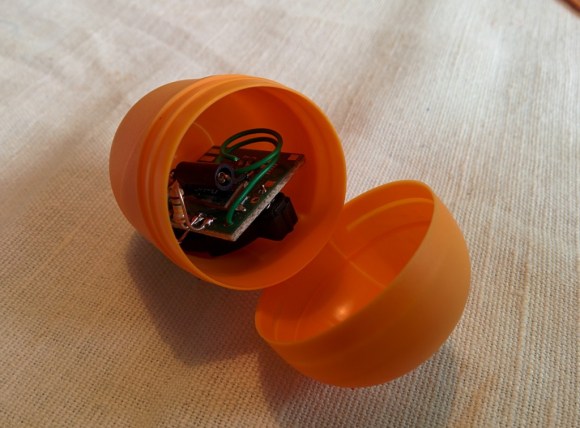
On the other end of the Funky wireless setup is a Kinder Surprise shell attached to his dog’s collar. In addition to the wireless module, it also contains a rudimentary 2-axis shock sensor consisting of a small spring that floats over a metal pin — when moved violently (when the dog is running about) it makes contact and [Martin’s] DVR alerts him by email and sends him pictures from the system.

He suspects he’ll be getting lots of pictures of the dog getting spooked by cats wandering by.