Unlocking Your Computer With A Leonardo And An NFC Shield

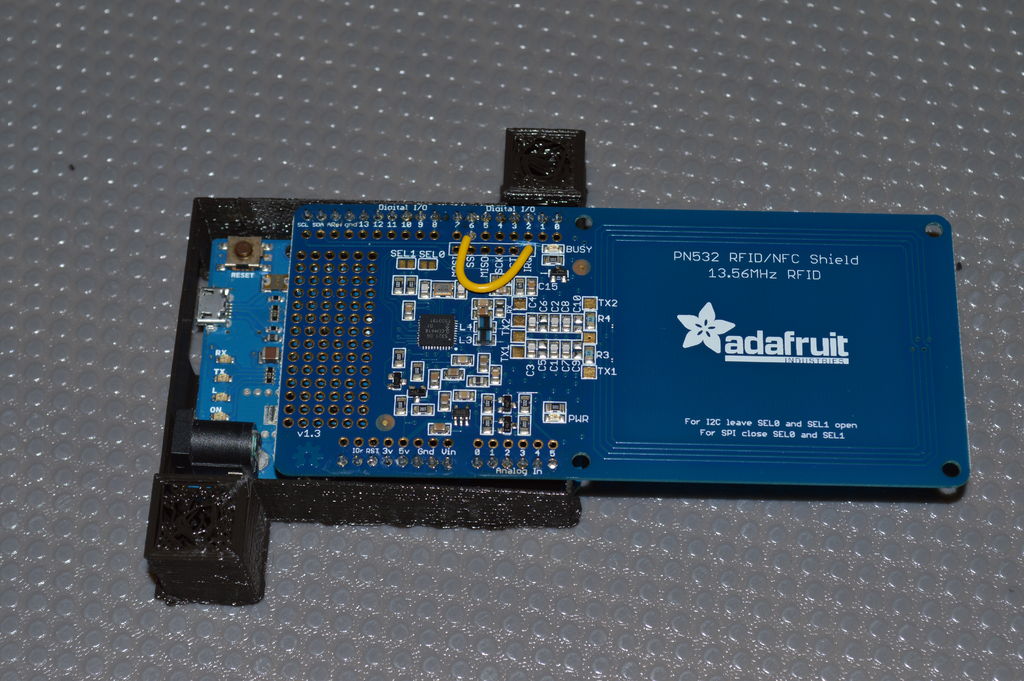
Manually typing your login password every time you need to login on your computer can get annoying, especially if it is long and complex. To tackle this problem [Lewis] assembled an NFC computer unlocker by using an Arduino Leonardo together with an NFC shield. As the latter doesn’t come with its headers soldered, a little bit of handy work was required.

A custom enclosure was printed in order to house the two boards together and discretely mount them under a desk for easy use. Luckily enough very few code was needed as [Lewis] used the Adafruit NFC library. The main program basically scans for nearby NFC cards, compares their (big-endianned) UIDs against a memory stored-one and enters a stored password upon match. We think it is a nice first project for the new generation of hobbyists out there. This is along the same lines as the project we saw in September.

Continue reading “Unlocking Your Computer With A Leonardo And An NFC Shield”

AWD Motorcycle Drives Over Anything, Fits Into Dufflebag

This has got to be one of the strangest motorcycles we’ve ever seen. It has huge tires, both wheels are chain driven, and it only weighs 100lbs or so — did we mention it also comes apart and fits into a dufflebag?

It’s what appears to be a home-made Russian bike of some sort, in fact, the YouTube title when translated is “ATV Suitcase” and they aren’t wrong… Anyway, it appears to be designed off of the American-made Rokon Trailbreaker, which is another AWD motorcycle with giant tires, huge ground clearance and extremely versatile — except this one Russian one is either really light, or the rider is ridiculously strong the way he throws the bike around.

In the following video the owner shows off the bike’s prowess climbing stairs, mountains, floating in water, and even uses it as a ladder to climb up a rock face — and then drags the bike up after him.

Plus he can disassemble it in a matter of minutes and fit it in a car smaller than a Fiat.

Continue reading “AWD Motorcycle Drives Over Anything, Fits Into Dufflebag”

Low-cost Solar Panels Are Easy To Make And Reconfigure

What’s the size of a deck of playing cards and can pump out enough power to charge your cellphone? These awesome little home-made magnetic solar panels!

[Christian Pedersen] has just published a guide on how to make these handy little solar panels, and they only cost about $1.25 each! They are capable of providing between 0 – 0.5V at 400-1000mA depending on the light available and load being driven.

All you need to make them is some multicrystalline solar cells, copper tape, Ethylene-Vinyl Acetate (EVA — a film used to protect solar panels) and Polycarbonate sheet for the external hard case. You can then assemble them in a matter of minutes, and laminate for a permanently sealed panel. He’s also added thin neodymium  magnets so the panels stick together when you arrange them in a line! Perhaps a future version could have the copper strips going in both directions to allow for larger arrays to be made.

He also has a complete BOM on his GitHub, and if you happen to be at the Maker Faire in San Mateo in May, he’ll be showing you how — in person!

[via Instructables]

MC Escher Inspires A Reptilian Floor

reptile-floor

A simple room refinishing project lead [Kris] to his biggest hack yet, a floor inspired by MC Escher’s Reptiles printMaurits Cornelis Escher is well known for his reality defying artwork. His lifelong passion was tessellation, large planes covered identical interlocking shapes. Triangles, squares, hexagons all EscherExample
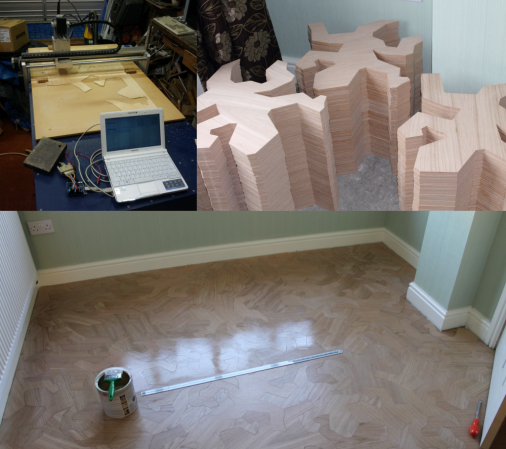
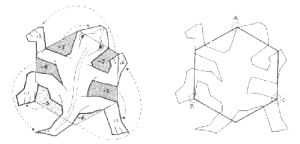
interlock naturally. Escher discovered that if he cut out part of a shape and replaced it on the opposite side, the new shape will still interlock. In Reptiles, Escher created a lizard shape by modifying a hexagon. One side flipped over to become the nose, 4 others to become the feet, and so on. If the cuts are all made perfectly, the final shape would still interlock.

[Kris] was inspired by a photo of a commercial flooring project using small wooden reptiles as the tiles. He wanted to go with larger wooden tiles for his room. He knew his shapes had to be perfect, so he wrote a computer program to split the hexagon perfectly. Armed with art in DXF format, he went looking for a flooring company to help him. The silence was deafening. Even with artwork ready to go, none of the local custom flooring shops would take his job. Undaunted, [Kris] bought an older CNC machine. The machine was designed to be driven from MS-DOS via the parallel port of a Pentium II era PC. [Kris] substituted an Arduino running GRBL. After some GCode generation, he was cutting tiles.

The real fun started when it was time to glue the tiles down. With all the interlocking parts, it’s impossible to just glue one tile and have it in the perfect position for the next. In [Kris’] own words, “You have to do it all in one go”. Thanks to some family support and muscle, the flooring project was a success.  Great work, [Kris]!

Editing Circuits With Focused Ion Beams

CPLD

[Andrew] has been busy running a class on hardware reverse engineering this semester, and figured a great end for the class would be something extraordinarily challenging and amazingly powerful. To that end, he’s editing CPLDs in circuit, drilling down to metal layers of a CPLD and probing the signals inside. It’s the ground work for reverse engineering just about every piece of silicon ever made, and a great look into what major research labs and three-letter agencies can actually do.

The chip [Andrew] chose was a Xilinx XC2C32A, a cheap but still modern CPLD. The first step to probing the signals was decapsulating the chip from its plastic prison and finding some interesting signals on the die. After working out a reasonable functional diagram for the chip, he decided to burrow into one of the lines on the ZIA, the bus between the macrocells, GPIO pins, and function blocks.

Actually probing one of these signals first involved milling through 900 nm of silicon nitride to get to a metal layer and one of the signal lines. This hole was then filled with platinum and a large 20 μm square was laid down for a probe needle. It took a few tries, but [Andrew] was able to write a simple ‘blink a LED’ code for the chip and view the s square wave from this test point. not much, but that’s the first step to reverse engineering the crypto on a custom ASIC, reading some undocumented configuration bits, and basically doing anything you want with silicon.

This isn’t the sort of thing anyone could ever do in their home lab. It’s much more than just having an electron microscope on hand; [Andrew] easily used a few million dollars worth of tools to probe the insides of this chip. Still, it’s a very cool look into what the big boys can do with the right equipment.


E-Waste Quadcopter Lifts Your Spirits While Keeping Costs Down

The advancement of Quadcopters and their capabilities over the last few years has been amazing. Unfortunately, the price point to get into the sport with a decent size, non-toy, vehicle is still several hundred dollars. And what’s the fun with buying one when you can built it?!? Strapped for cash and feeling the same way, [Hans] over at the hackerspace Knackatory decided to build a quadcopter from e-waste.

The + shaped frame is made from lightweight plywood. It’s pretty obvious that the main rotors are PC Fans, 140mm in this case. Normally, these wouldn’t be able to create enough lift to get out of their own way except the on-board 24v Dewalt cordless tool battery bumps up the fan speed to 15,000 rpm. The one orange fan allows the operator to maintain a visual reference to which side of the ‘copter is forward.

Continue reading “E-Waste Quadcopter Lifts Your Spirits While Keeping Costs Down”

Stretch Bike Hauls All

cargobike

Need to haul some stuff? Got nothing to haul it with? Then fashion yourself a cargo bicycle! We’ve seen cargo bikes before, but none quite like this one. Built from a German “klapprad”, [Morgan] and his father fashioned a well constructed cargo bicycle which is sure to come in handy for many years.

They started by cutting the bike in half and welding in a 1 meter long square tubing extension. The klapprad style bicycle is made from thick metal stock, making it sturdy and easy to weld. This process also make it a true “stretch” vehicle as opposed to one that replaces the front end in order to keep the handle bar assembly near the rider.

Along with some nicely done woodwork and carbon fiber, they used parts from an old mountain bike including a front fork, front bearing and handlebar, tubing from an old steel lamp, a kickstand from a postman motorcycle, and a kitchen sink to complete the build. It should handle well so long as the weight of the cargo is not heavier than the weight of the driver.