Mixer For Korg Volcas

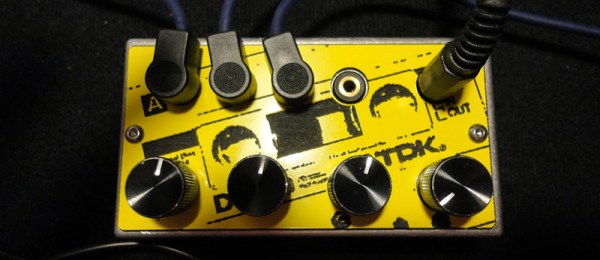
Korg, everyone’s third or fourth favorite synth company, but one of the only ones that still in business, recently put out a new line of synths, drum machines, and groove boxes. They’re called Volcas, and they’re cheap, analog, and very cool. [Jason] has a few of these Volcas, and while he enjoys the small form factor, using an off-the-shelf mixer to dump send the audio from these machines to his computer takes up too much space. He created a passive mini mixer to replace his much larger Mackie unit.

The circuit for this tiny passive mixer is an exercise in simplicity, consisting of just a few jacks, pots, and resistors. [Jason] overbuilt this; even though the Volcas only have mono out, he wired the entire mixer up for stereo.

The enclosure – something that looks to be a standard Hammond die cast aluminum enclosure – was drilled out, and a lovely laser cut acrylic laminate placed on top. It looks great, and for anyone interested in learning soldering, you couldn’t come up with a better first project.

Recovering Colo(u)r From PAL Tele-recordings

You will never see every episode of Doctor Who, and that’s not because viewing every single episode would require a few months of constant binging. Many of the tapes containing early episodes were destroyed, and of the episodes that still exist, many only live on in tele-recordings, black and white films of the original color broadcast.

Because of the high-resolution of these tele-recordings, there are remnants of the PAL color-coding signal hidden away. [W.A. Steer] has worked on PAL decoding for several years, and figured if anyone could recover the color from these tele-recordings, he could.

While the sensors in PAL video cameras are RGB, a PAL television signal is encoded as luminance, Y (R+G+B), U (Y-B), and V (Y-R). The Y is just the black and white picture, and U and V encode the amplitude of two subcarrier signals. These signals are 90 degrees out of phase with each other (thus Phase Alternating Line), and displaying them on a black and white screen reveals a fine pattern of ‘chromadots’ that can be used to extract the color.

Micro Python Now Runs On The ESP8266 – Contributors Wanted To Get Wifi Working

[Damien] sent us a quick email to let us know that Micro Python, a lean and fast implementation of the Python scripting language on microcontrollers is now running on the ESP8266. You may remember him from his interview on Hackaday, back when Micro Python was still at the crowdfunding stage. His campaign gathered £97k (for a £15k objective) and its comment section let us know that the backers are very happy with what he delivered.

As the very cheap ESP8266 Wifi module is gathering a lot of attention, he implemented support for it. You may use the dedicated files in the main repository ESP8266 folder  together with esp-open-sdk or simply use the precompiled binary available here. Unfortunately the software doesn’t have WiFi support yet, as it’s only a Python REPL prompt over UART at the moment. Contributors are therefore welcome to help speed up the development!

L3D Cube Takes The Work Out Of Building An LED Cube

Building an LED cube usually means a heck of a lot of delicate soldering work. Bending jigs, assembly jigs, and lots of patience are the name of the game. The problem multiplies if you want to build with RGB LEDs. [Shawn and Alex] are hoping to change all that with their L3D cube. Yes, L3D is a Kickstarter campaign, but it has enough good things about it that we’re comfortable featuring it here on Hackaday. What [Shawn and Alex] have done is substitute WS2812b surface mount LEDs for the 5mm  or 3mm through hole LEDs commonly used in cubes. The downside is that the cube is no longer visible on all sides. The upside is that it becomes a snap to assemble.

The L3D cube is open source hardware. The source files are available from separate software and hardware Github repositories. Not next week, not when they hit their funding goal, but now. We seriously like this, and hope all crowdfunding campaigns go this route.

The L3D cube uses an open source Spark Core as its processor and WiFi interface. Using WS2812b’s means less I/O pins, and no LED driver chips needed. This makes it perfect for a board like Spark or Arduino.  On the software side, the team has created a Processing Library which makes it easy to create animations with no coding necessary.

L3D has all the features one would expect from an LED cube – a microphone for ambient sound visualizations, and lots of built in animations. It seems [Shawn and Alex] have also created some sort of synchronization system while allows multiple cubes to work together when stacked. The team is hoping someone will come up with a 3D printed light diffuser to make these cubes truly a 360 degree experience.

The L3D cube campaign is doing well, [Shawn and Alex] are close to doubling their $38,000 goal. Click past the break to check out their Kickstarter video!

Continue reading “L3D Cube Takes The Work Out Of Building An LED Cube”

The Zork Virtual Machine Implemented In Hardware

ZorkHitchhiker’s Guide to the Galaxy, and all the other Infocom text adventures are much more clever than the appear at first glance. They actually run on a virtual machine, with all the code for the game files squirreled away in the Z-machine format. This is great if you’re writing a game for a dozen platforms; once you have an interpreter running on one system, the entire library of games can be shipped out the door.

While the Z-machine has been ported to all the retrocomputers you can imagine and a few different brands of microcontrollers, no one has yet implemented the Z-machine in hardware. There’s a reason for this: it’s crazy. Nevertheless, [Charlie] managed to implement the Z-machine in an FPGA, using only a few extra commands for driving a display.

zork2
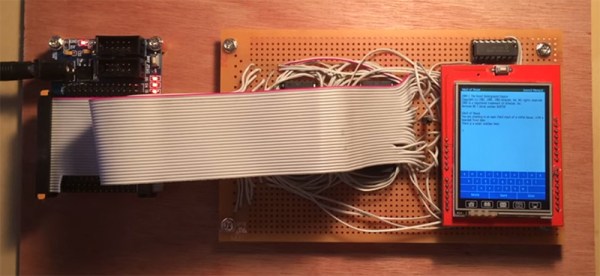
The circuit is constructed with a $10 eBay special FPGA, the Cyclone II EP2C5. Other than that, it’s just some Flash, some RAM, a display, and a whole lot of wire. The standard Z-machine spec is followed, version 3 specifically, meaning this text adventure on a chip can run nearly every Infocom game ever written. The most popular ones, at least.

This isn’t [Charlie]’s first time in the ring with the Infocom Z-machine. He ported the Z-machine to a freakin’ pen a few years ago.

You can check out [Charlie]’s video demo below. Because there was a bit of extra space in the FPGA, [Charlie] managed to put a Mandelbrot implementation and Space Invaders in as an easter egg.

Continue reading “The Zork Virtual Machine Implemented In Hardware”

ArTICam Interfaces Game Boy Camera With TI Calculators

[Christopher Mitchell] has given Texas Instruments calculators the ability to capture images through a Game Boy Camera with ArTICam. First introduced in 1998, The Game Boy Camera was one of the first low-cost digital cameras available to consumers. Since then it has found its way into quite a few projects, including this early Atmel AT90 based hack, and this Morse code transceiver.

TI calculators don’t include a Game Boy cartridge slot, so [Christopher] used an Arduino Uno to interface the two. He built upon the Arduino-TI Calculator Linking (ArTICL) Library  to create ArTICam. Getting the Arduino to talk with the Game Boy Camera’s M64282FP image sensor turned out to be easy, as there already are code examples available. The interface between the camera sensor and the Arduino is simple enough. 6 digital lines for an oddball serial interface, one analog sense line, power and ground. [Christopher] used a shield to solder everything up, but says you can easily get away with wiring directly the Arduino Uno’s I/O pins. The system is compatible with the TI-83 Plus and TI-84 Plus family of calculators. Grabbing an image is as simple as calling  GetCalc(Pic1) from your calculator program.

So, If you have an old calculator lying around, give it a try to enjoy some 128×123-pixel grayscale goodness!

A Staple Gun, Caulking Gun, And Four-Barrel Shotgun

In its native form, [Clint]’s K-441 is a caulking gun, able to apply silicones, resins, and liquid rubber from a reservoir with compressed air. It’s accurate, powerful, has a huge capacity, and looks strangely steampunk, even for caulking gun standards. This isn’t any normal caulking gun; this device was made from a staple gun. Oh, it also fires shotgun shells with the help of four rifled barrels.

This device that shoots lead, steel, and glue started off its life as an ordinary staple gun, with the usual 23lb pull you’ll find on these guns. By adding a few plates, hand-winding a spring, and milling a few parts, [Clint Westwood] turned this staple gun into a device that would shoot a single .410 bore shell. A practice round as far as shotguns go, but still a serious amount of punch.

Continue reading “A Staple Gun, Caulking Gun, And Four-Barrel Shotgun”