The Credit Card Sized GameBoy

Think you’ve seen every possible type of Arduino based hand held video game? [Kevin] managed to coax something new out of the theme with a very clever credit card sized console that uses some very interesting construction techniques.

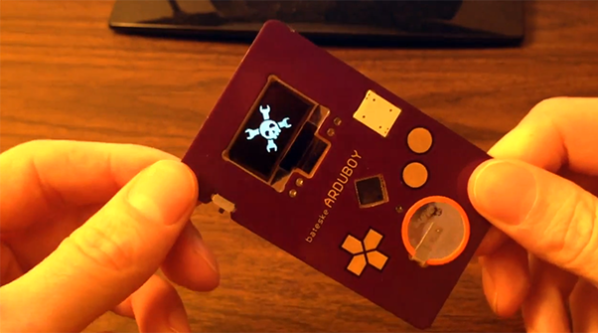
The inspiration for this project began when [Kevin] dropped an SMD resistor into a drill hole on a PCB. This resistor fell right through the hole, giving him the idea creating a PCB with milled cutouts made to fit SMD components. With a little experimentation, [Kevin] found he could fit a TQFP32 ATMega328p  – the same microcontroller in the Arduino – in a custom square cutout. The rest of the components including a CR2016 battery and OLED display use the same trick.

The rest of the design involved taking Adafruit and Sparkfun breakout boards, and modifying the individual circuits until something broke. Then, off to Eagle to create a PCB.

[Kevin]’s experiment in extremely unusual PCB design worked, resulting in a credit-card sized “Game Boy” that’s only 1.6 millimeters thick. The controls are capacitive touch sensors and he already has an easter egg hidden in the code; enter the Konami code and the Hackaday logo pops up to the tune of [Rick Astley]’s magnum opus.

Now [Kevin] is in a bit of a bind. He’d like to take this prototype and turn it into a crowd sourced campaign. In our opinion, this “Game Boy in a wallet” would probably do well on a site like Tindie, but any sort of large scale manufacturing is going to be a rather large pain. If you have any wishes, advice, of complaints for [Kevin] he’s got a few links at the bottom of his project page.

Design Your Own Processor With Verilog

Intel-sandy

Designing a computer from scratch is one of the holy grails of hardware design. For programmable logic, designing your own processor is a huge accomplishment. That’s exactly what [zhemao] has done. He created EZ8, an 8 bit processor is written in Verilog. EZ8 has a 3 stage pipeline, which makes design very interesting. Instruction set pipelines have been used in processors for many years. They speed up operation by allowing the processor to execute more than one instruction in parallel. The idea is similar to washing, drying and folding laundry. Most people pipeline their laundry. One load is in the washer, another in the dryer, and a third is being folded. Pipelines aren’t a free lunch though – there are hazards. If one instruction requires the result of an instruction which is still being executed in parallel, there’s a problem. In our laundry analogy this would be like having one sock on the folding table while its mate is still in the dryer. The folding operation must wait for the drying operation to complete before the socks can be paired. This is exactly how assemblers handle the situation – they insert NOPs between known hazard instructions.

[zhemao] didn’t just give us a processor and no support though. He also included an assembler written in OCaml, and an emulator written in C. Several test assembly programs are also up on [zhemao’s] github repo  to verify operation. [zhemao] has tested his processor with Altera Cyclone 5 series FPGAs, but it should be possible to port it to other FPGA manufacturers. If you want more information, [zhemao] also has a discussion going on in the ECE subreddit.

[Thanks for the tip LongHornEngineer!]

[Image courtesy of intel]

The Catweazle Mini: A Super Small ARM Based Embedded Platform

Catweazle

There has been a recent trend in miniaturizing embedded platforms. [Jan] wrote in to tell us about his very tiny ARM based embedded platform, the Catweazle Mini. Who knew that an ARM based system could be so simple and so small?!?

With the success of the Trinket and Femtoduino (miniature Arduino compatible boards) and many other KickStarter campaigns, it is only natural for there to be a mini platform based on the ARM architecture. Built around the NXP LPC810 ARM Cortex M0+ MCU at 30MHz (which only costs slightly more than $1, by the way), this small embedded platform packs some pretty impressive processing power. The board contains a simple linear regulator, and can be programmed via UART. [Jan’s] development environment of choice is the mbed compiler, which is free and requires no installation. If you need some help getting started Adafruit has a nice guide for the LPC810.

Do you need some more processing power for your next wearable project? Be sure to use the Catweazle Mini.

Smart Thermostats For An Old Club House

20140220_210220

[Michael] is a Scout Leader in the Netherlands, where they have a great clubhouse—a “Landhuis.” The only problem? It’s old, and it’s not an efficient place to heat!

The building currently has two furnaces to cope with its many nooks and crannies, with individual thermostats in each of the five rooms. If a thermostat was activated in one of the rooms, it would control a valve in the furnace responsible for that room. Depending on which valve the furnace is attached to, a furnace would start. As you can imagine, this is an extremely inefficient system if you are heating two different rooms (and using two different furnaces!) It’s all on or off with no in-between.

As true scouts, they try to adhere to the simple principle of “why buy it when you can build it?” Commercial systems are expensive, and besides, they needed a project to work on! They’ve designed a smart(er) system using an Arduino Mega 2560 with five DS18B20 temperature sensors set up in each room, and even threw together a nice enclosure for it! They’ve included the source code on GitHub (in Dutch), so if you’re interested in setting up something similar you can check it out.

[Michael] will be around in the comments section, so if you have any feedback or questions, let him know!

PCB Antenna Reference Designs

Have you ever built a wireless project and weren’t sure how to make one of those awesome (and cheap!) PCB antennas? “What low-cost solutions does our Antenna Board #referencedesign contain?” said Texas Instruments (TI) recently via Twitter.  This older reference design contains some comprehensive designs for sub-1 GHz and 2.4 GHz antennas.

While TI’s documentation can be difficult to navigate, there are many hidden gems, and this is one of them. While TI created these designs for use with their wireless products, they will work on any device which utilizes the same wireless base frequency. For example, you could use any of the 2.4 GHz antennas with any Bluetooth, WiFi (2.4 GHz), or Bluetooth Low Energy chips. Simply open up their Antenna Selection Quick Guide document and navigate to the specific design for whichever antenna you would like to build.

For a more detailed overview of what goes into designing and testing a PCB antenna, check out this hack which we featured back in 2010. With the internet of things coming into its own, wireless projects will become more and more prolific, making PCB antennas more important than ever.

Raspberry Pi GPU Goes Open Source! $10,000 Bounty For Quake 3

raspberrypi_logo

One of the thorns in the side of the Raspberry Pi crowd has been the closed source GPU. Today that all changes. [Eben Upton] reports that Broadcom is opening the source to the VideoCore® IV 3D graphics subsystem. In Broadcom’s own words:

The VideoCore driver stack, which includes a complete standards-compliant compiler for the OpenGL® ES Shading Language, is provided under a 3-clause BSD license; the source release is accompanied by complete register-level documentation for the graphics engine

Full documentation is available on Broadcom’s support site. To celebrate this, The Raspberry Pi Foundation is offering $10,000 to the first person to run Quake III at a playable frame rate on Raspberry Pi with open source drivers. The competition is worldwide. Full rules available here.

This release doesn’t cover everything, as there are still parts of the Pi’s BCM2835 which are hiding behind the blob files. However, it is a very big step for open source. Congrats to the Raspberry Pi Team, and good luck to all the entrants.

Computers Playing Flappy Bird. Skynet Imminent. Humans Flapping Arms.

flappy-double

After viral popularity, developer rage quits, and crazy eBay auctions, the world at large is just about done with Flappy Bird. Here at Hackaday, we can’t let it go without showcasing two more hacks. The first is the one that we’ve all been waiting for: a robot that will play the damn game for us. Your eyes don’t deceive you in that title image. The Flappy Bird bot is up to 147 points and going strong. [Shi Xuekun] and [Liu Yang], two hackers from China, have taken full responsibility for this hack. They used OpenCV with a webcam on Ubuntu to determine the position of both the bird and the pipes. Once positions are known, the computer calculates the next move. When it’s time to flap, a signal is sent to an Arduino Mega 2560. The genius of this hack is the actuator. Most servos or motors would have been too slow for this application. [Shi] and [Liu] used the Arduino and a motor driver to activate a hard drive voice coil. The voice coil was fast enough to touch the screen at exactly the right time, but not so powerful as to smash their tablet.

If you would like to make flapping a bit more of a physical affair, [Jérémie] created Flappy Bird with Kinect. He wrote a quick Processing sketch which uses the Microsoft Kinect to look for humans flapping their arms. If flapping is detected, a command is sent to an Android tablet. [Jérémie] initially wanted to use Android Debug Bridge (ADB) to send the touch commands, but found it was too laggy for this sort of hardcore gaming. The workaround is to use a serial connected Arduino as a mouse. The Processing sketch sends a ‘#’ to the Arduino via serial. The Arduino then sends a mouse click to the computer, which is running  hidclient.  Hidclient finally sends Bluetooth mouse clicks to the tablet. Admittedly, this is a bit of a Rube Goldberg approach, but it does add an Arduino to a Flappy Bird hack, which we think is a perfect pairing.

Continue reading “Computers Playing Flappy Bird. Skynet Imminent. Humans Flapping Arms.”