AVR Programmer

Inexpensive AVR Programmer Made From Five Components

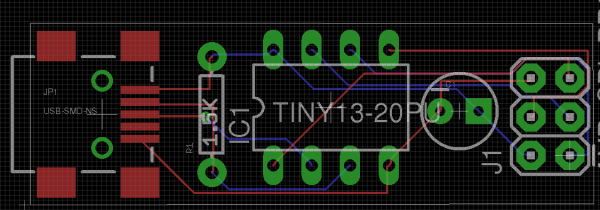
If you want to program an AVR chip as inexpensively as possible, then [Ian’s] solution might just be for you. He built an AVR programmer using only four components. This design is based on the vusbtiny AVR programmer design, with a few components left out.

[Ian’s] design leaves out two of the resistors and two diodes, leaving just four components. These include a 1.5k resistor, a small capacitor, a USB connector, a six pin header, and an ATtiny45. He admits that this may not be exactly up to USB spec, but it does work.

This is one of those projects that is really an exercise in “will it work?” more than anything else. The fact that you need to first program an AVR chip means that this wouldn’t be useful in a pinch, because you would already have to have a working programmer. Nonetheless, it’s always fun to see what can be done with as little as possible.

An ESP8266 Based Smartmeter

During these last weeks we’ve been talking a lot about the ESP8266, a $4 microcontroller based Wifi module. As the SDK was recently released by Espressif a lot of cheap Internet of Things applications were made possible.

[Thomas] used one module to make a simple smartmeter measuring the active time of his heater together with the outside temperature. He added 2 AT commands starting/stopping the logging process and used one GPIO pin to monitor the heater’s oil pump state. The measurements are then periodically pushed via a TCP connection to his data collecting server, which allows him to generate nice graphs.

In the video embedded below you’ll see [Thomas] demoing his system. On his hackaday.io project page he put up a very detailed explanation on how to replicate his awesome project. All the resources he used and create can also be downloaded on the project’s GitHub page.

Continue reading “An ESP8266 Based Smartmeter”

Turning The Raspberry Into A CAD Workstation

Inventables has been working hard on a successor to the extremely popular Shapeoko CNC milling machine, and to bring digital fabrication to the masses, they’ve created Easel, possibly the easiest 3D design software you’ll ever use. [Sacha] was trying out the beta version of Easel and mentioned to the dev mailing list he was running his installation on a Raspberry Pi. One of the developers chimed in, and after a bit of back and forth we now have a workflow to use Easel with the Raspberry Pi.

Easel is a web app, but since the graphics, design, and g-code generation are handled locally, even the most rudimentary CAD suite would choke the decidedly low power Raspi. Instead, [Sacha] is using the Raspberry to grab 2D and 3D files, turn that into g-code for a machine, and send it off to a Shapeoko router.

Easel doesn’t yet have local sender support that works on Linux, so a separate piece of software is used to shoot the g-code over a serial port to the machine. That’s something that will probably be added in a later version of Easel, making a Raspberry Pi a great way to control router or milling machine.

A Remote Control, Swing Wing F-14

Anyone can build a remote control airplane with a sheet of foam, some glue, and a handful of servos. Building an F-14, complete with the swing wing mechanism? [Thomas] found built one that’ll take you right into the danger zone.

This was [Thomas]’ first go at scratch building a RC airplane, and wanted a lot of electronics inside. His choice of airframe was the venerable F-14 Tomcat, complete with wings that swing out for landing and swing in for high-speed flight. This isn’t just taking off-the-shelf receivers and putting them in a fancy airframe, either: [Thomas\ is reading the PWM signals from the receiver with a small electronics board, mixing the elevons with his own code, and implementing an auto stabilization system with an accelerometer.

Most of the work on the airframe was done by [Maybz] over on the RCGroups forums. That’s an impressive thread spanning seven years of posts. [Thomas] doesn’t see his F-14 as an end goal, though: he’s using this as a stepping stone to learn about building unstable planes for a more complex UAV.

Videos below, with a warning to headphone users.

Continue reading “A Remote Control, Swing Wing F-14”

Delicious Dash Pi Driving Data

A few weeks ago, [sentdex] described how Python has changed his life. In particular, it has allowed him to mine Bitcoin automatically, teach other people programming, and realize a full in-car computer for less than $100 using a Raspberry Pi.

It’s based on a model B, which he’s enclosed in a beefy Pi camera case  that sits on the dash of his Honda S2000. The screen is a $17 internet special with composite in, which keeps the BOM way down. A 3A switch wired into the ignition ensures that power to the Pi is not rudely interrupted.

A script takes the Pi directly into desktop mode when [sentdex] starts the car. His main goals for the project were setting up a dash cam and communicating with the OBD computer. The Pi pulls various data points including the throttle position, and the user moves through the list with the arrow keys of one of those roll-up keyboards.

In the future, he’d like to upgrade it to live graph the throttle position and add a sensor to show the brake position. Be sure to check out the walk-through/demonstration video after the break.

Continue reading “Delicious Dash Pi Driving Data”

Making A Speaker With Resin, Magnets, And Wire

A speaker is just about the simplest electronic component possible, just barely more complex than resistors and wire. They’re also highly variable in their properties, either in size, shape, frequency response, and impedance. Obviously, building custom speakers would be of interest to a lot of people, but there aren’t many people out there doing it. [Madaeon] is one of those people. He created a speaker from scratch, using nothing but magnets, wire, and a bit of UV curing resin.

The frame of the speaker contains a magnet, and the coil of wire is carefully attached to the 0.1mm thin speaker cone with a bit of UV curing resin. All the parts are available on Thingiverse, but you will need a UV resin printer with a low layer height to print this thing out.

The speaker was built by [madaeon] as a demonstration of what the printer he built can do. It’s a fairly standard resin-based 3D printer built around a DLP projector. It’s also cheap, and unlike some other cheap resin-based 3D printers, there’s a reasonable likelihood his will ship within the next few months.

Which Way Are We Going? Concepts Behind Rotary Encoders

[Pete] needed a rotary encoder for one of his project so he set out to build his own. As the name implies, a rotary encoder measures rotation by encoding “steps” into electrical signals which can be measured by a microcontroller (or used in numerous other ways). Knowing the degrees of movement for each step will allow you to calculate precise distance traveled in applications like robot wheels. Or you can simply use the rotating shaft as an input device which navigates menus or settings.

This concept is a good one to understand. We had originally planned to build rotary encoders for the multi-person Duck Hunt at Hackaday’s 10th Anniversary but the build-off crew had difficulty getting the system to work. In [Pete’s] case he’s using photointerrupters (apparently the IR beam is easily detected through the white paper but usually these parts would be cut out of the disk). We were using reflectance sensors. Either way there’s a trick to detecting which direction a rotary encoder is turning. We’ll explain that for you after the break.

Continue reading “Which Way Are We Going? Concepts Behind Rotary Encoders”