Thinkpad 701c: Reverse Engineering A Retro Processor Upgrade

[Noq2] has given his butterfly new wings with a CPU upgrade. Few laptops are as iconic as the IBM Thinkpad 701 series and its “butterfly” TrackWrite keyboard. So iconic in fact, that a 701c is part of the permanent collection of the Museum of Modern Art in New York.

Being a 1995 vintage laptop, [Noq2’s] 701c understandably was no speed demon by today’s standards. The fastest factory configuration was an Intel 486-DX4 running at 75 MHz. However, there have long been rumors and online auctions referring to a custom model modified to run an AMD AM-5×86 at 133 MHz. The mods were performed by shops like Hantz + Partner in Germany. With this in mind, [Noq2] set about reverse engineering the modification, and equipping his 701c with a new processor.

thinkpad-brainsurgery
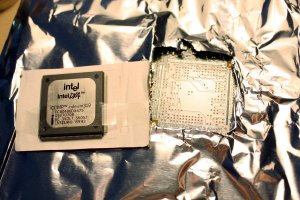
The first step was determining which AMD processor variant to use. It turns out that only a few models of AMD’s chips were pin compatible with the 208 pin Small Quad Flat Pack (SQFP) footprint on the 701c’s motherboard. [Noq2] was able to get one from an old Evergreen 486 upgrade module on everyone’s favorite auction site. He carefully de-soldered the AM-5×86 from the module, and the Intel DX4 from the 701c. A bit of soldering later, and the brain transplant was complete.

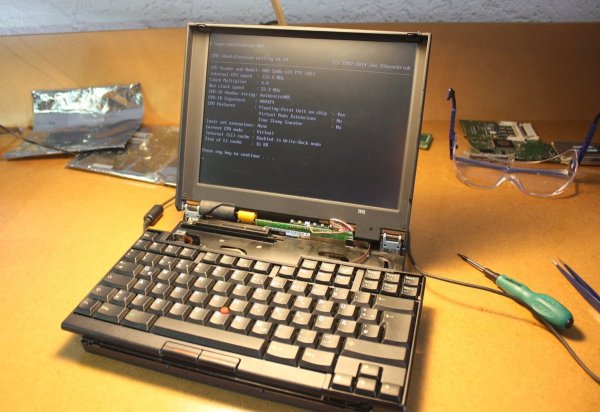
Some detailed datasheet research helped [noq2] find the how to increase the bus clock on his 5×86 chip, and enable the write-back cache. All he had to do was move a couple of passive components and short a couple pins on the processor.

The final result is a tricked out IBM 701c Thinkpad running an AMD 5×86 at 133 MHz. Still way too slow for today’s software – but absolutely the coolest retro mod we’ve seen in a long time.

What Is This, A Microcontroller Board For Ants?

You youngins probably don’t remember this, but a few years ago there was an arms race on Kickstarter to create the smallest Arduino-compatible microcontroller board. Since then, a few people have realized they can make more money on Kickstarter through fraud or potato salad, and the race to create the smallest ‘duino board petered out.

It’s a shame [Meizhu] wasn’t part of the great miniature Arduinofication of Kickstarter, because this project would have won. It’s an Atmel ATtiny85, with USB port, resistors, diodes, reset button, LED, and pin headers, that is just 72 mils larger than the PDIP package of the ‘tiny85. Outside of getting a bare die of ‘tiny85s, there isn’t much of a chance of this board becoming any smaller.

[Meizhu] was inspired to create this board from [Tim]’s Nanite 85, which up until a few days ago was the current champion of micro microcontroller boards. With a bit of work in KiCAD, the new board layout was created that is just a hair larger than the 0.4″ x 0.4″ footprint of the PDIP ATtiny85. There were a few challenges in getting a working board this small; you’d be surprised how large the plastic bits around pin headers are, but with some very crafty soldering, [Meizhu] was able to get it to work.

Android Flip Dot Display

Controlling A Flip-Disc Display Using Android

There’s just something about electro-mechanical displays that enthralls most people when they see them; and while you’ll be hard pressed to find a split-flap display for cheap, you can still easily buy flip-disc displays! That’s what [Scott] did, and he’s been having a blast messing around with his and building a system to control it via his Android phone.

He picked up the display from a company called Alfa-Zeta in Poland, a company that’s been making electromagnetic displays since 1988. No mention of price, but it looks like some pretty awesome hardware. The beauty with electromagnetic displays is they don’t consume any electricity in idle state, making them far more efficient than almost any other display technology – not to mention perfect contrast in any lighting conditions!

They work by using permanent magnets, electromagnets, and a material that can retain magnetization. A short pulse to the electromagnet causes the disc to flip into the second position, which will then hold in place due to the permanent magnet — no more electromagnet needed.

The display comes with all the necessary hardware to drive the electromagnets and interface with a microcontroller. But, it uses the RS-485 standard, which isn’t natively supported by most other microcontrollers. [Scott’s] using an Arduino which does have an RS-485 shield, but he decided he wanted to challenge himself and build a circuit to drive them himself!

All the info is on his blog if you’re looking to try something similar. Once he had it interfaced with the Arduino it was just a simple matter of writing an Android app to transmit controls over Bluetooth for the display. Take a look:

Continue reading “Controlling A Flip-Disc Display Using Android”

Solid State Tesla Coil Plays Music

If you’ve ever wanted to build a Tesla coil but found them to be prohibitively expensive and/or complicated, look no further! [Richard] has built a solid-state Tesla coil that has a minimum of parts and is relatively easy to build as well.

This Tesla coil is built around an air-core transformer that steps a low DC voltage up to a very high AC voltage. The core can be hand-wound or purchased as a unit. The drive circuit is where this Tesla coil built is set apart from the others. A Tesla coil generally makes use of a spark gap, but [Richard] is using the Power Pulse Modulator PWM-OCXi v2 which does the switching with transistors instead. The Tesla coil will function with one drive circuit but [Richard] notes that it is more stable with two.

The build doesn’t stop with the solid-state circuitry, though. [Richard] used an Arduino with software normally used to drive a speaker to get his Tesla coil to play music. Be sure to check out the video after the break. If you’re looking for a Tesla coil that is more Halloween-appropriate, you can take a look at this Tesla coil that shocks pumpkins!

Continue reading “Solid State Tesla Coil Plays Music”

Your New Winter Hat Should Express Your Brain Waves Like A Neon Sign… Just Saying

We’ve seen a few cool hacks for mainstream commercial EEG headsets, but these are all a tad spendy for leisurely play or experimentation. The illumino project by [io] however, has a relatively short and affordable list of materials for creating your own EEG sensor. It’s even built into a beanie that maps your mental status to a colorful LED pompom! Now that winter is around the corner, this project is perfect for those of us who want to try on the mad scientist’s hat and look awesome while we’re wearing it.

How does all the neuro-magic happen? At the heart of [io’s] EEG project is a retired Thinkgear ASIC PC board by Neurosky. It comes loaded with fancy algorithms which amplify and process the different types of noise coming from the surface of our brain. A few small electrodes made from sheets of copper and placed in contact with the forehead are responsible for picking up this noise. The bridge between the electrodes and the Thinkgear is an arduino running the illumino project code. For [io’s] tutorial, a Tinylilly Arduino is used to mesh with the wearable medium, since all of these parts are concealed in the folded brim of the beanie.

eegBeanie3

In addition, a neat processing sketch is included which illustrates the alpha, beta, gamma, and other wave types associated with brain activity as a morphing ball of changing size and color. This offers a nice visual sense of what the Neurosky is actually reading.

If all of your hats lack pompoms and you can’t find one out in the ether that comes equipped, fear not… there is even a side tutorial on how to make a proper puff-ball from yarn. Sporting glowing headwear might be a little ostentatious for some of us, but the circuit in this project by itself is a neat point of departure for those who want to poke around at the EEG technology. Details and code can be found on the illumino Instructable.

Thanks Zack, for showing us this neat tutorial!

Continue reading “Your New Winter Hat Should Express Your Brain Waves Like A Neon Sign… Just Saying”

The Internet Of Things Chip Gets A New Spectrum

Last year we learned about Weightless, an Internet of Things chip that solves all the problems of current wireless solutions. It’s low power and has a 10-year battery life (one AA cell), the hardware should cost around $2 per module, and the range of the Weightless devices range from 5+km in urban environments to 20-30km in rural environments. There haven’t been many public announcements from the Weightless SIG since the specification was announced, but today they’re announcing Weightless will include an additional spectrum, the 868/915 MHz ISM spectrum.

weightless

The original plan for Weightless was to use the spectrum left behind by UHF TV – between 470 and 790MHz. Regulatory agencies haven’t been moving as fast as members of the Weightless SIG would have hoped, so now they’re working on a slightly different design that uses the already-allocated ISM bands. They’re not giving up on the TV whitespace spectrum; that’s still part of the plan to put radio modules in everything. The new Weightless-N will be available sooner, though, with the first publicly available base station, module, and SDK arriving sometime next spring.

Weightless has put up a video describing their new Weightless-N hardware; you can check that out below. If you want the TL;DR of how Weightless can claim such a long battery life and huge range from an Internet of Things radio module, here’s an overly simplified explanation: power, range, and bandwidth. Pick any two.

Continue reading “The Internet Of Things Chip Gets A New Spectrum”

Hackaday Munich Speaker: Sprite_TM

Plans for Hackaday Munich are coming along quite nicely. Today we’re happy to announce that [Sprite_TM] will be speaking at the event. Click that link above and make sure you get your tickets for November 13th. You can do some hands-on hacking at the Embedded Hardware Workshop, hear the talks, find out which of the five finalists will be the grand prize winner, and enjoy The Hackaday Prize Party along with the Hackaday crew.

You may also know [Sprite_TM] as [Jeroen Domburg], one of the judges for The Hackaday Prize. That’s him on the left in the image above (we love a good avatar!). If you follow Hackaday, you should already be thrilled about meeting him and hearing his talk. The last talk we remember reading about was an epic hard drive controller hack. Just last month we saw a well-executed clock radio overhaul from him. While we’re on the topic, his micro-bots were a spectacular project.

[Sprite_TM] has also offered to help out with the reverse engineering workshop. We’re hard at work making sure everything is in place for those afternoon hacking events. As we solidify details we’ll be adding workshop pages (and emailing those already registered for Hackaday Munich) to let everyone know what to expect. We can report that we have shipped [Sprite_TM] a Bus Pirate so that he can be familiar with it. This will be the primary tool provided for this particular workshop.

The entire Hackaday crew is looking forward to it. See you there!