minimalist desk

Sliding Minimalist Computer Desk Starts Life As Ikea Shelf

Where are you right now? You’re probably sitting at a desk staring at a computer screen. Us tinkerers/makers/hackers/diyers use computers all the time… they are a great tool and an easy way to spread and gather information. Since we spend so much time sitting at a computer, why shouldn’t the computer’s desk be made to enhance the experience?

Self-proclaimed web guru [Ellis] admits to being a minimalist and wanted a super sleek computer desk. He couldn’t find a commercially available model that he liked so he built his own.

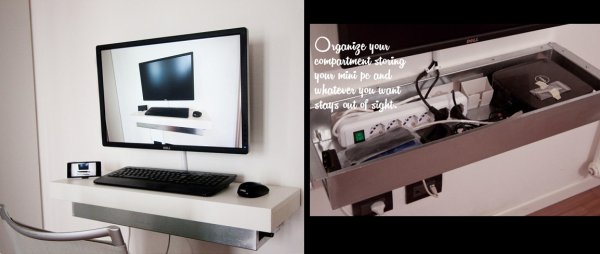
The desk started as an Ikea floating shelf. The shelf comes with a metal bracket that secures to a wall, then the shelf completely slides over the bracket so that the shelf looks as if it is floating in air. Once the u-shaped bracket was installed to the wall, a custom compartment was made to fit in between the bracket’s arms. This compartment will hold a power strip, mini Dell computer and other accessories. On the outside of each bracket arm, [Ellis] mounted drawer slides. The stock shelf was then modified to mount to the newly added drawer slides allowing it to be pulled forward for typing or to expose the hidden compartment. When closed, the shelf-desk looks clean and blends into the wall color.

A wide screen monitor is mounted directly on the wall just above the desk and a wireless keyboard/mouse combo supports the clean look. [Ellis] now has the minimalist computer desk he’s always wanted that doesn’t distract him from his work (or ‘net browsing).

A protoboard layout for an ATtiny85 door chime

AES-CMAC On An ATtiny85

[Blancmange] built a custom door chime using an ATtiny85. Unlike most commercial products out there, this one actually tries to be secure, using AES-CMAC for message signing.

The hardware is pretty simple, and a protoboard layout is shown in the image above. It uses the ATtiny85 for control, with an LM380N audio amplifier, and a low cost 315 MHz receiver.

The more impressive part of the build is the firmware. Using AVR assembly, [Blancmange] managed to fit everything into the 8 Kbytes of flash on the ATtiny85. This includes an implementation of AES-CMAC, an AES cypher based message authentication code. The transmitting device signs the request with a key shared between both devices, and the receiver verifies that the message is from a trusted transmitter.

Fortunately, the assembly code is very well commented. If you’ve ever wanted to take a look into some complex ASM assembly, this is a great project to check out. The source code has been released into the public domain, so the rest of us can implement crypto on this cheap microcontroller with much less effort.

DIY Freeboard

Serious Skateboard Build Lets You Snowboard Down The Street

For some of you HaD readers it’s winter and heading up to a mountain to go snowboarding is quite convenient. Unfortunately, for the boarder-holics, the off-season comes too quickly and lasts far to long. [jfaneumann] is a snowboarder and wanted to get that same carvey feeling during the summer months so he made a DIY skateboard that rides like a snowboard.

[jfaneumann] didn’t come up with the design, it’s modeled after a commercially available product called the Freebord which is basically an oversize skate deck with extra-wide trucks and integrated pivoting wheels (think casters) in the center of the deck. The pivoting wheels stand a little bit proud of the other 4 wheels which makes the board only ride on the pivoting wheels and two of the remaining wheels at a time. This setup allows the rider to carve, slide and spin down the street like a snowboarder would. This looks like fun to ride but at a cost of about $250 for a Freebord, it’s not cheap.

The project started with a home-made deck simply cut from plywood. To get that extra wide stance standard skateboard trucks were modified. Long coupling nuts were screwed onto the truck axles and epoxied into place. On a normal skateboard the wheel rides on an axle that is part of the truck. Since the axles were covered up by the coupling nuts, bolts were used to secure the wheels to the now much wider trucks.

The pivoting wheels for the Freebord look like standard casters so that’s what [jfaneumann] used for his board. He did remove the rubber wheels and replace them with inline skate wheels with real bearings. Wood shims space the casters away from the deck to put them at the right height compared to the other 4 skate wheels.

In the end, [jfaneumann] got the summer riding experience he desired without spending a boatload of cash.

Fixing Sega Cartridges With Old BIOS Chips

For one reason or another, [Dragao] has an old Sonic The Hedgehog cartridge that throws an illegal instruction somewhere in the Marble Zone stage. While the cause of this illegal instruction is probably cosmic rays, how to repair this cartridge isn’t quite as clear. It can be done, though, using BIOS chips from an old computer.

[Dragao] got the idea of repairing this cartridge from Game Boy flash carts. These cartridges use chips that are a simple parallel interface to the address and data lines of the Game Boy’s CPU, and Sega Genesis / Mega Drive flash cart would work the same way. The problem was finding old DIP flash chips that would work. He eventually found some 8-bit wide chips on the motherboard of an old computer, and by stacking the chips, he had a 16-bit wide Flash chip.

To program the chips, [Dragao] wired everything up to an Arduino Mega, put a ROM on the chip, and wired it up to the old Sega cartridge. Surprisingly or unsurprisingly, everything worked, and now [Dragao] has a fully functioning copy of Sonic The Hedgehog.

Turning A Cadenza Into A Finishing Move

What do you get when you mix dueling pianos with a 2D fighting game? Undoubtably some complex controls, but also an awesome platform for showmanship! The “Sound Fighter” installation by artists [Cyril] and [Eric] was built with the exact intention that two opposing parties could duke it out in a Street Fighter match with their piano playing abilities mapping into attack combos and dragon-punches.

In order to turn a piano into a glorified arcade stick, [Cyril] and [Eric] would need a way to register when and what notes were being played and then translate that data into commands for the fighting game itself. To start, they did their homework on the inner workings of different piano types. Whatever digital augmentation they were to design would have to work without inhibiting the piano’s function.

There were many possible methods of registering when the piano was being used and though several would have worked for their intended purpose, it took writing down and discussing the pros and cons of each sensor before they made a decision. Some of the options they considered included pressure sensors for the keys themselves, accelerometers to detect the movement of the individual hammers within the piano, and even a microphone to computationally analyze the sound heard from either instrument. In the end they chose to implement small and accurate piezo knock sensors tethered to the internal mechanism of each key. These could register both faint and strong notes when played without altering the natural sound of the instrument.

fighterPiano_2

After deciding on a Street Fighter iteration for the PS2 to develop the rest of the project around, they had to play the actual game a bit to get a feel for the command list of moves. They wanted to conceive of a way to map the notes played to the controller, but not in the direct “key to button” sort of way. The idea was that if someone was good at playing piano, they would also be good at executing moves in game. So they had to sort out how groups of notes and chords would translate into moving the character or attacking.

I highly suggest checking out their in depth play-by-play as they built the installation from the ground up. In addition to being fascinating (they prepared this project in a fight against time for the reopening of a historical site in Paris), you’ll find that everything they developed is opened source. The completed installation is as awesome as it sounds. You can see it in action in an actual duel below:

Continue reading “Turning A Cadenza Into A Finishing Move”

A Wearable Space Station Notifier

If you don’t live in northern Europe, Alaska, or the extreme southern part of South America, there’s a 400-ton, $150 Billion space station flying over your head several times a day. It’s the International Space Station, and it’s the most complex and expensive construction project of all time. Look up at the right time, and you can see a point of light rising in the sky, brighter than any star, darting across to the opposite horizon.

ISS-Above is a simple tool that will tell you when you’ll be able to see the ISS passing overhead next, and the creator of the project, [Liam Kennedy] has a new crowdfunding project to turn this space station notifier into a wearable. It’s called the Pulsar, and with the help of an RFduino and a real time clock, it will alert you to an upcoming station pass with a bit of wearable electronics.

ISS
Viewing the ISS at the most recent Hackaday Pasadena Meetup.

The ISS-Above is a great device to keep tabs on the six astronauts currently orbiting our globe, but if you want to see the space station rise over the horizon… well, lugging a Raspi and an HDMI monitor outside isn’t the best solution. The Pulsar is a tiny wearable board with a ring of LEDs programmed with 50 future passes of the space station. When the station is overhead, the LEDs light up, and a bright object appears over the western horizon.

[Liam] brought his Pulsar to the most recent Hackaday Pasadena meetup, and as his wearable LEDs lit up, the ISS appeared right on cue. The evening was only tainted by a crazy lady who decided to argue the existence of the International Space Station.

Video below.

Continue reading “A Wearable Space Station Notifier”

Fake Certificate

Lenovo Shipped PC’s With Spyware That Breaks HTTPS

If you’ve ever purchased a new computer then you are probably familiar with the barrage of bloatware that comes pre-installed. Usually there are system tools, antivirus software trials, and a whole bunch of other things that most of us never wanted in the first place. Well now we can add Superfish spyware to the list.

You may wonder what makes this case so special. A lot of PC’s come with software pre-installed that collect usage statistics for the manufacturer. Superfish is a somewhat extreme case of this. The software actually installs a self-signed root HTTPS certificate. Then, the software uses its own certificates for every single HTTPS session the user opens. If you visit your online banking portal for example, you won’t actually get the certificate from your bank. Instead, you’ll receive a certificate signed by Superfish. Your PC will trust it, because it already has the root certificate installed. This is essentially a man in the middle attack performed by software installed by Lenovo. Superfish uses this ability to do things to your encrypted connection including collecting data, and injecting ads.

As if that wasn’t bad enough, their certificate is actually using a deprecated SHA-1 certificate that uses 1024-bit RSA encryption. This level of encryption is weak and susceptible to attack. In fact, it was reported that [Rob Graham], CEO of Errata Security has already cracked the certificate and revealed the private key. With the private key known to the public, an attacker can easily spoof any HTTPS certificate and systems that are infected with Superfish will just trust it. The user will have no idea that they are visiting a fake phishing website.

Since this discovery was made, Lenovo has released a statement saying that Superfish was installed on some systems that shipped between September and December of 2014. They claim that server-side interactions have been disabled since January, which disables Superfish. They have no plans to pre-load Superfish on any new systems.