Hack Simple

Here at Hackaday, we definitely love to celebrate the hard hacks: the insane feats of reverse engineering, the physics-defying flights of fancy, or the abuse of cutting edge technology. But today I’d like to raise a rhetorical glass in tribute of the simple hacks. Because, to be perfectly honest, the vast majority of my hacks are simple hacks, and it’s probably the same for you too. And these often go unsung because, well, they’re simple. But that doesn’t mean that something simple can’t be helpful.

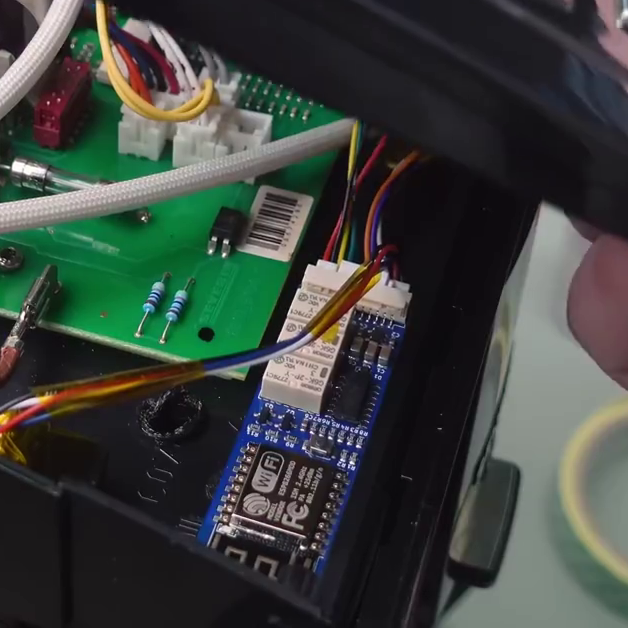
Case in point: an ESP8266 press-buttons device that we featured this week. It doesn’t do much. It’s main feature is that it connects to a home automation network over WiFi and enables you to flip three relays. Wires coming off the board are to be soldered to the not-yet-smart device in question, simply connected to each side of the button you’d like to press. In the example, a coffee machine was turned on and the “go” button pressed, automating one of the most essential kitchen rituals. While recording the podcast, I realized that I’ve built essentially this device and have it controlling our house’s heating furnace.

For the experienced hacker, there’s not much here. It’s a simple board design, the software heavily leverages ESPHome, so there’s not much work on that front either. But imagine that you lacked any of the wide-ranging skills that it takes to make such a device: PCB layout, ESP8266 software wrangling, or the nuances of designing with relays. You could just as easily build this device wrong as right. The startup costs are non-trivial.

Making a simple design like this available to the public isn’t a technical flex, and it’s not contributing to the cutting edge. But it just might be giving someone their first taste of DIY home automation, and a sweet taste of success. There’s not much easier than finding a switch and soldering on two wires, but if that’s the spark that pushes them on their path to greater hacks, that’s awesome. And even if it doesn’t, at least it’s another appliance under user control, connected to a private WiFi network rather than spying you out and phoning home to Big Toaster.

So here’s to the simple hacks!

Robotic Platform Is Open Sourced And User Friendly

Having a 3D printer or a CNC machine available for projects is almost like magic. Designing parts in software and having them appear on the workbench is definitely a luxury. But for a lot of us, these tools aren’t easily available and projects that use them can be out-of-reach. That’s why one of the major design goals of this robotics platform was to use as many off-the-shelf components as possible.

The robot is called the OpenScout and, as its name implies, intends to be a fully open-source robotics platform for a wide range of use cases. It uses readily-available aluminum extrusion as a frame, which bolts together without any other specialized tools like welders. The body of the robot is articulating, helping it navigate uneven terrain outdoors. The specifications also call for using an Arduino to drive the robot, although there is plenty of space in the robot body to house any robotics platform you happen to have on hand.

For anyone looking to get right into the useful work of what robots can do, rather than spending time building up a platform from scratch, this is an excellent project. It’s straightforward and easy to build without many specialized tools. The unique articulating body design should make it effective in plenty of environments. If you do have a 3D printer, though, that opens up a lot of options for robotics platforms.

DIY Metal Detector Gives You The Mettle To Find Some Medals

Hurricane season is rapidly approaching those of us who live in the northern hemisphere. While that does come with a good deal of stress for any homeowners who live in the potential paths of storms it also comes with some opportunities for treasure hunting. Storms tend to wash up all kinds of things from the sea, and if you are equipped with this DIY metal detector you could be unearthing all kinds of interesting tchotchkes from the depths this year.

The metal detector comes to us from [mircemk] who is known for building simple yet effective metal detectors. Unlike his previous builds, this one uses only a single integrated circuit, the TL804 operational amplifier. It also works on the principle of beat-balance which is an amalgamation of two unique methods of detecting metal.  When the wire coils detect a piece of metal in the ground, the information is fed to an earpiece through an audio jack which rounds out this straightforward build.

[mircemk] reports that this metal detector can detect small objects like coins up to 15 cm deep, and larger metal objects up to 50 cm. Of course, to build this you will also need the support components, wire, and time to tune the circuit. All things considered, though it’s a great entryway into the hobby.

Want to learn more about metal detecting? Check out this similar-looking build which works on the induction balance principle.

Continue reading “DIY Metal Detector Gives You The Mettle To Find Some Medals”

Rural Hacker De-Crufts And Rebuilds Hydroelectric Generator

YouTuber [Linguoer] has a knack, and it’s one that we don’t often see on the pages of Hackaday: rewinding and rebuilding dilapidated motors and generators. In the video below, you’ll see [Lin] take a hydroelectric turbine and generator that looks like it’s been sitting at the bottom of a lake, and turn it into a working unit, all while wearing her trademark blue and yellow denim jumpsuit.

Where as most makers would have used a MIG or TIG welder, [Linguoer] uses a simple (probably A/C) stick welder. Generator windings are calculated and wound by hand, and the carcass of what used to be the generator is sandblasted out in the open. Missing parts are fabricated from scratch using nothing more than an angle grinder. “Simple” is the order of the day.

[Linguoer] often refers to herself as “Village Girl”. Whatever specialty tools she uses, they are elementary. And whatever methods she uses, they are manual. You will get the idea very quickly that [Linguoer] isn’t just a person with a skill, but a person with a passion for getting things done no matter the circumstances. [Linguoer] is a hacker if there ever was one!

If hydroelectric hacks spin your pelton wheel, give this Impressive Off-Grid Hydroelectric Plant a whirl.

Continue reading “Rural Hacker De-Crufts And Rebuilds Hydroelectric Generator”

Charger Caddy Shows What 3D Printers Were Meant For

As computers became more popular in the late 80s and into the 90s, they vastly changed their environments. Of course the technological changes were obvious, but plenty of other things changed to accommodate this new technology as well. For example, furniture started to include design elements to accommodate the desktop computer, with pass-through ports in the back of the desks to facilitate cable management. While these are less common features now there are plenty of desks still have them, this 3D printed design modernizes them in a simple yet revolutionary way.

While these ports may have originally hosted thick VGA cables, parallel printer cables (if they would fit), and other now-obsolete wiring, modern technology uses simpler, smaller solutions. This doesn’t mean that they aren’t any less in need of management, though. This print was designed to hold these smaller wires such as laptop chargers, phone chargers, and other USB cables inside the port. A cap on the top of the print keeps everything hidden until it is lifted by hand, where a cable can be selected and pulled up to the top of the desk.

While it might seem like a simple project at first, the elegance of this solution demonstrates excellent use of design principles and a knack for integrating slightly older design decisions with modern technology. If you have a 3D printer and a cable management port on your desk, the print is available on Thingiverse. Not every project needs a complicated solution to solve a problem, like this automatic solar tracker we recently saw which uses no complicated electronics or algorithms to reliably point itself at the sun.

Little Flash Charges In 40 Seconds Thanks To Super Capacitors

We’ve all committed the sin of making a little arduino robot and running it off AA batteries. Little Flash is better than that and runs off three 350 F capacitors.

In fact, that’s the entire mission of the robot. [Mike Rigsby] wants people to know there’s a better way. What’s really cool is that 10 A for 40 seconds lets the robot run for over 25 minutes!

The robot itself is really simple. The case is 3D printed with an eye towards simplicity. The brains are an Arduino nano and the primary input is a bump sensor. The robot runs around randomly, but avoids getting stuck with the classic reverse-and-turn on collision.

It’s cool to see how far these capacitors have come. We remember people wondering about these high priced specialty parts when they first dropped on the hobby scene, but they’re becoming more and more prevalent compared to other solutions such as coin-cells and solder tab lithium batteries for PCB power solutions.

You Didn’t See Graphite Around This Geiger Counter

Even if you don’t work in a nuclear power plant, you might still want to use a Geiger counter simply out of curiosity. It turns out that there are a lot of things around which emit ionizing radiation naturally, for example granite, the sun, or bananas. If you’ve ever wondered about any of these objects, or just the space you live in, it turns out that putting together a simple Geiger counter is pretty straightforward as [Alex] shows us.

The core of the Geiger counter is the tube that detects the radiation. That’s not something you’ll be able to make on your own (probably) but once you have it the rest of the build comes together quickly. A few circuit boards to provide the tube with the high voltage it needs, a power source, and a 3D printed case make this Geiger counter look like it was ordered from a Fluke catalog.

The project isn’t quite finished ([Alex] is still waiting on a BNC connector to arrive) but seems to work great and isn’t too complicated to put together, as far as Geiger counters go. He did use a lathe for some parts which not everyone will have on hand, but a quick trip to a makerspace or machinist will get you that part too. We’ve seen some other parts bin Geiger counters too, so there’s always a way around things like this.