Training Fish To Feed Themselves

We’ve featured quite a few aquarium and fish feeder hacks on our blog. [RoboPandaPDX] thought of taking it up a notch and make an interactive fish feeder. He built a Fish feeder that train’s them to feed themselves.

A copper bar hangs from the middle of a metal cylinder – much like a bell. The end of the bar has a fish lure. When a fish pushes the lure, the copper bar touches the metal cylinder and  closes the circuit. This signal goes to an Arduino. To catch the attention of the fishes and to “teach” them, an RGB LED is used. The fish need to figure out that the feeder will dispense food only when the LED is ON and the Lure is pushed. If the fish figure that out, and push the lure when the LED is on, a servo is activated which pushes the feeder to deliver 1 unit of fish food. While at it, he added a couple of bells and whistles. A buzzer to indicate when the Lure switch is closed and a 2 line LCD shows how many times the switch has been activated and how long the program has been running.

A Sparkfun  open logger stores the hit count and the minutes and seconds of the hit for data analysis later on. The good news is that it seems to be working. The current code activates the feeder for 30 to 60 minutes every day, which is indicated by the LED. At the end of 9 days,  [RoboPandaPDX] found that the goldfish would hit the Lure when the LED turned on, and then turn around to face where the feeder would dispense food in to the tank. His next plan is to put up some obstacles along the path to see if the fish learn some new tricks. His schematic looks a little iffy (the Lure switch is connected to the RST pin of the Arduino), and it seems he cannot remember why he ever did that. He’s happy that it works though, but we’re sure that’s not the right way to wire it up.

[RoboPandaPDX] is looking for suggestions on improving his interactive feeder, so if you have any, do add them in the comments below.

If you need some more fish feeder ideas, check out this and this that we blogged about earlier.

laptop with external gpu

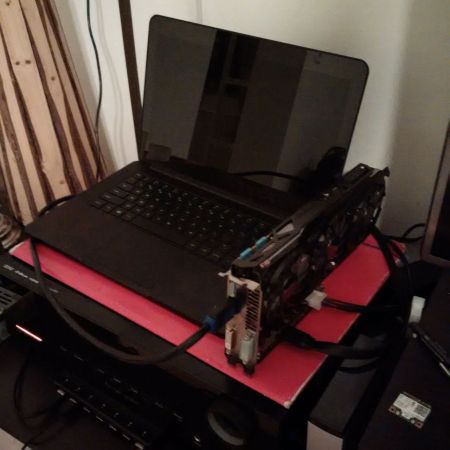
A Laptop With An External Graphics Card?

It used to be that desktop computers reigned king in the world of powerful computing, and to some extent, they still do. But laptops are pretty powerful these days, and in our experience, a lot of engineering companies have actually swapped over to them for resource hungry 3D CAD applications — But what if you still need a bit more power?

Well, [Kamueone] wasn’t satisfied with the performance of his Razer Blade GTX870m laptop, so he decided to hack it and give it its own external graphics card.

Now unfortunately this really isn’t quite a simple as running some PCIE extender cables — nope. You’ll have to modify the BIOS first, which according to [Kamueone], isn’t that bad. But after that’s done you’ll also need a way to mount your graphics card outside of the laptop. He’s using an EXP GDC Beast V6 which uses a mini PCIE cable that can be connected directly to the laptop motherboard. You’re also going to need an external power supply.

[Kamueone] ran some benchmarks and upgrading from the stock onboard GTX870m to an external GTX 780ti resulted in over three times the frame rate capability — 40fps stock, 130fps upgraded!

Actobotics Competition

SparkFun Stair Climbing Robot Challenge

In case you missed it, SparkFun recently held the Actobotics Stair Climber Challenge competition, where you could build a robot capable of ascending stairs and win some sweet SparkFun cash!

The contest is over now and the winners have just been announced — and some of the bots the contestants came up with are just plain awesome!

First prize went to the [Jaeger Family] who built a wheeled robot that can roll right up stairs without even batting an eyelash — it’s pretty cool to see. Check that out and more below.

Continue reading “SparkFun Stair Climbing Robot Challenge”

Caption CERN Contest Enters Week 8

The Caption CERN Contest has been going great guns thanks to the community of users over on Hackaday.io. The contest just finished up its seventh week of finding funny captions for images which CERN has in their archives. CERN has decades of great photo documentation of their projects. Unfortunately they don’t know which project each image goes with, or who exactly is in the image. We’re helping them out where we can, by letting CERN know any information we can find on their photos. We’re also having some fun along the way, by giving out a T-Shirt for the best caption each week.

Here are some of the best quotes from week 7

The Funnies:

“Are Socks and Sandals acceptable safety equipment for the Demolition Pit? Yes, because these are Kelvar socks and Zylon sandals being testing. Quite uncomfortable, but these feet will survive a close proximity blast.” – [controlmypad]

“Check it out! One tube for each Ninja Turtle” – [OzQube]

“Before the LHC, hunting for the Higgs was much less glamorous.” – [Tachyon]

The winner of course is [Tim] with the featured image at the top of this article.

week6winrarIf [Tachyon] sounds familiar, that’s because he came up with the best caption back in week 6. Runners up for week 6 were:

“Damn Mario Brothers ….. ‘gotta save the princess’ How about watching where you’re going for once. – [Scott Galvin]

“Here at CERN, you don’t get shafted. You get tubed.” – [Rollyn01]

“Thank god the separator caught him. Another 50 meters, and he’d be nothing but quarks.” – [Curtis Carlsen]

Click past the break to check out this week’s image!

Continue reading “Caption CERN Contest Enters Week 8”

Generating The Mandelbrot Set With IBM Mainframes

[Ken Shirriff] is apparently very cool, and when he found out the Computer History Museum had a working IBM 1401 mainframe, he decided to write a program. Not just any program, mind you; one that would generate a Mandelbrot fractal on a line printer.

The IBM 1401 is an odd beast. Even though it’s a fully transistorized computer, these transistors are germanium. These transistors are stuffed onto tiny cards with resistors, caps, and diodes, than then stuck in a pull-out card cage that, in IBM parlance, is called a ‘gate’. The computer used decimal arithmetic, and things like ‘bytes’ wouldn’t be standard for 20 years after this computer was designed – 4,000 characters of memory are stored in a 6-bit binary coded decimal format.

To the modern eye, the 1401 appears to be a very odd machine, but thanks to the ROPE compiler, [Ken] was able to develop his code and run it before committing it to punched cards. An IBM 029 keypunch was used to send the code from a PC to cards with the help of some USB-controlled relays.

With the deck of cards properly sorted, the 1401 was powered up, the cards loaded, and the impressive ‘Load’ button pressed. After 12 minutes of a line printer hammering out characters one at a time, a Mandelbrot fractal appears from a line printer. Interestingly, the first image of the Mandelbrot set was printed off a line printer in 1978. The IBM 1401 was introduced nearly 20 years before that.

We Have A Problem: Household Electrical

Hackaday, we have a problem. The electricity in your house is on. It’s always on. How fast are those kilowatt-hours ticking by and what is causing it? For most people the only measurement they have of this is the meter itself (which nobody looks at), and the electric bill (which few people actually analyze). Is it silly that people pay far more attention to the battery usage on their phone than the electricity consumption in their abode? I think it is, and so appears another great seed idea for Hackaday Prize entries.

A Better Way to Measure

breaker-panelThe tough part of the problem here is getting at reliable data. Just yesterday we saw an incredible resource monitoring project that uses an optical sensor to measure the turning or the wheel in an electric meter. We’ve seen similar projects for meters that have a blinking LED, and a few other methods. But in many cases the electrical meter is outdoors which makes cheap, easily installed sensors a difficult goal to achieve. Even if we did, this still provides just one stream of data, the entire house.

Alternatively you could tap into the breaker box. We’ve seen [Bill Porter] do just that and there are some commercially available kits that include an octopus of clamp-style current sensors. This is a bit of an improvement, but still requires the user to open the electrical panel (don’t scoff at that statement, you know most people shouldn’t be doing that) to install them. I’m sure there are other methods that I’m missing and would love to hear about them in the comments below.

The Point

To sum up what I’m getting at here, think about the Kill-A-Watt which proved to be a very interesting hack. People liked not just seeing how much power something uses but extending where that data can be accessed. We don’t remember seeing any successful efforts to move the concept ahead a few generations. But if someone can crack that nut it could yield a wave of energy savings as people are able to be better connected with what is using a lot of electricity in their homes.

Your Turn (and Lessons from Last Week)

As with last week, now it’s your turn to come up with some ideas… wild, fantastic, good, bad, outlandish, let’s hear them. Better yet, document your idea on Hackaday.io and tag it with “2015HackadayPrize“. You can win prizes just for a well presented idea!

Speaking of last week, I shared the idea of adding some feedback to how long you’ve been in the shower. There were many opinions about the value and worthiness of that idea so I thought I’d close by covering some of them. Yes, there are much bigger wastes of water (and electricity in this case) in the world but why limit our solutions to only the largest offenders? The low-hanging fruit tends to be stuff a lot of people can understand and relate to. If we only talked about large-scale fixes (I dunno; reducing mercury emissions from power plants?) there is little momentum to crank-start a movement. If you found yourself thinking the ideas from this week and last are far too simple to win The Hackaday Prize that means you better get your project going. The world is hacked together by those who show up.

I’d love to hear suggestions for future installments of We have a problem. Leave those ideas in the comments and we’ll see you here next week!


The 2015 Hackaday Prize is sponsored by:

Hackaday Retro Edition: Remaking The PDP 8/I With A Raspberry Pi

[Oscar] really likes the PDP-8s, with the extremely old school PDP-8/I being his favorite. If you haven’t checked the price on these recently, getting a real PDP-8/I is nigh impossible. However, after assembling a KIM-1 clone kit, an idea struck: what about building a modern PDP-8/I replica that looks like the real thing, but is powered by modern hardware. This would be fairly cheap to build, and has the added bonus of not weighing several hundred pounds.

The PiDP-8 is [Oscar]’s project to replicate the hardware of the 8/I in a modern format. Instead of hundreds of Flip Chips, this PDP-8 is powered by a Raspberry Pi running the SIMH emulator. The 40-pin GPIO connector on the Pi is broken out to 92 LEDs and 26 toggle switches on a large PCB. This setup gets [Oscar] a reasonable facsimile of the PDP-8/I, but he’s also going for looks too. He created an acrylic panel with artwork copied from an original 8/I  that mounts to the PCB and gives the entire project that beautiful late 60s / early 70s brown with harvest gold accent color scheme.

Since this emulated PDP-8/I is running on entirely new hardware, it doesn’t make much sense to haul out disk drives as big as a small child, tape drives, and paper tape readers. Instead, [Oscar] is putting everything on USB sticks. It’s a great solution to the problem of moving around files that are a few kilowords in size.

vt100normal[Oscar] says he’ll be bringing his PiDP to the Vintage Computer Festival East X in Wall, NJ, April 17-19. We’ll be there, and I’ve already offered [Oscar] the use of a VT-100 terminal. If you’re in the area, you should come to this event. It’s guaranteed to be an awesome event and you’re sure to have a great time. Since this is the 50th anniversary of the introduction of the PDP-8, there will be a half-dozen original PDP-8s set up, including a newly refurbished Straight-8 that came out of the RESISTORS.

Oh, if anyone knows how to connect a Pi to a VT100 (technically a 103), leave a note in the comments. Does it need the RTS/CTS?