Repurposing A Palm Portable Keyboard

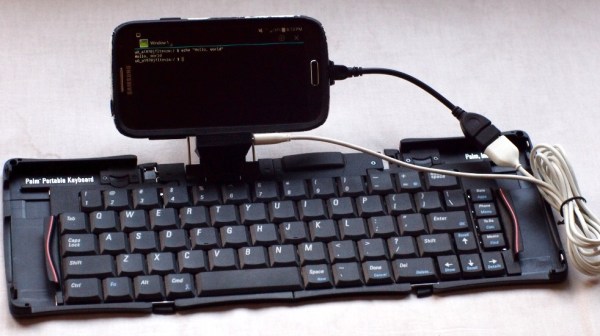
Typing comfortably on a Smart Phone is best done using an external keyboard, especially if you spend a lot of time on IRC or use other chat apps. Obviously, the keyboard needs to be portable too. [cy384] felt the current crop of portable keyboards left a lot to be desired in terms of build quality and feel. That’s when the Palm Portable Keyboard (PPK) caught his eye. It’s small enough to fold up and fit in a pocket, yet unfolds to a size big enough to feel comfortable while typing. Unfortunately, the version he preferred to use did not have either a Bluetooth or a USB interface, so he built up this Palm keyboard adapter.

The portable keyboards have a serial interface and custom connectors depending on the Palm model they were designed to connect to. [cy384]’s goal was to adapt the PPK as a generic USB HID keyboard using an Arduino Pro Mini clone, with a 3D printed adapter for both of the keyboard types that he had. The keyboards  use inverted TTL logic at 9600 baud with no parity and one stop bit. Some handshaking needs to be taken care of and there’s a low power mode that needs to be managed via the Arduino code. He was lucky to get his hands on a reference document that provided the hardware and software details to help him crack all of this. His Github repository has the code and 3D printable files for the adapters.

An Introduction To Clock Dividers And Psychological Warfare

A while ago, [nsayer] was inspired by a Hackaday post to build one of the most insidious means of psychological warfare. I speak, of course, of the [Lord Vetinari] clock, a clock that ticks at random intervals, but still keeps accurate time. His build, the Crazy Clock, is a small controller board for off-the-shelf clock movements that adds the [Vetinari] feature to any clock by soldering only a few wires.

The Crazy Clock is a pretty simple device consisting of only a 32.768 kHz crystal, a microcontroller, and a few transistors to pulse the movement of a clock mechanism. While psyops is great, it recently occurred to [nsayer] that this device could be used for other build.

Since the output of the Crazy Clock doesn’t necessarily have to be connected to a clock movement, [nsayer] decided to connect a LED, generating a 60Hz flashing light for a phonograph strobe. This is easy with timer prescalers and clock dividers; the original 32.768 kHz signal is divided by 8 to produce a clock that ticks every 4.096 kHz.  Divide that again by 120, and you get 34 2/15. Yes, this is all stuff you learned in fourth grade, and if you’re smarter than a third grader you can eventually whittle a 32.768 kHz clock down to a nice, round, binary number – exactly what you need for computing time.

[nsayer] posted a 240 fps (vertical) video of his Crazy Clock blinking at 60 Hz. You can see that below.

Continue reading “An Introduction To Clock Dividers And Psychological Warfare”

DIY Seven Segment Displays

[Esai] wanted to build an electronic clock from scratch. A noble quest, but ordinary seven-segment displays are just that – incredibly ordinary. Instead of a few displays that can be bought from the usual retailers for a dollar a piece, [Esai] made his own four digit, seven-segment display on some perfboard.

Before soldering 58 SMD LEDs to a small rectangle of perfboard, [Esai] traced out each segment with a marker. Two LEDs make up each segment, and they’re all connected to a breadboard-friendly pin header with 30 gauge wire.

Each segment is connected as a single column in the LED matrix, and each digit is a row. It’s a simple design, but there aren’t any resistors on this board. Hopefully [Esai] will be using a proper LED driver with this display; you really don’t want LEDs to burn out twice a day at 1:11.

Tank Track Motorcycle Goes Anywhere, Slowly

There are just somethings you don’t see often when it comes to motorcycles, 2 wheel drive and tank tracks. Well, [jeep2003] has combined both those oddities into one project he calls the Track-Powered 2×2 MiniBike.

As his descriptive project name suggests, this minibike has tracks instead of wheels. The track assemblies originally came off a snow blower. As if just having tracks wasn’t difficult enough, both sets are powered. The back has a straight forward chain and sprocket setup while the front ads in a clever jack-shaft and universal joint contraption which is shown in the video after the break around the 3:08 mark.

Tank Track Mini Bike

[jeep2003] doesn’t say where the tubing for his custom made frame came from, but from the photos available it appears they were once old bicycle frames. The powerplant is a 6.75hp vertical shaft Briggs & Stratton engine. The output shaft connects to a Peerless 5 speed transmission that also has reverse. This transmission usually outputs to two rear drive wheels of a riding lawnmower. [jeep2003] dedicates each axle output from the transmission to power one of the two track systems.

Although this minibike won’t be breaking any land speed records anytime soon, we here at HaD still think it’s a pretty rad build.

Continue reading “Tank Track Motorcycle Goes Anywhere, Slowly”

The 2G Raspberry Pi Smartphone

For [Tyler]’s entry to the Hackaday Prize, he’s making something that just a few years ago would be unheard of in a homebrew build. He’s making a DIY smartphone. Yes, with cheap single-board Linux computers, GSM modules, and SPI touchscreen displays, it’s possible to build your own smartphone.

Inside [Tyler]’s DIY smartphone is a Raspberry Pi Model A, a 3.5 inch touchscreen PiTFT with 480×320 resolution, and an Adafruit FONA module The connections are simple enough; the TFT is connected over SPI, and the GSM module over serial. The entire device is powered by a 1200mAh LiIon battery, charged with a powerboost board, runs an operating system written in Python capable of making calls, sending texts, and takes pictures with a Pi camera.

This is not what you would normally call a smartphone. The FONA module is 2G only, meaning you’re limited to 2G speeds and 2G networks. AT&T will be shutting down 2G networks in a little bit, although T-Mobile will be keeping them up for anyone who still has an old Nokia Brick.

That said, [Tyler]’s phone is still exactly what you want in a minimal phone: it just makes calls and receives texts, it has a camera, and unlike the Nokia, you can take it apart and repair it easily. Not that you ever had to do that with a Nokia…

LEGO Computer Case

With over 40,000 pieces in his possession, [Mike] is definitely a huge fan of LEGO. Given that he’s also very much a fan of technology, it’s no surprise that he has built more than one type of LEGO computer case. He wrote in to tell us that he’s finished work on a well-rounded system designed for everyone.

[Mike] is no stranger to interesting case builds. In the last couple of years, he’s also made a functioning wind tunnel case and a bio computer that uses generated heat to warm soil for wheat grass plants. In the course of planning the LEGO computer, he thought a lot about heat and airflow, ultimately deciding on a top-down cooling path.

He’s quoting custom LEGO computer builds, providing the choice between an i3, i5, or i7 with either 8 or 16 gigs of RAM. They will run Linux or Windows 7/8 and are 10-compatible. There are a few choices for the top of the case: classic LEGO brick, the industrial look with diagonal slats, and a colored, tiled top. These systems are completely upgradeable and are held firmly together with great engineering and the occasional support rod.

Magic Lantern Brings Linux To Canon EOS Cameras

On April 1st the Magic Lantern team announced a proof of concept that lets you run Linux on a Canon EOS camera. Because of the date of the post we’ve poured over this one and are confident it’s no joke. The development has huge potential.

The hack was facilitated by a recent discovery that the LCD screen on the camera can be accessed from the bootloader. In case you don’t recognize the name, Magic Lantern is an Open Source project that adds features to these high-end cameras by utilizing the bootloader with binary files on the SD card. It’s long been a way of hacking more features in but has always been complicated by the fact that you must figure out how to play nicely with the existing firmware. Commanding the LCD was the last part of the hardware that had previously not been driven directly from Magic Lantern.

Now that the Linux kernel is in the picture, ground-up features can be built without dealing with the stock firmware in any way (and without overwriting it). We’re excited to see where this one goes. Currently it’s just a proof that you can boot Linux, it’s not actually functional yet. Here’s your chance to polish those kernel porting skills you’ve been holding in reserve.