New Part Day: Memristors

For the last few years, the people in the know have been wondering about the memristor. The simplest explanation of what a memristor is comes from the name itself – it’s a memory resistor. In practice it’s a little more complex, but this basic understanding is enough to convey the fact that it’s a resistor that changes its resistance based on how much current has gone through it. The memristor was first described in the 70s by [Leon Chua], the idea sat in journals for nearly forty years, and in 2008 a working memristor was created by HP Labs.

Now you can buy one. Actually, you can buy eight in a 16-pin DIP package. It will, reportedly, cost $240 for the 16-pin DIP. That’s only $30 per memristor, and it’s the first time you can buy them.

These memristors are based on a silver chalcogenide (Ge2Se3). When a circuit ‘writes’ to this memristor and applies a positive voltage, silver ion migrate to the chalcogenide, forming what the datasheet (PDF) calls dendrites. This lowers the resistance of the memristor. When a negative voltage is applied to the device, these dendrites are removed, the memristor is ‘erased’, and the memristor returns to a high-resistance state.

This silver chalcogenide memristor is different from the titanium oxide memristors developed by HP Labs that is most frequently cited when it comes to this forgotten circuit element. This work is from [Kristy Campbell] of Boise State University. She’s been working on it for more than a decade now, with IEEE publications, conference proceedings (that one’s full text), and dozens of patents.

As far as applications for memristors go, there are generally two schools of thought on that. The most interesting, in terms of current computer technology, is storage. Memristors can hold either a binary 0 or a 1 in a fraction of the space NAND Flash or old-fashioned magnetic hard drives ever will. That means greater storage density, and bigger capacity hard drives with lower power requirements. These memristors have a limit of how many times they can be cycled – ‘greater than 2000 times’ according to the datasheet. That’s nearly an order of magnitude less than MLC Flash, and something wear leveling can’t reasonably compensate for. This is a new technology, though, so that could change.

The second major expected use for memristors is neural nets. Neural nets are just a series of inputs, a few neurons, outputs, and connections between all three. These connections are weighted, and the variable resistance of memristors puts them in a unique position to emulate in hardware at the most basic level what was once done with software and custom ASICs. The trade name for these memristors – Neuro-Bit – and the company name – Bio Inspired Technologies – give you a clue at what the intended use is.

As with all new technologies, there’s always something that is inevitably created that was never imagined by the original designers. What these new applications are is at this point just speculation. Now that anyone can buy one of these neat new chips, it’s going to be interesting to see what can be made with these parts.

Logic Noise: Ping-pong Stereo, Mixers, And More

So far on Logic Noise, we’ve built up a bunch of sound-making voices and played around with sequencing them. The few times that we’ve combined voices together, we’ve done so using the simplest possible passive mixer — a bunch of resistors. And while that can work, we’ve mostly just gotten lucky. In this session, we’ll take our system’s output a little bit more seriously and build up an active mixer and simple stereo headphone driver circuit.

For this, we’ll need some kind of amplification, and our old friend, the 4069UB, will be doing all of the heavy lifting. Honestly, this week’s circuitry is just an elaboration of the buffer amplifiers and variable overdrive circuits we looked at before. To keep things interesting we’ll explore ping-pong stereo effects, and eventually (of course) put the panning under logic-level control, which is ridiculous and mostly a pretext to introduce another useful switch IC, the 4066 quad switch.

At the very end of the article is a parts list for essentially everything we’ve done so far. If you’ve been following along and just want to make a one-time order from an electronics supply house, check it out.

klangoriumIf you’re wondering why the delay in putting out this issue of Logic Noise, it’s partly because I’ve built up a PCB that incorporates essentially everything we’ve done so far into a powerhouse of a quasi-modular Logic Noise demo — The Klangorium. The idea was to take the material from each Logic Noise column so far and build out the board that makes experimenting with each one easy.

Everything’s open and documented, and it’s essentially modular so you can feel free to take as much or as little out of the project as you’d like. Maybe you’d like to hard-wire the cymbal circuit, or maybe you’d like to swap some of the parts around. Copy ours or build your own. If you do, let us know!

OK, enough intro babble, let’s dig in.

Continue reading “Logic Noise: Ping-pong Stereo, Mixers, And More”

We’re Hiring Contributors And Social Media Masterminds

Hackaday has been expanding into all kinds of new areas. We find ourselves stretched a bit thin and it’s time to ask for help. Want to lend a hand while making some extra dough to plow back into your projects? These are work-from-home (or wherever you like) positions and we’re looking for awesome, motivated people to help guide Hackaday forward!

Applying as a Contributor

Contributors are hired as private contractors and paid for each post. You should have the technical expertise to understand the projects you write about, and a passion for the wide range of topics we feature. If you’re interested, please email our jobs line, start your subject with [Contributor], and include:

  • Details about your background (education, employment, etc.) that make you a valuable addition to the team
  • Links to your blog/project posts/etc. which have been published on the Internet
  • One example post written in the voice of Hackaday. Include a banner image, at least 150 words, the link to the project, and any in-links to related and relevant Hackaday features

Applying as a Social Media mastermind

Social Media positions are hired as private contractors. You should have at least some technical understanding of the type of material which Hackaday revolves around. This position has huge growth potential and we’re looking for someone who will keep a social media schedule full and ensure conversations are happening. If you’re interested, please email our jobs line, start your subject with [SocialMedia], and include:

  • Details about your background (education, employment, etc.) that make you a valuable addition to the team
  • Links to social media accounts you have driven (this may be your own or a company account)
  • Two example Tweets and one example Facebook post which have been written specifically for this application

What are you waiting for? Ladies and Gentlemen, start your applications!

Why Build Furniture When You Can Grow It?

[Gavin Munro] is turning the standard paradigm of furniture making on its head. Instead of harvesting trees and slicing them up into boards – or worse, turning them into sawdust to be used for particle board – [Gavin] is literally growing furniture.

Supple young willow saplings are pruned and trained using wire and plastic form work. The trees are encouraged to grow in the right directions to form legs, arms, seat and back, and eventually the individual pieces are grafted Fg_3_chairs_growing
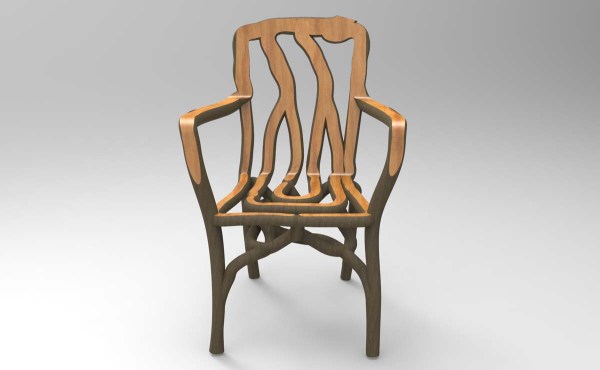
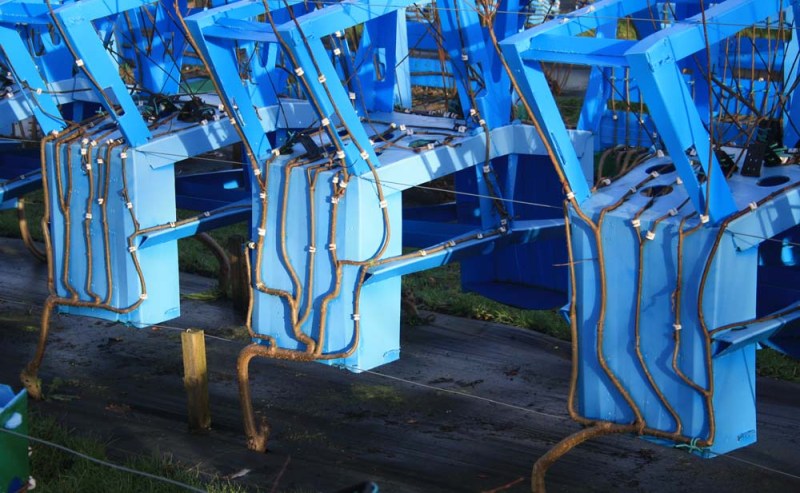
together to continue growing into one solid piece. When the chair is mature, the leaves are removed, the chair is cut free from the ground, and with a little seasoning and finishing, you’ve got a unique and functional chair. And what’s more, since it’s a solid piece of wood, there are no joints to loosen over time.

You’ve got to admire the dedication that goes into these chairs. The current crop is about nine years old and still a few years from harvest. There’s a lot to be learned from the organization of a project like this – planning a production line where the first finished pieces are a decade or more from the showroom is no mean feat. Looks like [Gavin] has thought that through as well, by starting a line of lamps that will be turning a profit sooner. The video after the break demonstrates not only [Gavin’s] chairs and lamps, but also features his first harvest of tables.

Continue reading “Why Build Furniture When You Can Grow It?”

Retro-fit Old Radio With Arduino And FM Module

“You can’t put new wine in old bottles” – so the saying goes. But you would if you’re a hacker stuck with a radio built in 2005, which looked like it was put together using technology from 1975. [Marcus Jenkins] did just that, pulling out the innards from his old radio and converting it to an Arduino FM radio.

His cheap, mains powered radio was pretty bad at tuning. It had trouble locating stations, and tended to drift. One look at the insides, and it was obvious that it was not well engineered at all, so any attempts at fixing it would be pointless. Instead, he drew up a simple schematic that used an Arduino Nano, an FM radio module based on the TEA5767, and an audio amplifier based on the LM386.

A single button on the Arduino helps cycle through a range of preset frequencies stored in memory. The Arduino connects to the FM radio module over I2C. The existing antenna was connected to the TEA5767 module. The radio module outputs stereo audio, but [Marcus] was content with using just a mono channel, as it would be used in his workshop. The audio amplifier is pretty straightforward, based on a typical application found in the data sheet. He put it all together on proto-board, although soldering the FM radio module was a bit tricky. The Arduino code is quite simple, and available for download (zip file).

He retained the original tuning knob, which is no longer functional. The AM-FM selector knob was fitted with a micro-switch connected to the Arduino for selecting the preset stations. Almost everything inside was held together with what [Marcus] calls “hot-snot” glue. The whole exercise cost him a few Euros, and parts scavenged from his parts bin. A good radio could probably be had for a few Euros from a yard sale and much less effort, but that wouldn’t be as cool as this.

Go deeper and explore how FM signals are modulated and demodulated for playback.

Hackaday Prize Entry: An E-Juice Robot

E-cigarettes are increasingly popular, with weird hipster head shops popping up in towns around the globe. While you can buy this e-juice at gas stations and just about anywhere else analog cigarettes are sold, there are inevitably people who want to mix their own propylene glycol, glycerin, water, and nicotine. For them, [conklinnick] is building The End Of An Evil Industry, an e-juice printer that automates the entire process.

This ‘e-juice printer’ is designed to mix the basic ingredients of the consumables for e-cigarettes. These ingredients are propylene glycol and/or glycerin, water, flavorings, and nicotine. [conklinnick]’s project is using different ‘stations’ and a camera slider to dispense these ingredients into a small vial. It’s effectively a barbot dispensing ingredients for silly putty instead of alcohol.

It’s a great project, and although it’s not for everybody – nor should it be for everybody – it’s a great application of homebrew tech we already have for new uses.


The 2015 Hackaday Prize is sponsored by:

diy air compressor

DIY Air Compressor Made From Refrigerator And Fire Extinguisher

[Giorgos] wanted to build a pneumatic solder paste application tool but needed an air compressor to power it. Instead of going out and buying a compressor, he decided to build one himself. It sure is an ugly duckling but we’re impressed with it’s performance.

The air tank is an old spent fire extinguisher. The stock valve was removed and the insides were cleaned out. Out of curiosity, [Giorgos] figured out the volume by filling the tank with water, then measuring how much water came out. It turned out to be 2.8 liters. Two holes were drilled and threaded bungs were welded on to attach inlet and outlet lines.

The compressor portion is straight out of a refrigerator. Besides the compressor being free, the other benefit is that it is super quiet! Check the video after the break, you’ll be astonished. [Giorgos] did some calculations and figured out that his solder paste applicator needed about 8 bar (116 psi) of pressure. The refrigerator compressor easily handles that, filling the tank in 1 minute, 25 seconds.

On the output side of the tank resides a pressure switch for automatically filling the tank and a regulator for ensuring the solder paste applicator gets the required pressure. This isn’t the first time we’ve seen a refrigerator compressor used as an air compressor. Check out this dual setup capable of 400 psi.

Continue reading “DIY Air Compressor Made From Refrigerator And Fire Extinguisher”