Tricking A Car Stereo To Think Your Cellphone Is A Tapedeck

When you have an older vehicle there’s not a lot of options in the stock stereo department, often a CD player and tape deck is what you get. When you want to play your tunes from your mobile what do you do? Buying an adapter, or a new head unit for that matter, isn’t any fun. So why not hack it? This isn’t just a mechanical marriage of a Bluetooth dongle and an elderly stereo. Some real work went into convincing the stereo that the BT receiver was the stock tape deck.

car-stereo-logic-analyzer
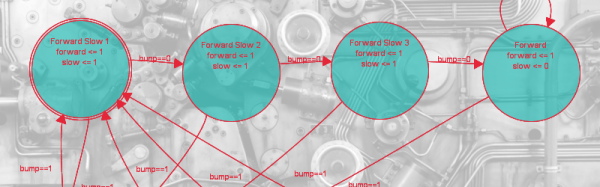
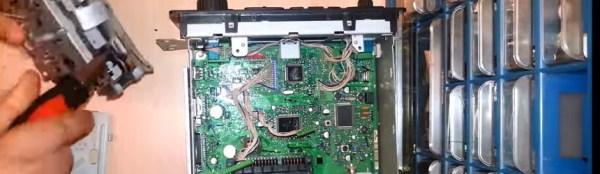
Attacking the outdated Cassette deck [kolonelkadat] knew that inside the maze of gears and leavers, most of it is moving around actuating switches to let the radio know that there is a tape inside and that it can switch to that input and play. Tricking the radio into thinking there is a tape inserted is handled by an Arduino. Using a logic analyzer [kolonelkadat] figured out what logic signals the original unit put out and replicating that in his Arduino code.

Audio is handled by the guts of a bluetooth speaker with the output redirected into the radio where the signal coming off the tape head normally would have been directed. Join us after the break for a couple of videos with all of the details.

Continue reading “Tricking A Car Stereo To Think Your Cellphone Is A Tapedeck”

Crack Open A USB Car Charger To Make It A Variable DC-DC Converter

[Boolean90] hacked a cheap USB car charger into a variable power supply. His proof of concept is to use this as a variable-speed motor controller. The best part is that nothing is being abused, the regulator inside is still running within manufacturer’s spec.

While we’ve seen similar hacks before, [Boolean90]s video is pretty cool and provides a nice insight into the components used in these cheap devices. Rather than a linear regulator, which would dissipate too much heat the device uses a common jelybean MC34063A (PDF) switching DC-DC converter which costs about 10 cents on eBay (about two dollars for twenty, shipped). Here it’s used to step the car batteries 12 volts down to 5, but can also be used in step-up and inverting configurations.

Like all switching buck converters the MC34063A uses a PWM (pulse width modulated) signal to drive an inductor and capacitor, which effectively form an LC filter. By controlling the pulse width, the output voltage can be regulated. [Afrotechmods] has a great tutorial on the basic principle. The regulation is controlled by feedback resistors. [Boolean90] simply added a variable resistor to allow the output voltage to be controlled.

Neat hack [Boolean90]! Continue reading “Crack Open A USB Car Charger To Make It A Variable DC-DC Converter”

Becoming A State Machine Design Mastermind

Imagine a robot with an all-around bump sensor. The response to the bump sensor activating depends on the previous state of the robot. If it had been going forward, a bump will send it backwards and vice versa. This robot exhibits behavior that is easy to model as a state machine. That is, the outputs of the machine (motor drive) depend not only on the inputs (the bump sensor) but also on the current state of the machine (going forward or backward).

As state machines go, that’s not an especially complicated one. Many state machines have lots of states with complex conditions. For example, consider a phone switchboard. The reaction to a phone going off hook depends on the state of the line. If the state is ringing, picking up the phone makes a connection. If the state is idle, the phone gets a dial tone. The switchboard also has to have states for timeouts, connection failures, three way calling, and more.

If you master state machines your design and debug cycles will both move along faster. Part of this is understanding and part is knowing about the tools you can choose to use. I’ll cover both below.

Continue reading “Becoming A State Machine Design Mastermind”

Your Homework For This Weekend

Your homework for this weekend: Build me something and enter it in The Hackaday Prize. I’m not joking.

It’s very rare for me to come out with a big “ask”, but this is it. I need you now. The Hackaday Prize is our STEAM initiative. It very publicly shows that you can have a lot of fun with engineering in your free time. This is a lesson we need to broadcast and to do so, I want to see dozens of entries come together this weekend.

Here’s the gist of it: Choose a problem that is faced by a large number of people. Build something that helps fix it, and document what you did. You need to start a project, publish 4 project logs, a system design diagram, and a video of less than 2 minutes in length. That’s it, and you can easily be done with all of this if you choose to make this weekend a hackathon.

You may win, you may not. But everyone who posts a project is helping to inspire the next generation of great engineers. The next [Forrest Mims] is out there, lets make sure he or she knows how amazing the world of engineering is! Get to work.

The 2015 Hackaday Prize is sponsored by:


Raspberry Pi And Windows 10 IoT Core: A Huge Letdown

Last Spring, Microsoft unveiled their plan for Windows and the Internet of Things. It starts with the Raspberry Pi and Windows 10 IoT Core – a stripped down system with Windows API calls running on an ARM architecture. Yes, Microsoft is finally moving away from the desktop, building a platform for a billion Internet of Things things, or filling the gap left by tens of thousands of POS terminals and ATMs running XP being taken offline. Either one is accurate.

Earlier this week, Microsoft announced the first public release of Windows 10 IoT Core. This is the review, but here’s the takeaway: run. Run as fast as you can away from Windows IoT. It’s not worth your time unless you have a burning desire to write apps for Windows, and even then you could do a better job with less effort with any Linux distro.

Continue reading “Raspberry Pi And Windows 10 IoT Core: A Huge Letdown”

Arduino Powered Rubber Band Sentry Turret Is Not A Lie

You know that guy in the next cube is sneaking in when you are away and swiping packs of astronaut ice cream out of your desk. Thanks to [Kevin Thomas], if you have an Arduino and a 3D printer, you can build a rubber band sentry gun to protect your geeky comestibles. You’ll also need some metric hardware, an Arduino Uno, and a handful of servo motors.

The video shows [Kevin] manually aiming the gun, but the software can operate the gun autonomously, if you add some sensors to the hardware.  The build details are a bit sparse, but there is a bill of material and that, combined with the 3D printing files and the videos, should allow you to figure it out.

We couldn’t help but wish for a first person view (FPV) camera and control via a cell phone, so you could snipe at those ice cream thieves while hiding in the broom closet. On the other hand, if you got the gun working, adding the remote wouldn’t be hard at all. You probably have a WiFi FPV camera on your quadcopter that finally came out of that tree and there’s lots of ways to do the controls via Bluetooth or WiFi.

Not that you don’t have options. But here at Hackaday HQ, we have lots of rubber bands and not so many green pigs. If you’d rather shoot paintballs, be careful you don’t accidentally repaint the insides of your cube.

Continue reading “Arduino Powered Rubber Band Sentry Turret Is Not A Lie”

Raspberry Pi Field Unit (RPFU)

Raspberry Pis are great for tons of projects, but if you want to use them outside, you’re going to need a waterproof enclosure. Not happy with what was available, [Jay Doscher] went all out and created the Raspberry Pi Field Unit — a piece of tech that looks straight out of the Call of Duty franchise.

Wanting it to be extra durable, [Jay] started with a Pelican Case 1300 — the standard in electronics protection. These come with a Pelican panel mount, so he had some plastic laser cut specifically to fit the panel mount, and attach all of his components. Speaking of components, he got only the best — inside is:

  • A Raspberry Pi 2 with a few PIHATs (permanent prototyping shield)
  • A 10.1″ IPS display
  • A high power wireless USB dongle
  • Weather proof USB and LAN connectors
  • An RTC for when it’s off the network
  • A 12V power supply for running off solar panels
  • DC-to-DC adapters to bring it down to 5V
  • A whole bunch of hardware from McMaster-Carr

Continue reading “Raspberry Pi Field Unit (RPFU)”