Hacking A Pi Camera With A Nikon Lens

Cell phones have killed many industries. It is getting harder and harder to justify buying an ordinary watch, a calculator, or a day planner because your phone does all those things at least as well as the originals. Cell phones have cameras too, so the days of missing a shot because you don’t have a camera with you are over (although we always wonder where the flood of Bigfoot and UFO pictures are). However, you probably still have a dedicated camera tucked away somewhere because, let’s face it, most cell phone cameras are just not that good.

The Raspberry Pi camera is about on par with a cheap cell phone camera. [Martijn Braam] has a Nikon camera, and he noticed that he could get a Raspberry Pi camera with a C-mount for lenses. He picked up a C to F adapter and proceeded to experiment with Nikon DSLR lenses on the Raspberry Pi camera.

Continue reading “Hacking A Pi Camera With A Nikon Lens”

Nixie Tube Clock Isn’t Just A Clock

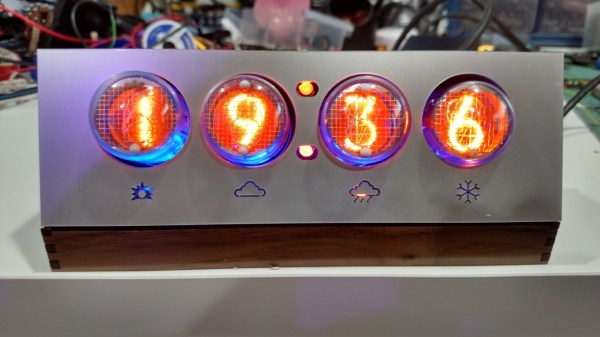
With everything that’s been happening in the news lately, [Jarek] decided it was finally time to finish up his latest project. The Internet of Things has been exploding with projects lately, and this clock that also alerts him of the weather is the latest addition. Plus it has the added bonus of using everybody’s favorite display: nixie tubes!

Of course, using high voltage for the nixies can be terror-inducing, but [Jarek] found a power supply on eBay that was able to power the tubes for not too much money. The controller is an HV5622 which can control up to 32 nixies while only using up three pins on a microcontroller which is pretty handy if you have a limited number of output pins.

The clock also has another device hidden behind all of the wires for the tubes: an ESP8266 to give it network connectivity. The clock connects to the Internet and searches for the nine-hour weather forecast. There are a few nixie lights behind the display which illuminate cutouts in the case to indicate a few different weather statuses. It’s a very polished project, and since it’s enclosed in a nice case it’s not likely to be mistaken for any movie props. Of course, other nixie projects don’t have the same comforting look.

Continue reading “Nixie Tube Clock Isn’t Just A Clock”

3D Printed Battery Forms

What’s the worst thing that can happen when you are trying to show off a project? Dead batteries might not be the absolute worst thing, but it is pretty close to the top of the list. [KermMartian] has this problem every year at World Maker Faire with demos based around calculators. At first, he tried wedging power supply wires into the calculator using dead batteries to hold the wires in place. However, it didn’t take much wear and tear before the wires would pull out.

The solution? A 3D printed battery form that accepts metal hardware that can connect to the external power supply. The AAA-sized plastic batteries insert into the calculator’s battery compartment and the small machine screws and washers form the connection points.

Continue reading “3D Printed Battery Forms”

Hackaday Prize Semifinalist: Helping Out In The ER

[Moldovanu] and [Radu] are out to fix emergency medical care in their native Romania. They’re developing a very inexpensive bracelet that keeps track of heartbeat, blood oxygen, and temperature of a patient, either in an ER or in the waiting room.

The Health Mate, as the guys are calling it, is a small bracelet loaded up with IR LEDs, photodiodes, a temperature sensor, and a WiFi module. They’ve wired all these parts up on a home made board, connected a battery, and are starting to measure their vitals.

It’s a simple device, but it’s simple for a reason: heart rate and blood oxygen saturation are some of the most important indicators doctors and nurses look at when triaging patients. By making their health monitor cheap and good enough, it eventually makes its way onto the wrists of more patients, and will hopefully save more lives

The 2015 Hackaday Prize is sponsored by:

Quick Keyboard Hack To Control Heavy Loads

When you want to control an external device (like a lamp) from your computer, you might reach for a USB enabled micro. Looking for an inexpensive and quick option to control two lamps [Pete] wanted to control a couple 12 volt halogen lamps, he reached for his keyboard and used a little bit of python.

Desktop PC keyboards have 3 LED’s indicating lock functions, hardly anyone uses the scroll lock, and on a laptop with no keypad, numlock is no big loss as well. Adding wires to the little PCB out of a USB keyboard the numlock and scroll lock LED’s 5 volt output was redirected to a switching circuit.

That switching circuit takes the output of either LED, inverts it with a PNP transistor, then connects to the gate of a FQP30N06L, “logic level” mosfet transistor to handle the heavy lifting. Once the wiring is in place a fairly simple Python script can take over turning on and off the two chosen lock keys, giving  control of up to 32 amps with the touch of a button.

Transparent ESP8266 WiFi-to-Serial Bridge

These days, connecting your microcontroller project to a WiFi network is pretty easy — you connect up an ESP8266 to your microcontroller project and pretend it’s a WiFi modem, using these old-school-style AT commands. But what do you do if you need to flash new code into the microcontroller? You can’t reprogram the micro remotely through the ESP8266 because those stupid AT commands get in the way.

The solution? By flashing the esp-link firmware into your ESP8266, you talk directly to the microcontroller over WiFi as if it were connected by a serial cable: the ESP8266 becomes a totally transparent WiFi-serial bridge. Now, with a serial bootloader and an ESP8266 in Wifi-to-serial bridge mode, you can reflash your microcontroller wirelessly, and then telnet in to interact with and debug the system remotely. Once you’ve fixed the bugs, you can re-flash the microcontroller: all over WiFi, without having to climb up a ladder to reach your IoT attic-temperature sensor.

To flash a connected Arduino, for instance, all you need to do is convince AVRDUDE to use the network instead of a locally-connected USB-serial cable: avrdude -p m328p -c arduino -b 115200 -P net:192.168.1.123:23 -U:yourHexFile.hex. The ESP8266 passes the data straight through its TX and RX lines to your microcontroller and everything works as if it were wired.

Configuration to allow the ESP8266 to join your WiFi network takes place on a self-hosted webpage that uses [Sprite_tm]’s esp-httpd standalone server, which makes setup pretty painless. And then after that you can simply telnet to the ESP8266 at port 23 and type away, or do anything else you would with a wired serial connection.

Although the simple bridge mode came first, esp-link looks like it’s growing to be a one-stop shop for all your IoT or microcontroller + WiFi needs. In addition to the serial bridge code, there is also a REST-based microcontroller-to-internet mode and there is bi-directional MQTT support in the wings. We haven’t had a chance to dig into these yet, so if you have, let us know in the comments.

If you want to dig in deeper, head over to [Jeelabs]’ blog for a slightly outdated tour of the project written by the code’s author, [Thorsten von Eicken]. For the most up-to-date development news, follow the very active development of esp-link in this thread on the esp8266 forums.

Hacking Eating Tracking

There’s a great hackathon going on this weekend in the Boston area. Hacking Eating Tracking challenges participants to develop technology that will help guide personal behavior toward a healthier lifestyle.

The event in hosted in Cambridge, MA by Harvard University. It isn’t focused on giving you a diet that you need to follow. It looks instead at how some more abstract behavior changes will cause your body to do this for you. One really quick example is to change the hand in which you hold your fork, or swap out the fork for a different utensil. Going “lefty” while you eat can change the cadence of your consumption and my impact how many calories you consume before feeling full. This is a really fun type of hacking to delve into!

Hackaday is one of the Hackathon sponsors and [Sophi] is headed out to participate in the weekend of building. She’s planning to work with a Pixy Camera which can measure depth data and can separate colors. Of course decisions on the build direction won’t be made until she and her teammates put their heads together, but she did have a few preliminary ideas. Several of these cameras might be used in a supermarket to gather data on where customers tend to congregate and how aisle flow and stock choices might be able to change behavior.

If you’re not in the area you should still be able to follow along as the event helps to improve people’s lives through behavior. The hackathon will be using the Hackaday.io Hackathon framework. Teams will register and update their projects throughout the weekend. We’re looking forward to seeing what is built using the crate of LightBlue Bean boards we sent along from the Hackaday Store.