Adding A Second Drive To A Forgotten Commodore

Commodore would never release a laptop, or really much of anything resembling the chunky luggable portable computers of the 1980s. This doesn’t mean a ‘Commodore LCD’ wasn’t designed – it’s sitting in [Bil Herd]’s basement. Of the entire Commodore lineup, the only computer that could remotely be called ‘portable’ is the SX-64, the ‘executive’ version that came with a built-in 5″ monitor, the usual C64 circuitry, one floppy drive, and an empty hole that could obviously hold a second floppy drive. Something must be done about that missing floppy drive, and it only took thirty years for someone to do something about it.

While the conversion requires mucking around in an already tight enclosure, the parts for this conversion are readily available thanks to a few people trying to repair an SX-64, giving up, and parting the whole thing out on eBay. These parts include the 1541 controller relabeled as the ‘FDD’ board in the SX-64, and of course the floppy drive itself. With the right teardown guide, putting the new drive in this old computer isn’t that hard; just remember to cut a jumper to assign the new drive a number other than 8.

The missing floppy drive of the SX-64 is what happens when marketing is put in charge of engineering. There were a few of these dual drive Commodore luggables back in ’83, and we have the computer magazine clippings to prove it. The official story is the power supply wasn’t beefy enough to handle the second drive. This mod, though, seems to work well enough, albeit with a distinct lack of somewhere to store a few floppies.

Find yourself getting sentimental while reading about this great hardware? Keep those feelings going by listening to [Bil] recount some stories from his time at Commodore.


Hackaday Links: December 13, 2015

So you’ve been rocking a tin foil hat for years now, and people have finally gotten used to your attire and claims that fluoridated water is a government mind control experiment. This holiday, how about something a little more stylish? Yes, it’s a Kickstarter for the World’s First Signal Proof Headwear. This fashionable beanie or cap protects you from harmful electromagnetic rays. Next time you shoot an eighteen minute long YouTube video of a wheezing rant about chemtrails, look fashionable with Shield – the world’s first stylish signal proof hat.

That last tip came to us from a Crowdfunding marketing agency. That means money was exchanged for the purposes of marketing a modern tin foil hat.

[Mike] has an old IBM 5155, the ‘luggable’ computer with design cues taken from the first Compaq. With an Ethernet adapter and a little inspiration, He was able to get this old computer to load the Hackaday retro edition.

[gyrovague] has a Chromecast that’s a bit janky. When it comes to electronics, strangeness means heat. The solution? A heat sink for the Chromecast. You don’t even need a proper heat sink for this one – just epoxy a big ‘ol transformer to the aluminum plate in the Chromecast.

This year, Keysight gave away a pile of test and measurement gear to the i3Detroit hackerspace. Keysight is doing it again, with a grand prize of around $60,000. Entries close on the 15th. Protip: you, personally, don’t want to win this for tax reasons. A non-profit does.

The Internet recently caught wind of a satellite modem being sold by Sparkfun. It’s $250 for the module, with a $12/month line rental, and each 340 byte message costs $0.18 to receive. Yes, it’s cool, and yes, it’s expensive. If you ever need to send a message from the north pole, there you go.

Need to remove the waterproof coating from LED strips? Don’t use a knife, use a Dremel and a wire brush.

Maker Barn Organizer Creates Makerspace Access Control System

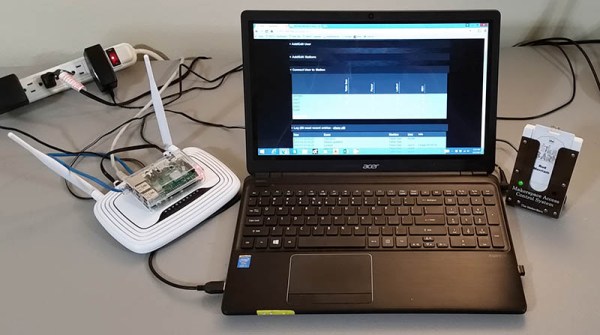
The MakerBarn is a new makerspace between The Woodlands and Tomball, TX (north of Houston). [George Carlson], one of the founders and a retired design engineer, wanted to make sure only members certified on a machine could use it. He worked with [Kolja Windeler] to create the MACS or Makerspace Access Control System. He has one video explaining MACS and, after the break, another explaining the browser based user interface for the system.

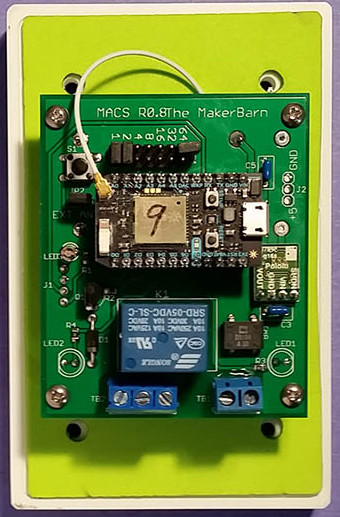
20151205_181615A control box, [George] calls them stations, controls the power to a machine. Member badges have an RFID tag that is read when inserted into the station’s reader. If the member is authorized to use the machine, the power is enabled. For safety, the member’s badge must remain in the reader to maintain power. The reader uses a Photon board from Particle with a WiFi link to a Raspberry Pi server.
[Kolja] developed a Pi system to maintain a database of member numbers and the machines they can use. The list is sent to the stations periodically or when updates occur. The user interface is browser based on the MakerBarn’s LAN so it can be maintained by a computer or smartphone in the space. Presently 21 MACS modules have been built with some going to Hanover University in Germany for their auto hobby shop.

Not only did [George] lead the effort on creating MACS but has been key to getting the construction done inside a pole barn to make the MakerBarn a reality.

Continue reading “Maker Barn Organizer Creates Makerspace Access Control System”

OSWatch, An Open Source Watch

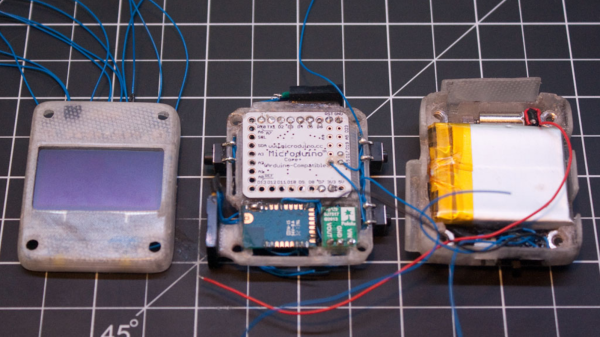
If you are a soldering ninja with a flair for working with tiny parts and modules, check out the Open Source Watch a.k.a. OSWatch built by [Jonathan Cook]. His goals when starting out the project were to make it Arduino compatible, have enough memory for future applications, last a full day on one charge, use BLE as Central or Peripheral and be small in size. With some ingenuity, 3d printing and hacker skills, he was able to accomplish all of that.

OSWatch is still a work in progress and with detailed build instructions available, it is open for others to dig in and create their own versions with modifications – you just need to bring in a lot of patience to the build. The watch is built around a Microdunio Core+ board, an OLED screen, BLE112A module, Vibration motor, a couple of LEDs and Buttons, and a bunch of other parts. Take a look at the schematics here. The watch requires a 3V3, 8MHz version of the Microdunio Core+ (to ensure lower power consumption), and if that isn’t readily available, [Jonathan]  shows how to modify a 5V, 16MHz version.

Continue reading “OSWatch, An Open Source Watch”

FIRST Robotics Gives Us Hope In The Next Generation Of Hackers

A top scoring team in FIRST Robotics shows off just what some high-school students are capable of. Called the Simbot SideSwipe, their 2015 robot is a slick piece of mechatronic genius, which according to our tipster was built in just six weeks by the students.

The robot is essentially a remote controlled palletizing forklift, capable of collecting and stacking six recycling totes, and a green bin. It’s an impressive combination of mechanical control and fabrication — though it is worth noting, these bots are remote controlled — not autonomous.

To encourage learning, the team has posted their engineering report, and even the CAD model online. They obviously had quite a bit of funding judging by their component selection, but regardless, we’re seriously impressed with both the design and execution of manufacturing their robot — especially if it was really built in just six weeks. Just take a look at the following videos:

Continue reading “FIRST Robotics Gives Us Hope In The Next Generation Of Hackers”

Decoupling Lego Trains Automatically

Lego train sets were introduced almost 50 years ago, and since then, one thing has been constant: the trains connected with magnets. While this is a supremely simple means of connecting locomotives to rolling stock, there is one big disadvantage. Building decouplers – devices that will separate one car from another – is difficult.

Now, with a clever combination of racks, gears, and wedges, trains can disassemble themselves. They can even do it with an Arduino.

wedgeThis decoupler works by effectively wedging cars apart from each other. With a motor from an old Lego Technic set, a few gears, shafts, and a rack, a device can be constructed that fits between the rails of a track that raises into the undercarriage of rolling stock.

Because this rolling stock is moved around with a locomotive, all that’s needed to separate two halves of a train is to move the locomotive forward. Yes, it does mean that the connection with the weakest magnet is disengaged – not necessarily the connection you want to decouple. However, with only one car and a locomotive, there’s only one connection to break. Simple enough.

This Lego decoupler can be further improved with an Arduino, a few ultrasonic sensors, and an IR detector to make a fully automatic decoupling siding for a Lego train layout. You can see all this below operating with a full state machine that perpetually switches rolling stock behind a locomotive.

A great use for Legos.

Continue reading “Decoupling Lego Trains Automatically”

ARM-Based Gesture Remote Control

When we wave our hands at the TV, it doesn’t do anything. You can change that, though, with an ARM processor and a handful of sensors. You can see a video of the project in action below. [Samuele Jackson], [Tue Tran], and [Carden Bagwell] used a gesture sensor, a SONAR sensor, an IR LED, and an IR receiver along with an mBed-enabled ARM processor to do the job.

The receiver allows the device to load IR commands from an existing remote so that the gesture remote will work with most setups. The mBed libraries handle communication with the sensors and the universal remote function. It also provides a simple real-time operating system. That leaves just some simple logic in main.cpp, which is under 250 lines of source code.

Continue reading “ARM-Based Gesture Remote Control”