Doubling Down On A Big LED Display

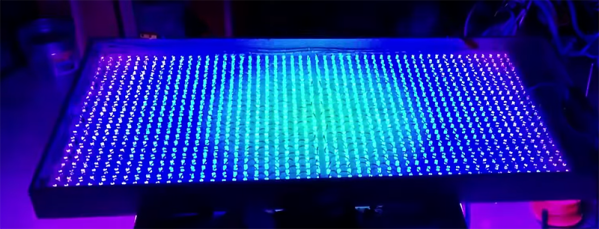
Last year at the 2014 NC Maker Faire, Manical Labs brought a large LED display. Blinking LEDs and pixel animations are always welcome, but at 24 inches square this build was impressive, but it wasn’t impressive enough. This year, [Adam] at Manacal Labs wanted to go bigger. Much bigger. This build is called Colossus, and at two square meters and with 1250 individual LEDs, this LED display is a colossal build.

When building a big LED display, an enormous amount of planning pays off in dividends. The backbone of this project is a sheet of 3/8″ plywood, ripped down to 1 meter by 2 meters. 1250 half-inch holes are drilled in this sheet over four or five very long and very tedious evenings. The LEDs are installed in the thousand or so holes, and a grid of foam core board encases each individual LED.

One of the biggest problems with large arrays of LEDs is the sheer scale of it all. If one LED pixel draws 60mA, 1250 pixels means a draw of 75 Amps. This current will melt most wires, so the power is delivered over custom made copper bus bars. Driving this display with a reasonable refresh rate is another important consideration; WS2812 lights, with an 800kHz signal over one wire, is far too slow for a huge display. Instead of the 2812s, [Adam] went with LPD8806 LEDs that can be clocked at 30MHz. This is controlled with two AllPixels, effectively making this two displays acting as one. It all comes together in a very big LED display. You can check out a video of it below.

Continue reading “Doubling Down On A Big LED Display”

WiFi Power Monitor Based on ESP8266

WiFi Power Monitor

Building your own hardware to measure AC power isn’t a simple task. There’s a number of things to measure, including voltage, current, power, and power factor. The Atmel 90E24 is a single chip solution designed for this exact purpose. Connect a few components, and all the power data is available to a microcontroller over SPI.

[hwstar] built a custom power monitoring board based on this IC. His AC-Emeter will give you all the measurements you’d want, and includes an ESP12 module for data collection and WiFi connectivity. Aside from the Atmel 90E24 device, a high power and low resistance resistor is needed for shunt sense current measurement. An external module is used to convert mains voltage down to 5V to power the board.

Of course, working with mains voltages can be a dangerous endeavour. Fortunately, [hwstar] provides some tips on how to prevent “equipment from being BLOWN UP” along with the open source hardware and firmware.

[via Embedded Lab]

Etch-A-SDR

What do you get if you cross a software defined radio (SDR) and an iconic children’s drawing toy that we are sure is a trademarked name? If you are [devnulling], you wind up with the Etch-A-SDR. The box uses an Odroid C1, a Teensy, and the ubiquitous RTL-SDR.

The knobs work well as control knobs (as you can see in the video below). When you are bored listening to the radio, you can reset the box and go into Etch-a… um, drawing mode. The knobs work like you’d expect and you can even erase the screen with a vigorous shake.

Continue reading “Etch-A-SDR”

Music RFID Bot

RFID Enabled Robot Plays Music For 3 Year Old

[Ronald] has a three year old daughter who loves music, but hasn’t quite gotten the hang of complex MP3 players or the radio yet — what gives, three is pretty old?! Inspired by an RFID enabled cassette player he saw, [Ronald] decided to make her something that was cute — and easy to use.

He started with the adorable KNG Andrew Home Invader speaker, and proceeded to jam a Raspberry Pi inside. What he wanted to do was be able to put RFID tags on certain objects that his daughter could associate with her favorite music — only problem, he didn’t know how to use RFID tags! Luckily he found another article which explained how to write a script in Python in order to easily use an RFID system.

Continue reading “RFID Enabled Robot Plays Music For 3 Year Old”

A Thousand LED Lights For Your Room

Sure, you could get a regular light fixture like a normal person… Or you could use close to a thousand RGB LEDs to light your room!

That’s what [Dmitry] decided to do after trying to figure out the best way to light his pad. You see, his room is 4 by 4 meters, and WS2812 RGB LED strips happen to come in 4 meter lengths… Coincidence? We think not.

The problem with using 16 meters of LED strips is powering them… You see, at 16 meters, you’re looking at about 5V @ 57.6A — and we’re guessing you probably don’t have a 5V 60A power supply handy. Not to mention if you run them in series, the resistance of the system is going to kill your efficiency and the last LEDs probably won’t even work… So [Dmitry] had to break the system up. He has two power supplies feeding the strips from the middle of each pair — that way, he doesn’t have to worry about any voltage drops due to the length of the strips.

Continue reading “A Thousand LED Lights For Your Room”

Raspberry Pi Sentry Turret Is The Enemy Of All Mankind

War, huh, what is it good for? Absolutely nothing, except as an excuse to build a Raspberry Pi powered sentry turret that will track and fire upon your enemies. That’s what [Matt Desmaris] decided to do, and he has released the full details of his build.

It lacks the polished elegance of most military hardware, but what do you expect of a quick and dirty hack? It’s not shiny or ominous, but it has that killer motion-tracking feature. [Matt] is using OpenCV to detect movement from a USB webcam, two servos to pan and tilt the camera and gun and a small relay to pull the trigger. Manual control over the Interwebs is also available.

We’ve seen lots of similar builds using weaponry such as rubber bands and Nerf guns, but this one is a great start if you are interested in seeing how you can tie together tools like OpenCV and servos to create a camera that actively tracks movement.

Vintage BBC Computer Gets FPGA Buddies

The BBC Microcomputer System (or BBC Micro) was an innovative machine back in the early 1980’s. One feature that impressed reviewers was a “tube” interface that allowed the machine to become an I/O processor for an additional CPU. When the onboard 6502 became too slow, it could become a slave to a Z-80 or even an ARM processor. The bus was actually useful for any high-speed device, but its purpose was to add new processors, a feature Byte magazine called “innovative.”

[Hoglet67] has released a very interesting set of FPGA designs that allows a small board sporting a Xilinx Spartan 3 to add a 6502, a Z80, a 6809, or a PDP/11 to a BBC Micro via the tube interface. There’s something satisfying about a classic computer acting as an I/O slave to a fairly modern FPGA that implements an even older PDP/11.

Continue reading “Vintage BBC Computer Gets FPGA Buddies”