Transparent ESP8266 WiFi-to-Serial Bridge

These days, connecting your microcontroller project to a WiFi network is pretty easy — you connect up an ESP8266 to your microcontroller project and pretend it’s a WiFi modem, using these old-school-style AT commands. But what do you do if you need to flash new code into the microcontroller? You can’t reprogram the micro remotely through the ESP8266 because those stupid AT commands get in the way.

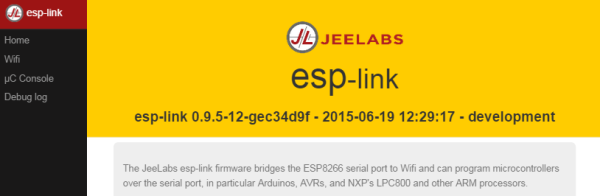
The solution? By flashing the esp-link firmware into your ESP8266, you talk directly to the microcontroller over WiFi as if it were connected by a serial cable: the ESP8266 becomes a totally transparent WiFi-serial bridge. Now, with a serial bootloader and an ESP8266 in Wifi-to-serial bridge mode, you can reflash your microcontroller wirelessly, and then telnet in to interact with and debug the system remotely. Once you’ve fixed the bugs, you can re-flash the microcontroller: all over WiFi, without having to climb up a ladder to reach your IoT attic-temperature sensor.

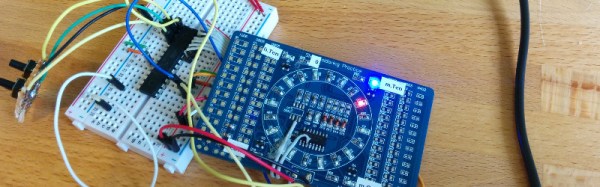
To flash a connected Arduino, for instance, all you need to do is convince AVRDUDE to use the network instead of a locally-connected USB-serial cable: avrdude -p m328p -c arduino -b 115200 -P net:192.168.1.123:23 -U:yourHexFile.hex. The ESP8266 passes the data straight through its TX and RX lines to your microcontroller and everything works as if it were wired.

Configuration to allow the ESP8266 to join your WiFi network takes place on a self-hosted webpage that uses [Sprite_tm]’s esp-httpd standalone server, which makes setup pretty painless. And then after that you can simply telnet to the ESP8266 at port 23 and type away, or do anything else you would with a wired serial connection.

Although the simple bridge mode came first, esp-link looks like it’s growing to be a one-stop shop for all your IoT or microcontroller + WiFi needs. In addition to the serial bridge code, there is also a REST-based microcontroller-to-internet mode and there is bi-directional MQTT support in the wings. We haven’t had a chance to dig into these yet, so if you have, let us know in the comments.

If you want to dig in deeper, head over to [Jeelabs]’ blog for a slightly outdated tour of the project written by the code’s author, [Thorsten von Eicken]. For the most up-to-date development news, follow the very active development of esp-link in this thread on the esp8266 forums.

Hacking Eating Tracking

There’s a great hackathon going on this weekend in the Boston area. Hacking Eating Tracking challenges participants to develop technology that will help guide personal behavior toward a healthier lifestyle.

The event in hosted in Cambridge, MA by Harvard University. It isn’t focused on giving you a diet that you need to follow. It looks instead at how some more abstract behavior changes will cause your body to do this for you. One really quick example is to change the hand in which you hold your fork, or swap out the fork for a different utensil. Going “lefty” while you eat can change the cadence of your consumption and my impact how many calories you consume before feeling full. This is a really fun type of hacking to delve into!

Hackaday is one of the Hackathon sponsors and [Sophi] is headed out to participate in the weekend of building. She’s planning to work with a Pixy Camera which can measure depth data and can separate colors. Of course decisions on the build direction won’t be made until she and her teammates put their heads together, but she did have a few preliminary ideas. Several of these cameras might be used in a supermarket to gather data on where customers tend to congregate and how aisle flow and stock choices might be able to change behavior.

If you’re not in the area you should still be able to follow along as the event helps to improve people’s lives through behavior. The hackathon will be using the Hackaday.io Hackathon framework. Teams will register and update their projects throughout the weekend. We’re looking forward to seeing what is built using the crate of LightBlue Bean boards we sent along from the Hackaday Store.

Hacklet 75 – Guitar Projects

Some things just go hand in hand. Hacking and guitars are one perfect example. A huge number of hackers, makers, and engineers have at least dabbled in playing the guitar. Even those who don’t play have heard the swan song of the wayward guitarist “Bro, you fix amps?”. Seriously, once your guitar toting friends find out you tinker in electronics, you’ll never be left wanting for pizza or beer. This week’s Hacklet is about some of the best guitar projects on Hackaday.io!

Continue reading “Hacklet 75 – Guitar Projects”

I Built A Clock To Spread Awareness. Now It’s Your Turn

I spent an evening building a clock. It’s not about keeping time, or even about the clock. This is about raising awareness that people actually build electronics as a hobby. Promoting wide understanding of this can have a profound effect on our society. On the one hand, it can avoid drama like we’ve seen with the clock incident this week at a school in Texas. The far more important result is to get more people interested in STEM fields.

If you think back to 10-20 years ago, everyone knew that “computer person” who always had interesting technology, spent tons of time on the computer, and was the go-to when people needed help. Fast forward to today and everyone is that computer geek to one extent or another. Smartphones, tablets, and laptops have been universally adopted. We need everyone today to know that “hardware person” who is building electronics in their basement, garage, or hackerspace. I don’t have any illusions that everyone will be bootstrapping a clock in 10 years. But there are enough of us out there already that raising our profile will let everyone discover they already have a hardware hacker in their social circles.

Get started this weekend by building a Clock for Social Good. Grab a non-hacker friend and build a clock with anything you have lying around. Document it on Hackaday.io and send me a message with the link so I can add it to the already-growing list of clock builds.

This will break down the barriers your non-hacker acquaintances have about cracking open the case on something, or about seeing a bunch of loose wires hanging off of a board. Getting our projects out into the community will help people learn that building hardware is a thing, and one that they should get their kids excited about. The more engineers we can create in middle and high school, the better our future outlook becomes.

Now, if you want to know more about my clock, check out the video after the break. I do have a project page started, with plenty more information coming later today as I find carve out some time to update it. I can’t wait to see what you come up with for your own project!

Continue reading “I Built A Clock To Spread Awareness. Now It’s Your Turn”

Dear TSA: This Is Why You Shouldn’t Post Pictures Of Your Keys Online

We have to hand it to the Transportation Security Administration (TSA). They seem to have a perfect track record of screwing up – and that’s not an easy thing to accomplish if you think about it. If it’s not reports of TSA agents stealing valuables or inappropriately groping passengers, there is the fun fact that in all the years since it was created in 2001, the agency hasn’t caught a single person seeking to do harm in the friendly skies. We’re actually okay with that if it means nobody is trying to do anything shady.

The most recent TSA folly seemed to practically fall into the Internet’s lap when a reporter for the The Washington Post published a hi-res picture of the entire set of TSA master keys while writing an article about how the TSA handles your bags after checking them at the counter. Well, the lock picking community when nuts and in a short time had 3D printed versions available and working. You can see it in action in the (twitter) video after the break.

For those that are not familiar with travel in the US, you are not allowed to use just any old lock on your bags. It has to be approved by the TSA – and that means that they have to be able to open it. So the TSA agents have a set of master keys that can open any bag if they need to look inside for some reason. If you put a non-TSA approved lock on the bag, that can make them a little angry, and you risk having your bag delayed or even cut open.

Of course, you can get into just about any suitcase with a ball point pen, so maybe this isn’t a real “security” issue, but it sure isn’t what you want to see from the agency that is supposed to protect you. Who knew that you could make keys from a photograph? We did way back in 2009 and way more in depth this May… maybe the TSA should start reading Hackaday?

Continue reading “Dear TSA: This Is Why You Shouldn’t Post Pictures Of Your Keys Online”

Embed With Elliot: Interrupts, The Good…

What’s the biggest difference between writing code for your big computer and a microcontroller? OK, the memory and limited resources, sure. But we were thinking more about the need to directly interface with hardware. And for that purpose, one of the most useful, and naturally also dangerous, tools in your embedded toolchest is the interrupt.

Interrupts do exactly what it sounds like they do — they interrupt the normal flow of your program’s operation when something happens — and run another chunk of code (an interrupt service routine, or ISR) instead. When the ISR is done, the microcontroller picks up exactly where it left off in your main flow.

Say you’ve tied your microcontroller to an accelerometer, and that accelerometer has a “data ready” pin that is set high when it has a new sample ready to read. You can wire that pin to an input on the microcontroller that’s interrupt-capable, write an ISR to handle the accelerometer data, and configure the microcontroller’s interrupt system to run that code when the accelerometer has new data ready. And from then on everything accelerometer-related happens automagically! (In theory.)

This is the first part of a three-part series: Interrupts, the Good, the Bad, and the Ugly. In this column, we’ll focus on how interrupts work and how to get the most out of them: The Good. The second column will deal with the hazards of heavyweight interrupt routines, priority mismatches, and main loop starvation: the Bad side of interrupts. Finally, we’ll cover some of the downright tricky bugs that can crop up when using interrupts, mainly due to a failure of atomicity, that can result in logical failures and corrupted data; that’s certainly Ugly.

Continue reading “Embed With Elliot: Interrupts, The Good…”

Golden Commodore C64 Brings The Bling To 8-Bit Computing

Sometimes, a hack is just a hack. And sometimes, a hack is nothing but a gold-plated Commodore C64.

Alright, it’s not gold-plated, it’s gilded. For the uninitiated, gilding is the process of gluing gold powder or gold leaf to an object. Gold is amazingly ductile – a tiny nugget 5mm in diameter can be hammered into a sheet of gold leaf that can cover about a half a square meter. It’s extremely thin and delicate and has to be handled very gingerly, and the gilder’s craft is therefore very meticulous. For more on gilding, see this post on signmaking with gold leaf.

[thefuturewas8bit], who runs a vintage Commodore web store, did a great job gilding a C64 case, just because. The attention to detail is fantastic – notice that even the edges of the keyboard cutouts are gilded and burnished. A nice finishing touch is swapping out the stock red power LED for a yellow one – red simply clashes too much. Lest you think there’s nothing to learn from a purely aesthetic hack, [thefuturewas8bit] shares a great tip for removing the metal badges from a plastic case – spray them with freeze-spray from the back to pop off the glue. No need to dig at them with a screwdriver and gouge or bend them. Nice trick.

Any hack can earn extra points for style, and we think that gold works well on the C64.  But if gold is a little too overstated for you, you can always try to score a colorful new injection-molded case for your vintage Commodore.