Levitating Objects In Paramagnetic Liquids

Two weekends ago was the Bay Area Maker Faire, and lacking a venue to talk to people who actually make things, we had a meetup at a pub. This brought out a ton of interesting people, and tons of interesting demos of what these people were building. By either proclivity or necessity, most of these demos were very blinkey. The demo [Grant McGregor] from Monterey Community College brought was not blinkey, but it was exceptionally cool. He’s levitating objects in paramagnetic liquids with permanent magnets.

Levitating objects in a paramagnetic solution around a magnetic field has been an intense area of research for the Whitesides Research Group for a few years now, with papers that demonstrate methods of measuring the density of objects in a paramagnetic solution and fixing diamagnetic objects inside a magnetic field. [Grant] is replicating this research with things that can be brought to a bar in a small metal box – vials of manganese chlorate with bits of plastic and very strong neodymium magnets. The bits of plastic in these vials usually float or sink, depending on exactly what plastic they’re made of. When the paramagnetic solution is exposed to a magnetic field, the density of the solution changes, making the bits of plastic sink or float.

It’s a bizarre effect, but [Grant] mentioned a nurd rage video that shows the effect very clearly. [Grant]’s further experiments will be to replicate the Whitesides Research Group’s experiment to fix a diamagnetic object inside a magnetic field. As for any practical uses for this effect, you might be able to differentiate between different types of plastic (think 3D printing filament) with just a vial of solution and a strong magnet.

[Grant] was heading out of the pub right when I ran into him, but he did stick around long enough to run into the alley behind the pub and record an interview/demo. You can check that out below.

Continue reading “Levitating Objects In Paramagnetic Liquids”

Dancing Mandelbrot Set On A FPGA

This FPGA based build creates an interesting display which reacts to music. [Wancheng’s] Dancing Mandelbrot Set uses an FPGA and some math to generate a controllable fractal display.

The build produces a Mandelbrot Set with colours that are modified by an audio input. The Terasic DE2-115 development board, which hosts a Cyclone IV FPGA, provides all the IO and processing. On the input side, UART or an IR remote can be used to zoom in and out on the display. An audio input maps to the color control, and a VGA output allows for the result to be displayed in real time.

Dancing Mandelbrot Block Diagram
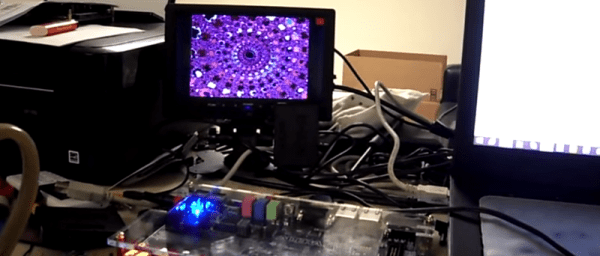
On the FPGA, a custom calculation engine, running at up to 150 MHz, does the math to generate the fractal. A Fast Fourier transform decomposes the audio input into frequencies, which are used to control the colors of the output image.

This build is best explained by watching, so check out the video after the break.

Continue reading “Dancing Mandelbrot Set On A FPGA”

Retrotechtacular: Hand-Synthesized Sound

When you think of early sound synthesis, what technologies come to mind? The Hammond Organ?  Or perhaps its predecessor, Thaddeus Cahill’s Telharmonium? In the early 1920s and 30s, many Bauhaus artists were using paper and film to synthesize musical instruments.

A few of them experimented with the optical film soundtrack itself, drawing waveforms directly upon it. [Evgeny Sholpo] created an optical synthesizer he called the Variophone. It used cardboard disks with intricate cutout patterns that resembled spinning, sonic snowflakes.

During the early 1930s, an artist named [Nikolai Voinov] created short animated films that incorporated the cut paper sound technique. [Voinov]’s soundtrack looked like combs of varying fineness. For his animated figures, [Voinov] cut and pieced together characters from paper and made them move in time to his handmade paper soundtrack.

In [Voinov]’s “Dance of the Crow”, an animated crow struts his stuff from right to left and back again while working his beak in sync with the music. The overall effect is like a chiptunes concertina issuing forth from a crow-shaped pair of bellows. It’s really not to be missed.

Thanks for the tip, [Leo]!

Retrotechtacular is a weekly column featuring hacks, technology, and kitsch from ages of yore. Help keep it fresh by sending in your ideas for future installments.

Review: DSLogic Logic Analyzer

Logic analyzers historically have been the heavy artillery in an engineer’s arsenal. For many of us, the name invokes mental images of large HP and Tektronix iron with real CRT screens. Logic connections were made through pods, with hundreds of leads weaving their way back to the test equipment. The logic analyzer came out when all else failed, when even a four channel scope wasn’t enough to figure out your problems. Setting them up was a pain – if you were lucky, the analyzer had a PC keyboard interface. If not, you were stuck typing your signal names into the front panel keyboard. Once setup though, logic analyzers were great at finding bugs. You can see things you’d never see with another tool – like a data bus slowly settling out after the read or write strobe.

There have been a number of USB based logic analyzers introduced in recent years, but they didn’t really catch on until Saleae released their “Logic” line of devices. Low cost, high-speed, and easy to use – these devices were perfect. They also inspired an army of clone devices based upon the same Cypress Semiconductor parts. DSLogic designed by DreamSource Labs, can be thought of as an open source evolution of the original Saleae device.

DSLogic appeared in 2013 as a Kickstarter campaign for an open source logic analyzer with an optional oscilloscope extension. I think it’s safe to say that they did well, raising $111,497 USD, more than 10 times their initial goal of $10,000 USD. These days both the DSLogic and the oscilloscope extension are available at The Hackaday Store. In this review we’re focusing on the logic analyzer portion of the tool. 

Click past the break for the full story!

Continue reading “Review: DSLogic Logic Analyzer”

LayerOne Demoscene Demoboard Party

The LayerOne conference is over, and that means this last weekend saw one of the biggest demoscene parties in the USA. Who won? A European team. We should have seen this coming.

There were two categories for the LayerOne demo compo, the first using only the LayerOne Demoscene Board. It’s a board with a PIC24F microcontroller, VGA out, and a 1/8″ mono audio out. That’s it; everything that comes out of this board is hand coded on the PIC. A few months ago, [JKing] wrote a demo to demonstrate what this demoboard can do. According to him, it’s the only reason Hackaday sold a single Demoboard in the Hackaday store:

Continue reading “LayerOne Demoscene Demoboard Party”

hand in hand clock

Odd Clock Moves Minute Hand To Hour Hand

We see a lot of clocks here on Hackaday. Some make it easy to tell the time, others are more cryptic. [dragonator] has done something that is so simple, we are surprised it isn’t more common. In a typical mechanical hand clock the minute and hour hands rotate around the same axis. [dragonator] decided to take the minute hand and move it out to the tip of the hour hand.

It works because of a gear system hidden behind the thick hour hand. As the hour hand turns, the gear system rotates, the last gear of which is connected to the minute hand. Since the minute hand rotates 12 times for every one revolution of the hour hand, the gear ratio can easily be calculated.

hand in hand clock
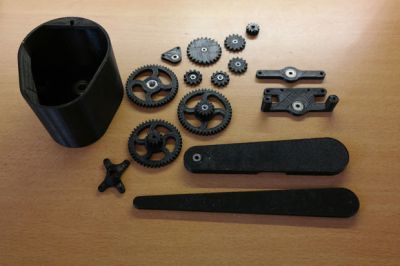
The 3D printed parts were designed by [dragonator] himself. All of the design files are available here for anyone who wants to build one of these neat clocks.

The clock uses a Trinket microcontroller board to keep track of the time and to send step signals to a StepStick that drives a NEMA 17 stepper motor. There is no on-board battery power for this clock, 9-12vdc comes in via a wall wart and is stepped down to 5v by the micro controller’s regulator. Even still, this is a great project that makes it fun to watch time pass, check the video out after the break.

Continue reading “Odd Clock Moves Minute Hand To Hour Hand”

The Hackaday Prize: An Ultra Low Cost 3D Printer Controller

This isn’t a Hackaday Prize entry that will change the world, but that doesn’t mean there’s not a place for it. [vdirienzo] is building an ultra low-cost 3D printer controller for 3D printers and other CNC machine. It’s not going to change the world, but it is a rather interesting little device.

This printer controller is very minimal, with a single-sided circuit board with just enough parts and components to make this board useful. The stepper motor drivers are from Pololu, and most of the other components are stuff you could pull out of a reasonably stocked junk drawer. The microcontroller is rather interesting; it’s an Arduino Nano. Instead of the ATMega644 and ‘Mega1280 microcontrollers found on other 8-bit printer controller boards, [vdirienzo] slimmed down the Teacup firmware to fit on the ATMega328 in the Arduino Nano.

The SinapTec is not by any means the first effort to create an ultra low-cost controller board for a 3D printer that can be assembled at home. The RepRap Gen 7 electronics can be manufactured on a RepRap or small CNC mill. There’s not much to these boards – just a small, single-sided board. If you want a small, simple, and cheap controller board for a 3D printer, this is all you need.

While a cheap 3D printer controller board doesn’t really fit with the ‘change the world’ theme of The Hackaday Prize, that doesn’t mean there’s still not a place in the contest for [vdirienzo]’s entry; we have a Best Product category, with a $100k prize and a six month residency in the Hackaday Design Lab. If that’s not enough reason to build something cool – even if it won’t change the world – we don’t know what is.


The 2015 Hackaday Prize is sponsored by: