More Hackathon Tickets Just Made Available

We had a number of people tell us they weren’t able to get tickets to our Hackathon in New York on Saturday. A block of tickets was just made available. Head on over and grab yours right now!

We’re bringing a mini-van-load of hardware along with us for this one. Our hope is to see a hardware hacker claim the top prize of $5000, but we do have other prizes just for the teams that create something with hardware. You can team up with other creative hackers from the area, all while being wined and dined (well, fed and hydrated anyway) through the entire thing. We can’t wait to see what you can get working with just twenty-hours of build time! You can find out a bit more about the hardware we’re supplying and what we have planned over on our event page.

That’s on Saturday, but the fun actually starts this evening. Join us at 7pm this evening at Antler Wine & Beer Dispensary. We’d appreciate a quick RSVP if you’re coming, and don’t forget to bring some hardware you been working on lately. See you there!

$50k In Play: Giving Away 50 LightBlue Bean This Week

This week we’re awarding a LightBlue Bean board to 50 projects entered in The Hackaday Prize.

We love this little board so much we put it in our store. It brings a microcontroller that has plenty of room and peripherals (and is quite well-known… the ATmega328) with the connectivity of Bluetooth Low Energy. If you’re planning on building something that needs processing power and connectivity with smartphones this is a good place to start. And this week you might just score one as part of the 2015 Hackaday Prize.

We’ll be looking for entries that are getting ready for the physical build and need connectivity. The best way to let us know your project should be one of the fifty winners is to post a new project log with your construction plans and how the Bean (or BTLE) would fit into that plan. Submit your build by next Wednesday (5/6) and you’re in the running!

We’re giving away $50,000 in prizes, 1/10 of the total Hackaday Prize pool during the build phase going on right now.

Last Week’s 30 Winners

OSHpark-coupon-prize

Last week we were looking for great entries in need of circuit boards and boy, did we find a lot of them. Judging is super hard. We looked at all the entries and ended up with these 30 winners. Each will receive $50 to use for custom PCB manufacturing from OSH Park. We expect to see a lot more purple boards popping up on entry pages in the coming weeks! Congratulations to all winners. Each project creator will find prize info as a message on Hackaday.io.


The 2015 Hackaday Prize is sponsored by:

3D Printering: Laser Cutting 3D Objects

3D printing can create just about any shape imaginable, but ask anyone who has babysat a printer for several hours, and they’ll tell you 3D printing’s biggest problem: it takes forever to produce a print. The HCI lab at Potsdam University has some up with a solution to this problem using the second most common tool found in a hackerspace. They’re using a laser cutter to speed up part production by a factor of twenty or more.

Instead of printing a 3D file directly, this system, Platener, breaks a model down into its component parts. These parts can then be laser cut out of acrylic or plywood, assembled, and iterated on much more quickly.

You might think laser-cut parts would only be good for flat surfaces, but with techniques like kerf bending, and stacking layer upon layer of material on top of each other, just about anything that can be produced with a 3D printer is also possible with Platener.

To test their theory that Platener is faster than 3D printing, the team behind Platener downloaded over two thousand objects from Thingiverse. The print time for these objects can be easily calculated for both traditional 3D printing and the Platener system, and it turns out Platener is more than 20 times faster than printing more than thirty percent of the time.

You can check out the team’s video presentation below, with links to a PDF and slides on the project’s site.

Thanks [Olivier] for the tip.

Continue reading “3D Printering: Laser Cutting 3D Objects”

Hackaday Prize Entry: Building A Car, From Scratch, Out Of Foam

Want an impressive example of what a few people can do in a garage? How about building an electric car, from scratch, starting with a gigantic chunk of foam?

The Luka EV from [MW Motors] had a few project aims: it should be all-electric, naturally, with a top speed of 130km/h or 80mph. It should have a range of over 300km, and it should look good. That last line item is tricky; it’s not too hard to build an electric car, but to make one look good is a challenge.

The design of the car actually started out as a digital file. A large block of foam was acquired and carefully carved into the desired shape. This foam is covered fiberglass, and parts are pulled off this fiberglass mold. This is a great way to do low-volume production – once the molds are complete, it’s a relatively simple matter to build another body for a second Luka EV.

With all the lights, accessories, windows, and trim installed, it’s time to put this body on a chassis. This was welded out of square tube and serves as a test rig that can be independent of the mess of fiberglass. In the chassis are batteries, suspension, motor controllers, and wheels loaded up with hub motors. It works well, even with one motor.

There’s a lot more to this project, including a great guide on building a road legal car in the UK. The team isn’t based in the UK, but it’s a much more friendly environment for ‘small series’ vehicles. The requirements are easy to meet – “have a horn”, for example – but there are a lot of them.

Already the car is beautiful, and that’s just with it sitting on a trailer. We can’t wait to see this thing hit the road.


The 2015 Hackaday Prize is sponsored by:

Use A Lamp To See Into The Future

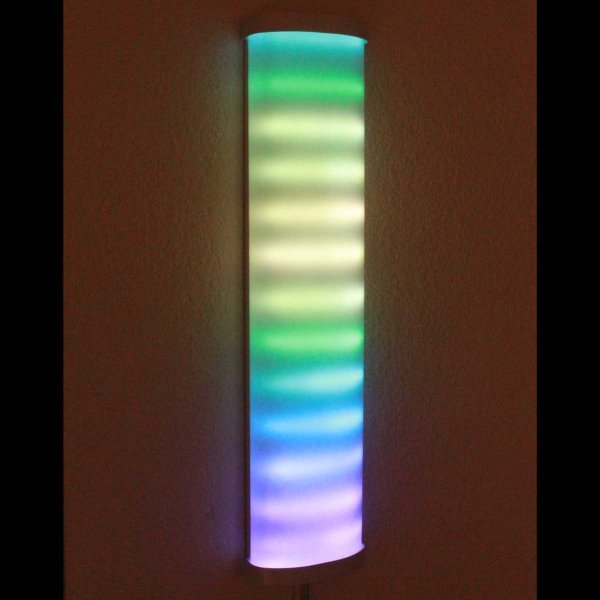
We’ve heard of magic lamps before, but this one is actually real. [Alex] has created a wall-mounted lamp that can tell you what the future will be like; at least as far as the weather is concerned. It is appropriately named “Project Aladdin” and allows you to tell a great deal about the weather at a glance as you walk out of the door.

The lamp consists of twelve LED strips arranged vertically. The bottom strip represents the current hour, and each strip above represents another hour in the future. The color of each strip indicates the temperature, and various animations of the LEDs within each strip indicate wind speed and precipitation.

The system uses a weather forecasting backend built-in Java, which is available on the project’s page. The LEDs are controlled by an application that is written in C, and the entire set of LEDs are enclosed in a translucent housing which gives it a very professional appearance. Be sure to check out the demo video after the break. Be sure to check out some other takes on weather lamps which use regular desk lamps instead of intricate scratch-made LED lamps.

Continue reading “Use A Lamp To See Into The Future”

Using The Sun To Beat The Heat

It’s practically May, and that means the sweltering heat of summer is nearly upon us. Soon you’ll be sitting outside somewhere, perhaps by a lake, or fishing from a canoe, or atop a blanket spread out on the grass at a music festival, all the while wishing you had built yourself a solar-powered personal air conditioner.

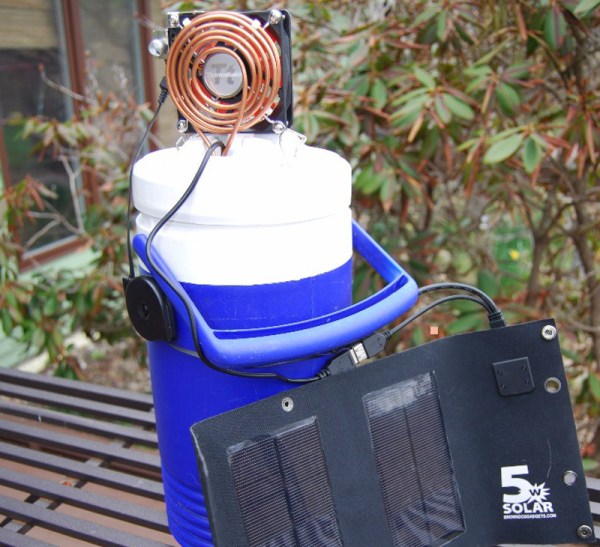
[Nords] created his from a large insulated beverage vessel. The imbibing spout offers a pre-made path to the depths of said vessel and the heart of this build, the ice water refrigerant. [Nords] fashioned a coil out of copper tubing to use as a heat exchanger and strapped it to the fan that performed best in a noise-benefit analysis.

A small USB-powered submersible pump moves the ice water up through the copper tubing. Both the pump and the fan run off of a 5V solar panel and are connected with a USB Y cable, eliminating the need for soldering. Even if you spend the summer inside, you could still find yourself uncomfortably warm. Provided you have access to ice, you could make this really cool desktop air conditioner.

[via Embedded Lab]

Arduino GPS

A Simple And Inexpensive GPS Navigation Device

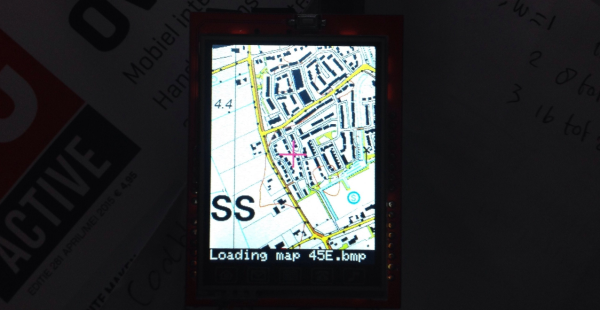
There are plenty of GPS navigation units on the market today, but it’s always fun to build something yourself. That’s what [middelbeek] did with his $25 GPS device. He managed to find a few good deals on electronics components online, including and Arduino Uno, a GPS module, and a TFT display.

In order to get the map images on the device, [middelbeek] has to go through a manual process. First he has to download a GEOTIFF of the area he wants mapped. A GEOTIFF is a metadata standard that allows georeferencing information to be embedded into a TIFF image file.  [middelbeek] then has to convert the GEOTIFF into an 8-bit BMP image file. The BMP images get stored on an SD card along with a .dat file that describes the boundaries of each BMP. The .dat file was also manually created.

The Arduino loads this data and displays the correct map onto the 320×240 TFT display. [middelbeek] explains on his github page that he is currently unable to display data from two map files at once, which can lead to problems when the position moves to the edge of the map. We suspect that with some more work and tuning this system could be improved and made easier to use, of course for under $25 you can’t expect too much.