IntelliServo

Servos are extremely versatile actuators used in a large number of applications which need controlled mechanical movement. The usual way of driving them is by using a PWM output from a micro-controller. But if you’re building a robot or a drone which requires a large number of servos, then it makes sense to add smarts directly to the servo.

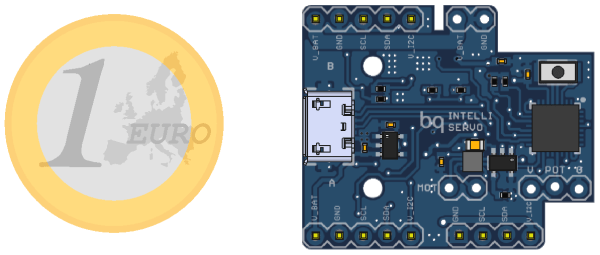
[Alvaro Ferrán Cifuentes] did just that by building IntelliServo – an add on board which makes regular servos smart by giving them enhanced capabilities as found in high-end versions. His approach is different compared to other takes on this theme. The IntelliServo is designed to replace the electronics in any regular servo and is not limited to any particular make or type. Once upgraded, it’s possible to read the servos position, temperature and current consumption. This allows interesting uses, such as controlling one servo by moving another one, or detecting collision or stalling by monitoring the servo current. Multiple servos can be daisy-chained and controlled over I²C from a micro-controller, or over USB directly from a computer. Each board features an LPC11U24 32-bit Cortex-M0 micro-controller, a DRV8837 motor driver, a TMP36 temperature sensor and a PCA9508 I²C repeater.

The project is open source and the Github repository contains the board design, Arduino library and examples, servo firmware and mechanical parts as well as use instructions. It’s a modular design which allows using either an external controller or running it directly via the on-board micro-USB socket. Check out the videos after the break to see the IntelliServo in action.

Continue reading “IntelliServo”

USB-less WiFi For The Pi Zero

Since the introduction of the Raspberry Pi Zero, the hacker, maker, and hobbyist electronics world has been thrown into turmoil. ‘The Raspberry Pi Foundation is corrupt,’ the detractors said, ‘and the Pi Zero is just a marketing ploy to get their name out.’ Others chimed in that the Raspberry Pi Zero doesn’t even exist. Despite what a million monkeys on a million keyboards say, the Raspberry Pi Zero does exist and is very cool, despite how limited it is. There’s only one USB port, but that doesn’t mean you can’t have WiFi. [ajlitt] came up with a WiFi hat for the Pi Zero that goes right through the GPIO pins, and shouldn’t cost more than a few dollars to implement on any Raspberry Pi.

There is no Ethernet port on the Pi, and apart from a single USB OTG port, no apparent high-speed interfaces to the outside world. On the other hand, there’s a few things hidden deep down in the SoC on the Pi including two MMC controllers. One of these controllers is used for the SD card, but the second can be broken out on a few GPIO pins. By tapping into those pins and configuring the kernel just right, SDIO is available on the GPIO pins, giving the Pi WiFi through a cheap ESP8266 module.

We’ve seen [ajlitt]’s work on SDIO devices on the Pi before, but he’s slowly been reworking this build with the Pi Zero in mind. It didn’t begin as a project for the Hackaday Prize, but already it’s one of the more popular entries so far. Of course there are thousands of projects on Hackaday.io that aren’t entered into the Hackaday Prize this year, and if you’re behind one of those, this is your call to step up.

The HackadayPrize2016 is Sponsored by:

Automated Blinds Open The Window To Our Heart

[Brian Harms] made his living room window blinds open and close automatically using servos, an Arduino, and a SmartThings Arduino shield. Best of all, it’s connected to his Amazon Echo so that merely saying “Alexa, turn on/off the blinds” will open and close them.

To accomplish the feat [Brian] used two laser cut acrylic gears; one of which was attached to the servo horn, and the other to the long square rod running the length of the blinds. Despite using the bulky Arduino and shield, the finished product is inconspicuous and streamlined, and the single Arduino controls all three of the blinds in the living room. [Brian] answered a bunch of questions on a Reddit thread.

Blinds are a common connected home hack, and while none of the hacks we’ve covered in the past were voice activated, we have seen temp-sensitive blinds and a Raspberry Pi-based solution.

Continue reading “Automated Blinds Open The Window To Our Heart”

DIY Arduino Watch

We first thought [Alexis Ospitia]’s watch was a sports watch made with an Arduino, but it’s actually a sporty watch made with an Arduino. This explains the watch’s strange ability to tell you the current temperature and humidity.

The core of the watch is an Arduino Mini. To make it good for time telling, a real-time clock module was added. A DHT11 monitors the temperature and humidity. A charge circuit and lithium battery provide power. Finally, the watch displays the date, time, and other data with an LCD from a Nokia 5110. We can tell you the last part that’s going to break on this.

Even if you think the watch is a bit chunky, the tutorial is very slick. [Alexis] has taken the trouble to individually draw and describe each portion of the watch’s construction. He explains each pin, what they do, and provides a Fritzing drawing of the wires to the Arduino. The code is provided; to program the watch a USB-to-serial module must be used.

For the housing he made a box from a thin gauge aluminum sheet and attached leather straps to the assembly. The final construction is cool looking in a techno-punk way, and is fairly compact. One might even say sporty.

“That’s Not A Knife…”

[Robin Baumgarten] likes to play dangerously. His latest creation, Knife To Meet You cuts to the quick of cooperative gaming. 3 humans play together against the machine. The object of the game is to hold your button down as long as possible. The game makes this difficult by sweeping a knife across the play field, right at finger level. (Video below.)

Knife to meet you is controlled by a flesh eating Arduino. In addition to reading the controls and driving a servo to move the knife, the Arduino also displays encouraging messages on a 2×20 character LCD.

The idea is to scare people, not to actually slice them up. To this end, the knife is actually a capacitive sensor. When the game detects the knife has contacted soft human flesh, it stops the knife before blood starts flowing. The game indicates a player has been defeated by making several chopping motions toward the loser. If the losing player still has all their digits, a new round begins.

The project was created as part of a 24 hour game jam. The final product is quite nice, built into a wood case that closes up for travel. It even has a carrying handle, so you can bring it to parties and find fresh victims players.

We’re not sure what it is about knives and Arduinos. It was only a few months ago that we saw an Arduino driving a knife wielding tentacle. Could the world’s friendliest microcontroller board be turning on us?
Continue reading ““That’s Not A Knife…””

World Create Day: A Subcontinent, An Island Continent, And Asia

Hackaday’s own World Create Day is just two days away. This Saturday, April 23rd, the Hackaday community will rise up, come together, have fun, share a few stories, and build something cool in the process.

ausasiaWhen we announced World Create Day a few weeks ago, we were inundated with responses. Hackerspaces across the globe have offered up their spaces for the Hackaday community to brainstorm the latest entries for The Hackaday Prize.

We have hackerspaces from Islamabad to Adelaide and from Mumbai to Shenzhen opening their doors to the world. If you’re near any of these events, join in on the festivities. If you don’t see one in your neck of the woods, you can still host your own meetup. Just click here to get your town on the map.

What’s going on at these meetups? [Robert] and [Steven] in Adelaide are planning several events including a meet and greet, a few lightning talks, and snacks. They’re also live streaming their event. Maker’s Asylum in Mumbai is doing project demos and forming some teams for the Hackaday Prize. It’s going to be a great event at every hackerspace, and the largest distributed meetup we’ve ever done. Don’t miss this.

The HackadayPrize2016 is Sponsored by:

Pine64: The Un-Review

Even before the announcement and introduction of the Raspberry Pi 3, word of a few very powerful single board ARM Linux computers was flowing out of China. The hardware was there – powerful 64-bit ARM chips were available, all that was needed was a few engineers to put these chips on a board, a few marketing people, and a contract manufacturer.

One of the first of these 64-bit boards is the Pine64. Introduced to the world through a Kickstarter that netted $1.7 Million USD from 36,000 backers, the Pine64 is already extremely popular. The boards are beginning to land on the doorsteps and mailboxes of backers, and the initial impressions are showing up in the official forums and Kickstarter campaign comments.

I pledged $15 USD to the Pine64 Kickstarter, and received a board with 512MB of RAM, 4K HDMI, 10/100 Ethernet and a 1.2 GHz ARM Cortex A53 CPU in return. This post is not a review, as I can’t fully document the Pine64 experience. My initial impression? This is bad. This is pretty bad.

Continue reading “Pine64: The Un-Review”