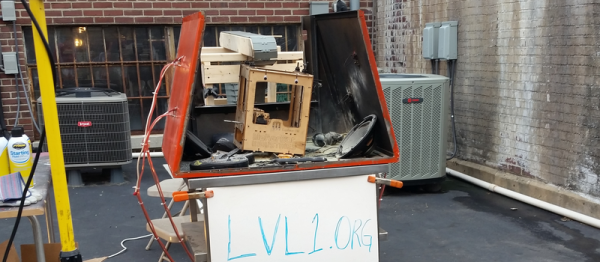
LVL1 Hackerspace Builds A DOOMcano

When you need a DOOMcano, there’s no real substitute. And they’re not just selling these things on the street-corner. Nope, friend, you’ve got to get the hackerspace together and build your own.

plastic_thumbnailFor a fundraiser, and we suspect for the fun of it, the folks at LVL1 in Louisville, KY built a metal case with four (4!) flame-thrower jets. The idea is that you donate, and they’ll burn stuff for you.

Or you could build your own, following their detailed build log. LVL1 earns clever points for the use of 3D printer nozzles as gas jets, and for the laser-cut boxes that hold spray-cans of combustible fluid with servos to depress the buttons. It’s Rube-Goldbergy, but it works. Battery-powered grill igniters provide the spark, and an Arduino provides the control.

If you need more fire-breathing madness, check out this duck decoy (naturally) or this RC flamethrower turret build for further inspiration. And be safe!

Forge Your Own Neon Signs With EL Wire

Neon tube signs radiate an irresistible charm, which has been keeping them alive to this day. The vintage, orange glow is hard to substitute with modern means of illumination, but never trust a neon sign that you didn’t forge yourself. [NPoole] shows you how to build remarkably realistic faux neon tube signs from plastic tubing and EL wire.

After sourcing some polycarbonate tubing from a pet shop, where it’s more commonly used in aquariums, [NPoole] simply inserted some orange EL wire into the tubing. He heated one end of the tubing with a heat gun and twisted it off, sealing one end of the tube and welding the EL wire in place. [Npoole] then went on bending his neon tube to shape, repeatedly heating it up with the heat gun, bending it carefully, and blowing into the open end of the tube to prevent kinking of the tube.

Continue reading “Forge Your Own Neon Signs With EL Wire”

Clustering A Lot Of Raspberry Pi Zeros

It became something of a cliché a few years ago in online discussions, whenever a new single board computer was mentioned someone would pop up and say something like “Imagine a Beowulf cluster…“. Back then it was said largely in jest, but with the current generation of boards it’s a distinct possibility. Who hasn’t looked at a Raspberry Pi and idly thought about a cluster of them, or even created one!

[Electronoob] did just that, creating a variety of Raspberry Pi cluster configurations, the most impressive of which is a stack of 32 Pi Zeros mounted together with stand-offs. The plan was to network it via USB, for which he initially considered building a backplane, but was put off by the cost of vertical USB connectors and instead went for a wired approach. If there is a lesson to be learned from his experiences it is that buying very cheap USB cables is a minefield: his pile of eBay specials turned out to have significant numbers of faults. He’s now faced with a stark choice, solder  32 sets of USB pads on the base of each Zero or buy better cables.

The stack of Zeros is pretty impressive, but so what, you think. It’s still not working properly. But the Zero cluster isn’t his only work. He’s also created a set of very nicely executed Ethernet clusters using the larger Pi boards, and the way he’s mounted them on top of compact Ethernet switches sets them apart from some of the more spaghetti-like Pi clusters.

It’s true a Pi cluster won’t cut it in the world of supercomputers, you could almost certainly buy more bang for your buck without too much effort. But it does represent a very accessible way to learn about cluster computing, and you have to admit it a stack of Zeros does look rather impressive.

We’ve seen quite a few Pi clusters here since 2012, the biggest of which is probably this 120 node behemoth, complete with screens.

Vacuum Exposure Unit Gives Better PCB Etching Results

PCB etching seems to be a subject that sharply divides our community into those who are experts in it and etch themselves every PCB they use, and those who have significant quantities of ferric chloride stained clothing in their past and for whom the advent of cheap commercial PCB manufacture and CNC milled PCB prototyping have been the best thing since sliced bread.

Your likely success when etching your own boards is most dependent on the quality of your preparation and your equipment. If you began your PCB career with etch-resist transfers and a permanent marker with a Tupperware tub of etchant, then later progressed to laser toner or photographic masking and a bubble etcher, you’ll understand this.

[Jana Marie Hemsing] has drawn our attention to this very nicely built PCB etching suite (Translation, German original) at the Warpzone hackerspace (Translation, German original) in Münster, Germany. The foil pattern is printed on transparency and exposed to UV light over a photoresist coated board with a vacuum pump arrangement to ensure as good a contact as possible to the board for the sharpest result. They have two exposers, one for single sided and the other for double-sided boards, both are very well-built from what looks like plywood.

The attention to detail continues with a home-made magnetic stirrer and heated bubble etching tank Their etchant of choice is sodium persulphate, so there are none of those brown ferric chloride stains.

PCB etching is nothing new, indeed we have covered the subject extensively over the years. But we think you’ll agree, if you’re going to etch your own PCBs you should have as good a set-up as you can, and Warpzone’s PCB suite is rather well put together. Those of us in spaces with lesser facilities should be getting ideas from it.

High Impedance Headphones? They’re In The Can!

[George Trimble] likes to build crystal radios. The original crystal radio builders used high impedance headphones. In modern builds, you are as likely to include a powered amplifier to drive a speaker or normal headphones (which are usually around 4 to 16 ohms).

[George] builds his own speakers using chile cans, some wire, a few magnets, part of a Pepsi can (we are pretty sure someone will leave a comment that Coke cans sound better), and the iron core out of an audio transformer. You can see a very detailed video of the process, below.

There is a little woodworking and hot gluing involved. The result is decidedly homemade looking, but if you want to say you built it yourself (or, if you are a prepper trying to get ready to  rebuild after the apocalypse and you can’t find a cache of headphones) this might be just the ticket.

Most of the headphone hacks we see start with a pair of headphones. That’s a bit tautological, but the goal is usually to add features, not make the whole thing. It does give you some hacker cred, though, to be able to look at the other guy’s radio and say, “Oh. I see you used commercial headphones.”

Continue reading “High Impedance Headphones? They’re In The Can!”

Hackaday Prize Entry: AutoFan Saves Tired Drivers With Face Recognition

Long distance driving can be tedious at times. The glare of the sun and the greenhouse effect of all your car’s windows make it hot and dry. You turn on the fan, or air conditioning if you have it, and that brings relief. Soon enough you’ve got another problem, the cold dry air is uncomfortable on your eyes. Eventually as you become more tired, you find yourself needing the air on your face more and more as you stay alert. You thus spend most of the journey fiddling with your vents or adjusting the climate controls. Wouldn’t it be great if the car could do all that for you?

AutoFan is a project from [hanno] that aims to automate this process intelligently. It has a fan with steerable louvres, driven by a Raspberry Pi 2 with attached webcam. The Pi computes the position of the driver’s face, and ensures the air from the fan is directed to one side of it. If it sees the driver’s blink rate increasing it directs the air to their face, having detected that they are becoming tired.

The build logs go into detail on the mathematics of calculating servo angles and correcting for camera lens distortion in OpenCV. They also discuss the Python code used to take advantage of the multicore architecture, and to control the servos. The prototype fan housing can be seen in the video below the break, complete with an unimpressed-looking cat. For those of you interested in the code, he has made it available in a GitHub repository.

Continue reading “Hackaday Prize Entry: AutoFan Saves Tired Drivers With Face Recognition”

Chair Dances Like No One Is Watching

Although it might be more accurate to say that this chair dances because no one is watching, the result is still a clever project that [Igor], a maker-in-residence at the National Museum of Decorative Arts and Design in Norway, created recently. Blurring the lines between art, hack, and the ghosts from Super Mario, this chair uses an impressive array of features to “dance”, but only if no one is looking at it.

In order to get the chair to appear to dance, [Igor] added servo motors in all four legs to allow them to bend. A small non-moving dowel was placed on the inside of the leg to keep the chair from falling over during all of the action. It’s small enough that it’s not immediately noticeable from a distance, which helps maintain the illusion of a dancing chair.

From there, a Raspberry Pi 3 serves as the control center for the chair. It’s programmed in Python and runs OpenCV for face detection and uses pigpio for controlling the leg servos. There’s also a web interface for watching the camera’s output and viewing its facial recognition abilities. The web interface also allows a user to debug the program. [Igor]’s chair can process up to 3 frames per second at 800×600 pixels.

Be sure to check out the video after the break to see the chair in action. It’s an interesting piece of art, and if those dowels can support the weight of a person it would be a great addition to any home as well. If it’s not enough chair for you, though, there are some other more dangerous options out there.

Continue reading “Chair Dances Like No One Is Watching”