Tennis Ball Cannon

Tennis Ball Cannon With Clear Combustion Chamber

[hw97karbine] has made a pretty cool tennis ball cannon. While making a cannon of this sort is nothing new to us, we were impressed by the effort taken to get a stoichiometrically ideal mixture of 3.2% butane and air in the combustion chamber.

[hw97karbine] filled a syringe with butane and then dosed exact amounts into the chamber using a hole in the back. To control the air mixture he marked lines on the outside of the cylinder with magic marker. Simple but effective.

More rewarding than the methods was the cool slow-mo videography of the explosions in the chamber. You really have to check it out. [hw97karbine] shows clearly the difference between a well-balanced fuel to air mixture and a poorly balanced one. It’s one thing to say that more fuel does not mean better combustion, as we all remember from our personal potato cannon experiences, but it’s another thing entirely to see it.

[Via Reddit]

How do you even?

An Incredible Clock Made Of Popsicle Sticks

[alvenh] has come a long way since he was a kid, but he kept the bag of popsicle sticks from his childhood. When he set out to build a clock for himself, he remembered his stored treasure and made something unexpectedly good out of the humble material. We’ve seen some neat stuff made with popsicle sticks before, but they usually retain their familiar shape.

[alvenh] began by choosing a style for his clock. We don’t know how he looked at a bag of sticks and thought, “Old English Georgian bracket clock with a bell top,” but if Hackaday teaches anything, it’s that some people just have a wider vision for the world. Next he laminated the sticks together or used them as a veneer for a thinner sheet of plywood to make his base materials.

An incredible amount of work went into the clock as he did things like sanding large contours using a jar for a form, or cutting mortise and tenons into craft sticks. [alvenh] even painted the face of the clock using his German Shepard as a model. Finally he installed an antique movement into the creation. The final result is stunning, and the build log is fun to read through.

Continue reading “An Incredible Clock Made Of Popsicle Sticks”

Hacklet 90: Schlieren Videos And Jigsaw Puzzle Robots

Happy new year, and welcome to the first Hacklet of 2016! The Hacklet is one of my favorite columns to write, as I get to talk about the great projects people are working on at Hackaday.io. Generally these articles follow a theme, but this being a new year, I’m going to try something new. As Hackaday’s community editor, I keep an eye on the new and updated projects feeds over on Hackaday.io. Every single week I see projects that surprise, impress, and inspire me. This week, I’m going to highlight a couple that I think are just freaking awesome.

torch[Jana Marie] created the Schlieren-Videography project. Schlieren photography is used to image changing densities in fluids and this includes capturing density changes in air. Super and Hypersonic wind tunnels often use this technique to show airflow around a test model. Outside of the wind tunnel, Schlieren is great for showing density changes due to heat or different gasses. That’s exactly what [Jana] is doing in this project.

There are several ways to create Schlieren images, everything from lasers, to diffraction gratings, to razor blades can be used. [Jana] is using a simple moiré pattern and a couple of video tricks to capture Schlieren video. A high density moiré pattern will appear to flicker as density changes bend the light from the moiré stripes. [Jana] simply takes a reference image, then subtracts that image from the live video. The result of the subtraction is the Schlieren images you see above. [Jana] did more than explain the technique she’s used to create the videos, she’s also uploaded a processing sketch which performs the video subtraction magic.
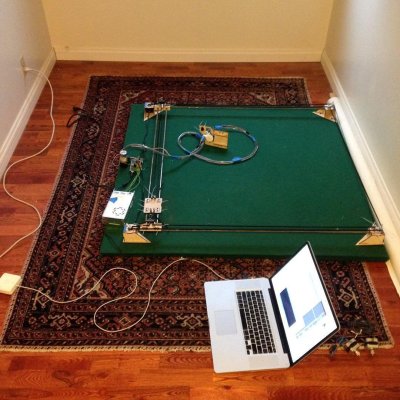
jigsolve[Dan Royer] has a more domestic problem – his family loves starting jigsaw puzzles, but never seems to finish them. He’s decided to invite around 3 billion of his closest friends in the form of JigSolve, an internet connected jigsaw puzzle robot. JigSolve’s Cartesian platform  is a CoreXY based design. [Dan] used CoreXY as a guideline, but designed and built the hardware himself. The electronic hardware side borrows from RepRap 3D printers. An Arduino Mega2560 and RAMPS board control two NEMA 17 stepper motors. The Arduino is running firmware from Makelangelo, [Dan’s] own open source art robot.

The internet connected portion of the project comes in the form of a Java based IRC bot and a connection to the Freenode IRC network. The internet connected masses will have to see what they are working on, so a Logitech webcam will stream video to the ‘net.

The hardest part of JigSolve thus far has been the nozzle. Much like an SMT pick and place machine, the nozzle needs to pick up parts with a vacuum, then rotate them to the desired orientation. [Dan] is looking at different kinds of silicon, and he’s asking for suggestions. Stop over on the project page and offer him a hand!

That’s it for this week’s Hacklet. As always, see you next week. Same hack time, same hack channel, bringing you the best of Hackaday.io!

Very Detailed BB-8 Robot Build

[James Bruton] has just finished and posted the designs for his very impressive BB-8 robot build. We covered the start of his adventures some time ago when we were theorizing about the secret in the new droid, but it was for a completely different robot design. [James] was pursuing a design that used a little robot sitting on top of a big ball.

This new version has a robot sitting inside a ball with the head being magnetically coupled to the body. Among many things with this build, we thought it was cool how the robot has one drive motor and turns by spinning up and reversing a big flywheel in the base of the robot. That was certainly not one of the top theories proposed for the secret behind the robot. The robot is mostly made with a 3d printer, with the occasional cosmetic piece being vacuum formed. If you’d like to make one for yourself, [James] has also posted all of the design and cad for the robot on his GitHub. On Thursday he posted the final installment of his 10-part video series on the build. Check out part one after the break.

Continue reading “Very Detailed BB-8 Robot Build”

FM 101 And Transmitter Build With Afroman

One of our favorite purveyors of electronics knowledge is at it again. This time, [Afroman] explains how frequency modulation works while building up a short-range FM transmitter on a board he has available at OSH Park.

The design is based on a MAX2606 voltage-controlled oscillator (VCO) chip that can do 70-150MHz. [Afroman] sets it up to oscillate at about 100MHz using a 390nH inductor. He also put a potentiometer voltage divider on the 2606’s tuning pin. Voltage changes issued through the pot alter the transmitting frequency in small increments, making it easy to dial in a suitable channel for your broadcast. Add an electret mic and about a meter’s worth of solid-core wire and you have yourself an FM transmitter that is good for around 20 meters.

There are plenty of ways to build a small FM transmitter that allow for some experimentation and don’t involve placing SMD components. We covered a build last summer that uses a couple of 3904s and rides a 9V connector salvaged from a dead battery. The downside is that transistor-based transmitters tend to be less frequency-stable than a VCO chip.

Continue reading “FM 101 And Transmitter Build With Afroman”

Building Triodes With Blinker Fluid

The triode is one of the simplest kinds of vacuum tubes. Inside its evacuated glass envelope, the triode really is just a few bits of wire and metal. Triodes are able to amplify signals simply by heating a cathode, and modulating the flow of electrons to the anode with a control grid. Triodes, and their semiconductor cousin the transistor, are the basis of everything we do with electricity.

Because triodes are so fantastically simple, they’re the parts most commonly crafted by the homebrew tube artisans of today. You don’t need a glass blowing lathe to make the most basic vacuum tube, though: [Marcel] built one from the light bulb used in a car’s tail light.

The light bulb in your car’s tail light has two filaments inside: one for the normal tail light, and a second one that comes on when you brake. By burning out the dimmer filament, [Marcel] created the simplest vacuum tube device possible. In his first experiment, he turned this broken light bulb into a diode by using the disconnected filament as the anode, and the burning filament as the cathode. [Marcel] attached a 1M resistor and measured 30mV across it. It was a diode, with 30μA flowing.

The triode is just a diode with a grid, but [Marcel] couldn’t open up the light bulb to install a piece of metal. Instead, he wrapped the bulb in aluminum foil. After many attempts, [Marcel] eventually got some amplification out of his light bulb triode.

The performance is terrible – this light bulb triode actually has an “amplification” of -108dB, making it a complete waste of energy and time. It does demonstrate the concept though, even though the grid isn’t between the anode and cathode, and this light bulb is probably filled with argon. It does work in the most perverse sense of the word,  and makes for a very interesting build.

Video Gives You The Basics Of DIY Rotary Encoders

Is it really possible to build a rotary encoder out of a flattened tin can and a couple of photodetectors? Sure it’s possible, but what kind of resolution are you going to get from such a contraption? Is there any way that you’d be able to put them to work in a DIY project like a CNC router? If you pay attention to the basics then the answer is yes, and [HomoFaciens] wants to prove that to you with this detailed video on homebrew encoder design.

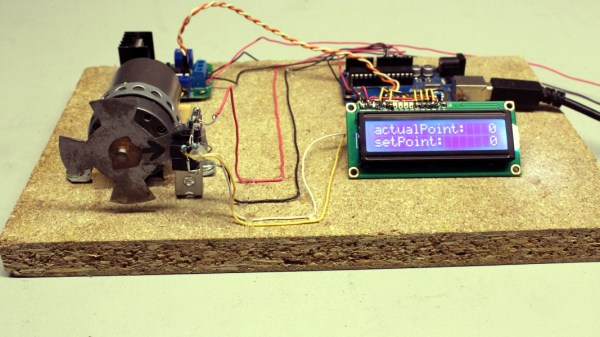
Faithful Hackaday readers will no doubt recognize [HomoFaciens] from a number of prior appearances on these pages, including this recent hardware store CNC router build. When we first ran across his builds, we admit a snicker or two was had at the homemade encoders, but if you watch the results he manages to get out of his builds, you quickly realize how much you can accomplish with very little. The video is a primer on encoder design, walking you through the basics of sensing rotation with phototransistors, and how a pair of detectors is needed to determine the direction of rotation. He also discusses the relative merits of the number of teeth in the chopper; turns out more isn’t necessarily better. And in the end he manages to turn a car wiper motor into a high-torque servo, which could be a handy trick to have filed away.

Continue reading “Video Gives You The Basics Of DIY Rotary Encoders”