Someone’s Made The Laptop Clive Sinclair Never Built

The Sinclair ZX Spectrum was one of the big players in the 8-bit home computing scene of the 1980s, and decades later is sports one of the most active of all the retrocomputing communities. There is a thriving demo scene on the platform, there are new games being released, and there is even new Spectrum hardware coming to market.

One of the most interesting pieces of hardware is the ZX Spectrum Next, a Spectrum motherboard with the original hardware and many enhancements implemented on an FPGA. It has an array of modern interfaces, a megabyte of RAM compared to the 48k of the most common original, and a port allowing the connection of a Raspberry Pi Zero for off-board processing. Coupled with a rather attractive case from the designer of the original Sinclair model, and it has become something of an object of desire. But it’s still an all-in-one a desktop unit like the original, they haven’t made a portable. [Dan Birch has changed all that, with his extremely well designed Spectrum Next laptop.

He started with a beautiful CAD design for a case redolent of the 1990s HP Omnbook style of laptop, but with some Spectrum Next styling cues. This was sent to Shapeways for printing, and came back looking particularly well-built. Into the case went an LCD panel and controller for the Next’s HDMI port, a Raspberry Pi, a USB hub, a USB to PS/2 converter, and a slimline USB keyboard. Unfortunately there does not seem to be a battery included, though we’re sure that with a bit of ingenuity some space could be found for one.

The result is about as good a Spectrum laptop as it might be possible to create, and certainly as good as what might have been made by Sinclair or Amstrad had somehow the 8-bit micro survived into an alternative fantasy version of the 1990s with market conditions to put it into the form factor of a high-end compact laptop. The case design would do any home-made laptop design proud as a basis, we can only urge him to consider releasing some files.

There is a video of the machine in action, which we’ve placed below the break.

Continue reading “Someone’s Made The Laptop Clive Sinclair Never Built”

Weaving With Light: An OLED Fibre Fabric Display

If you think of wearable electronic projects, in many cases what may come to mind are the use of addressable LEDs, perhaps on strips or on sewable PCBs like the Neopixel and similar products. They make an attractive twinkling fashion show, but there remains a feeling that in many cases once you have seen one project, you have seen them all.

So if you are tiring of static sewable LED projects and would like to look forward to something altogether more exciting, take a look at some bleeding-edge research from a team at KAIST, the Korean Advanced Institute of Science & Technology. They have created OLED fibres and woven them into fabric in a way that appears such that they can be lit at individual points to create addressable pixels. In this way there is potential for fabrics that incorporate entire LED displays within their construction rather than in which they serve as a substrate.

The especially interesting feature of the OLED fibres from the KAIST team is that their process does not require any high temperatures, meaning that a whole range of everyday textile fibres can be used as substrates for OLEDs. The results are durable and do not lose OLED performance under tension, meaning that there is the possibility of their becoming practical fabrics for use in garments.

While this technology is a little way away from a piece of clothing you might buy from a store, the fact that it does not rely on special processes during weaving means that when the fibres become commercially available we are likely to see their speedy adoption. Meanwhile you can buy conductive fabric, but you might have to take a multimeter to the store to find it.

Via EENewsLED, and thank you [Carl] for the tip.

Hackaday Links Column Banner

Hackaday Links: January 21, 2018

You know what next week is? Sparklecon! What is it? Everybody hangs out at the 23b Hackerspace in Fullerton, California. Last year, people were transmuting the elements, playing Hammer Jenga, roasting marshmallows over hot resistors, and generally having a really great time. It’s the party for our sort of people, and there are talks on 3D projection mapping and a hebocon. I can’t recommend this one enough.

The STM32F7 is a very, very powerful ARM Cortex-M7 microcontroller with piles of RAM, oodles of Flash, DSP, and tons of I/O. It’s a relatively new part, so are there any breakout or dev boards for it? Sure thing. [satsha] used a desktop CNC mill to create what is probably the simplest possible breakout board for the STM32F7. There’s not much here — just some parts for power and a few LEDs — but this is all you need to get one of these powerful chips up and running.

It’s cold and dark and you can’t fly RC airplanes in January. It’s not because planes and quadcopters don’t work in the cold (they should work better, but I’d love to see a graph of battery temperature and density altitude), it’s that your hands don’t work in the cold. What’s the solution? Just strap some motorcycle handwarmer thingies onto your transmitter. With a 2200 battery strapped to the back, you’ll get about an hour of runtime for these handwarmers.

The BBC is reporting the latest advancement in Hyperloop technology. Is it a fundamentally different way of digging tunnels that isn’t simply scaling down the size of tunnel boring machines? No. Is it improvements in material science that would allow the seals on a 500-mile-long steel pressure chamber to exist? No. Does this latest advancement mitigate the ‘hillbillies with guns’ problem that would turn every Hyperloop car into a literal bullet screaming towards one of the most spectacular deaths possible? No. The chief executive of the Virgin Hyperloop project has something better in mind. A smartphone app, “that would connect future Hyperloop passengers with other modes of transport on arrival.”

Interactive LED Table

Some hackers make functional things that you can’t allow to be seen in polite company. Others make beautiful things that could come from a high-end store. [Marija] falls into the second category and her interactive LED coffee table would probably fetch quite a bit on the retail market. You can see a video of the awesome-looking table, below.

It isn’t just the glass, MDF, and pine construction. There’s also a Bluetooth interface to a custom Android application from [Dejan], who collaborated on the project. However, if you aren’t comfortable with the woodworking, [Marija’s] instructions are very detailed with great pictures so this might be a good starter project.

Continue reading “Interactive LED Table”

Quick And Dirty Driver Tips For Surplus VFDs

Sometimes it seems like eBay is the world’s junk bin, and we mean that in the best possible way. The variety of parts available for a pittance boggles the mind sometimes, especially when the parts were once ordered in massive quantities but have since gone obsolete. The urge to order parts like these in bulk can be overwhelming, and sooner or later, you’ll find yourself with a fistful of old stuff but no idea how to put it to use.

Case in point: the box of Russian surplus seven-segment vacuum fluorescent displays (VFDs) that [w_k_fay] had to figure out how to use. The result is a tutorial on quick and dirty VFD drivers that looks pretty handy. [w_k_fay] takes pains to point out that these are practical tips for putting surplus VFDs to work, as opposed to engineered solutions. He starts with tips on characterizing your surplus tubes in case you don’t have a pinout. A 1.5 V battery will suffice for the hot cathode, while a 9 V battery will turn on the segments. The VFDs can be treated much like a common cathode LED display, and a simple circuit driving the tube with a 4026 decade counter can be seen below. He also covers the challenges of driving VFDs from microcontrollers, and promises a full build of a frequency counter wherein the mysteries of multiplexing will be addressed.

Sounds like it’s time to stock up on those surplus VFDs and put them to work. For inspiration, take a look at this minimalist VFD clock, or perhaps mix VFDs with Nixies to satisfy your urge for all things glowy.

Continue reading “Quick And Dirty Driver Tips For Surplus VFDs”

ESP8266 Beacon Announces Your Arrival

It used to be people were happy enough to just have to push a button in their car and have the garage door open. But pushing a button means you have to use your hands, like it’s a baby toy or something. We’re living in the 21st century, surely there must be a better way! Well, if you’ve got a home automation system setup and a spare ESP8266 laying around, [aderusha] may have your solution with MQTTCarPresence.

The theory of operation here is very clever. The ESP8266 is powered via the in-dash USB port, which turns on and off with the engine. When the engine is started, the ESP8266 is powered up and immediately connects to the WiFi network and pushes an MQTT message to Home Assistant. When Home Assistant gets the notification that the ESP8266 has connected, it opens the garage door.

When [aderusha] drives out of the garage and away from the house, the ESP8266 loses connection to the network, and Home Assistant closes the door. The same principle works when he comes home: as the car approaches the house it connects to the network and the garage door opens, and when the engine is shut off in the garage, the door closes again.

The hardware side of the setup is really just a WeMos D1 mini Pro board, though he’s added an external antenna to make sure the signal gets picked up when the vehicle is rolling up. He’s also designed a very slick 3D printed case to keep it all together in a neat little package.

We’ve covered automated entry systems based on the ESP8266 before, though usually the ESP stays at home. Be sure to check out the awesome series [Elliot Williams] has on the wonders of MQTT if you’re looking to setup your own automation system.

The SD-11 Sphericular Display: Pixels That Aren’t Pixels

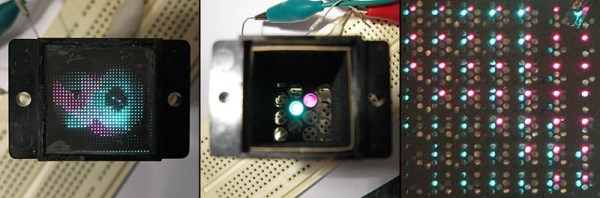
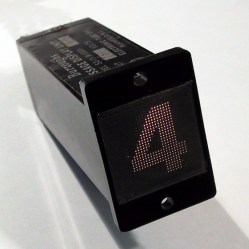
Ever heard of a sphericular display? [AnubisTTP] laid hands on a (damaged) Burroughs SD-11 Sphericular Display and tore down the unusual device to see what was inside. It’s a type of projection display with an array of bulbs at the back and a slab of plastic at the front, and the rest is empty space. The usual expected lenses and slides are missing… or are they? It turns out that the thin display surface at the front of the unit is packed with a two- dimensional 30 x 30 array of small lenses, a shadow mask, and what can be thought of as a high-density pixel mask. The SD-11 was cemented together and clearly not intended to be disassembled, but [AnubisTTP] managed to cut things carefully apart in order to show exactly how these fascinating devices solved the problem of displaying digits 0-9 (with optional decimal points) on the single small screen without separate digit masks and lenses to bend the light paths around.

The “pixel mask” of the SD-11

The face of the display can be thought of as a 30×30 array of pixels, with each of the microlenses in the lens array acting as one of these pixels. But these pixels are not individually addressable, they light up only in fixed patterns determined by the “pixel mask”. How exactly does this happen? With each microlens in the array showing a miniature of the bulb pattern at the rear of the display, a fixed image pattern can be shown at the front by putting a mask over each lens: if a certain bulb at the rear needs to result in a lit pixel at the front, that mask has a hole in that bulb’s location. If not, there is no hole and the light is blocked. Just as the compound lens is a two-dimensional array of microlenses, so is the light mask really a two-dimensional array of smaller masks: exactly one per microlens. In this way the “pixel mask” is how each bulb at the rear results in a fixed pattern (digits, in this case) projected at the front.

The Burroughs SD-11 Sphericular Display was very light, containing mostly empty space where other projection displays had lenses and light masks. It turns out that the SD-11 operates using the same principles as other projection displays, but by using a high-density light mask and a compound lens array it does so by an entirely different method. It’s a great peek into one of the different and fascinating ways problems got solved before modern display solutions became common.