Shoehorning A Slick Spotify Remote Into An ESP8266

In 2017 Spotify finally deprecated their public vanilla C SDK library,  libspotify, and officially replaced it with dedicated SDKs for iOS and Android and this new-fangled web thing we’ve all heard so much about. This is probably great for their maintainability but makes writing a native application for a Linux or a hardware device significantly harder, at least without an application process and NDA. Or is it? Instead of using that boring slab of glass and metal in their pocket [Dani] wanted to build a handy “now playing” display and remote control interface but was constrained by the aforementioned SDK limitations. So they came up with a series of clever optimizations resulting in the clearly-named ESP8266 Spotify Remote Control.

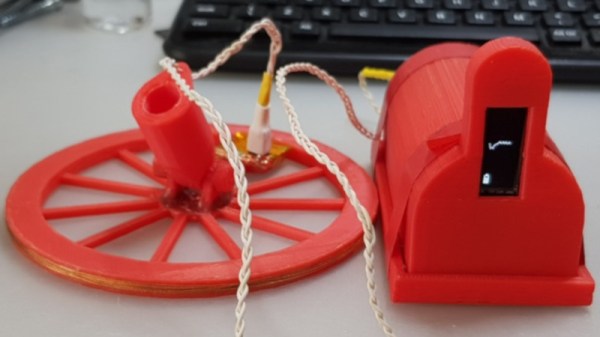
The Spotify Remote Control has a color LCD with a touchscreen. Once attached to a Spotify account it will show the album art of the currently playing track (with a loading indicator!) and let you play/pause/skip tracks from its touch screen, all with impressively low latency. To get here [Dani] faced two major challenges: authorizing the ESP to interact with a user’s Spotify account, and low latency LCD drawing.

2 Bit Cover Art

If you’re not on iOS or Android, the Spotify web API is the remaining non-NDA’d interface available. But it’s really designed to be used on relatively rich platforms such as fully featured web browsers, not an embedded device. To that end, gone are the days of asking a user to enter their username and password in a static login box, the newer (better) way is to negotiate for a per-user token (which is individually authorized per application), then to use that to authenticate your interaction. With this regime 3rd party applications (in this case an ESP8266) never see a user’s password. One codified and very common version of this process is called OAuth and the token dance is called a “workflow”. [Dani] has a pretty good writeup of the process in their post if you want more detail about the theory. After banging out the web requests and exception handling (user declines to authorize the device, etc) the final magic ended up being using mDNS to get the user’s browser to redirect itself to the ESP’s local web server without looking up an IP first. So the setup process is this: the ESP boots and displays a URL to go to, the user navigates there on a WiFi connected device and operates the authorization workflow, then tokens are exchanged and the Remote Control is authorized.

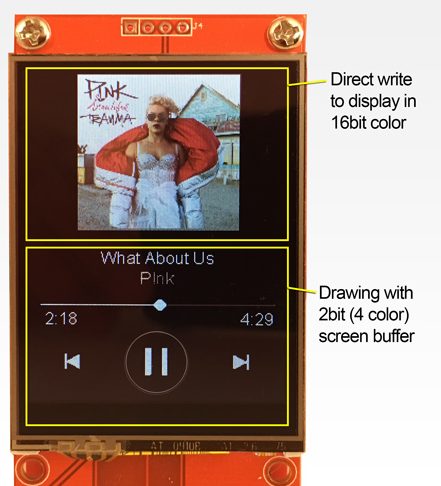
The second problem was smooth drawing. By the ESP’s standards the album art for a given track at full color depth is pretty storage-large, meaning slow transfers to the display and large memory requirements. [Dani] used a few tricks here. The first was to try 2 bit color depth which turned out atrociously (see image above). Eventually the solution became to decompress and draw the album art directly to the screen (instead of a frame buffer) only when the track changed, then redraw the transport controls quickly with 2 bit color. The final problem was that network transfers were also slow, requiring manual timesharing between the download code and the display drawing routing to ensure everything was redrawn frequently.

Check out [Dani]’s video after the break, and take a peek at the sources to try building a Spotify Remote Control yourself.

Continue reading “Shoehorning A Slick Spotify Remote Into An ESP8266”

Diode Recovery Time Explained

There are at least two phases to learning about electronics. In the first phase, you learn about how components are supposed to work. In the second phase, you learn about how they really work. Wires have resistance and inductance. Adjacent wires have capacitance. Capacitors leak. Inductors have resistance. All of these things matter. [Learnelectronics] has a recent video that explores recovery time for a diode — a phase two conversation.

If you haven’t run into recovery time before, it is the amount of time the diode takes to shut off after it is conducting. This manifests itself as a little undershoot where the signal that the diode should block leaks through briefly.

Continue reading “Diode Recovery Time Explained”

A Graph Plotting Metal Detector

Metal detectors can be a great source of fun, and occasionally even found wealth. They allow the detection of metal objects at a distance, enabling hidden treasures to be discovered. They’re also highly critical to the work of minesweepers and unexploded ordnance disposal teams. [Andrius] wanted to add such a device to his kit when motorcycling through the woods of Lithuania, and thus decided to undertake a build of his own. (Editor’s note: original link went bad, this is through the Wayback Machine.)

The detector is a thoroughly modern one – fans of the 555 may want to look away now. A Collpits oscillator, built from two transistors, is used to generate a frequency that is passed through the detection coil. This frequency is measured by an Arduino that plots a graph of the received frequency on an OLED display. As the coil is passed near metal objects, the oscillator frequency changes, and this is visible on the frequency plot on-screen.

Not only is it a quick and easy build that is achievable from what are now junkdraw components, it’s also one that would be readily usable by the hearing-impaired, too. It’s a great project to tackle if you’re looking to get to grips with basic oscillators, frequency measurement, or just microcontroller programming in general.

Still need more inspiration? We’ve seen a similar concept executed before.

Building a gasometer

Building A Gasometer To Store Wood Gas And Other Bio-Fuels

Old solutions are often so elegant and effective that they keep coming back. The gasometer, or gas holder, is one such example. Now [NightHawkInLight] has built one for storing the wood gas he’s been experimenting with, and it’s pretty neat to watch it rise and fall as he first adds gas and then burns it off. The mechanism couldn’t be simpler.

How a gasometer works

For those who, like us, are hearing about this low tech for the first time, gasometers are a means of safely storing gas stemming from the 1700s when gas was king and electricity was little more than a gentleman scientist’s pursuit. In its simplest form, it consists of a container of water with another container filled with gas sitting upside down in the water. Gas pressure is controlled by the weight of the gas-filled container and the water provides a seal, preventing the gas from escaping. Adding gas simply raises the gas-filled container, and removing or using gas lowers it. Simple, safe, and elegant.

We’ll leave the details of how he made his gasometer to the video below, but suffice it to say that his use of a double-walled gas pipe originally intended as a furnace chimney just adds more elegance to this whole hack.

[NightHawkInLight’s] cool projects have graced the pages of Hackaday before. For example, in the area of gas alone there’s his propane-powered plasma rifle, his transparent hybrid rocket engine, and his thermic lance which was hot enough to melt rocks.

Continue reading “Building A Gasometer To Store Wood Gas And Other Bio-Fuels”

Robotic Muscles From Fishing Line And Nichrome

Did you know that under the right conditions, nylon can be used as a type of artificial muscle? We certainly didn’t until we came across [Brandon T. Wood]’s Material Linear-Actuator for Robotics entry for the 2018 Hackaday Prize.

When [Brandon] first learned about Nylon Linear Material Actuators (NLMAs), he became determined to find a repeatable and practical method of making and experimenting with them. This is how it works: hyper-wound coils of nylon, when heated, will contract along their length while expanding in width. Upon cooling, they return to their original shape.

[Brandon] has been busy mainly with the kind of work that is important but not very flashy: finding accessible methods to reliably create strands of artificial nylon muscles cheaply and reliably. His current method uses a jig to wind nylon fishing line until it coils upon itself tightly, then twist a length of nichrome wire around the outside to act as a heater. Using this method, the coils can be electrically controlled. [Brandon] is currently experimenting with creating bundles of individual nylon coils to act all together as one big muscle, because while one wire isn’t particularly strong, a bundle could be quite another story. It’s definitely unusual and is doing a lot of work to turn a known phenomenon into something hackable, which makes it lovely to see in this year’s Hackaday Prize.

ERRF 18: Slice Engineering Shows Off The Mosquito

With few exceptions, it seemed like every 3D printer at the first inaugural East Coast RepRap Festival (ERRF) was using a hotend built by E3D. There’s nothing inherently wrong with that; E3D makes solid open source products, and they deserve all the success they can get. But that being said, competition drives innovation, so we’re particularly interested anytime we see a new hotend that isn’t just an E3D V6 clone.

The Mosquito from Slice Enginerring is definitely no E3D clone. In fact, it doesn’t look much like any 3D printer hotend you’ve ever seen before. Tiny and spindly, the look of the hotend certainly invokes its namesake. But despite its fragile appearance, this hotend can ramp up to a monstrous 500 C, making it effectively a bolt-on upgrade for your existing machine that will allow you to print in exotic materials such as PEEK.

We spent a little time talking with Slice Engineering co-founder [Dan], and while there’s probably not much risk it’s going to dethrone E3D as the RepRap community’s favorite hotend, it might be worth considering if you’re thinking of putting together a high-performance printer.

Continue reading “ERRF 18: Slice Engineering Shows Off The Mosquito”

Friday Hack Chat: Hacking Voice Assistants

The future of consumer electronics is electronic voice assistants, at least that’s what the manufacturers are telling us. Everything from Alexas to Google Homes to Siris are invading our lives, and if predictions hold, your next new car might just have a voice assistant in it. It’s just a good thing we have enough samples of Majel Barrett’s voice for a quality virtual assistant.

For this week’s Hack Chat, we’re going to be talking all about voice interfaces. There are hundreds of Alexa and Google Home hacks around, but this is just the tip of the iceberg. What else can we do with these neat pieces of computer hardware, and how do we get it to do that?

Our guest for this week’s Hack Chat will be Nadine Lessio, a designer and technologist out of Toronto with a background in visual design and DIY peripherals. Nadine holds an MDes from OCADU where she spent her time investigating the Internet of Things through personal assistants. Currently, she’s working at OCADUs Adaptive Context Environments Lab where she’s researching how humans and devices work together.

During this Hack Chat, Nadine will be talking about voice assistants and answering questions like:

  • What languages can be used to program voice assistants
  • How do you use voice and hardware together?
  • What goes into the UX of a voice assistant?
  • How do these assistants interface with microcontrollers, Pis, and other electronics platforms?

You are, of course, encouraged to add your own questions to the discussion. You can do that by leaving a comment on the Hack Chat Event Page and we’ll put that in the queue for the Hack Chat discussion.join-hack-chat

Our Hack Chats are live community events on the Hackaday.io Hack Chat group messaging. This week is just like any other, and we’ll be gathering ’round our video terminals at noon, Pacific, on Friday, July 13th.  Need a countdown timer? Yes you do.

Click that speech bubble to the right, and you’ll be taken directly to the Hack Chat group on Hackaday.io.

You don’t have to wait until Friday; join whenever you want and you can see what the community is talking about.