Infinite Build Volume With RepRap On Wheels

The average 3D printer is a highly useful tool, great for producing small plastic parts when given enough time. Most projects to build larger 3D printed objects use various techniques to split them into smaller parts which can fit inside the limited build volume of most Cartesian-based printers. However, there’s no reason a printer need sit inside a box, and no reason a printer can’t roam about, either. Hence, we get the RepRap HELIOS on wheels.

[Nicholas Seward] created the HELIOS and entered it into the Hackaday Prize in 2017, using a SCARA arm to build a printer with a large build volume and no moving steppers. One of [Nicholas]’s students then did a test, in which the HELIOS was mounted on an angled motorized cart, giving the printer potentially infinite build volume in one axis.

[Nicholas] expects the current basic setup to be capable of prints 200mm wide, 100mm high, and theoretically infinite length. There’s also potential to enable the device to create large curved parts by allowing the printer to steer itself with independently controlled motors.

There’s more work to be done, particularly to allow the printer to locate itself relative to its work space to avoid dimensional issues on large prints, but the preliminary results are highly impressive. We’ve seen other infinite volume printers, too – like this build using a conveyor belt design. Video after the break.

[Thanks to smerrett79 for the tip!]

Continue reading “Infinite Build Volume With RepRap On Wheels”

Get Twelve Charlieplexed PWM Outputs From An ATtiny85

Most of us are aware that charlieplexing can drive a large number of LEDs from a relatively small number of I/O pins, but [David Johnson-Davies] demonstrates adding another dimension to that method to create individually controlled PWM outputs as well. His ATtiny85 has twelve LEDs, each with individually-set brightness levels, and uses only four of the five I/O pins on the device.

Each LED can be assigned a brightness between 0 (fully off) and 63 (fully on). The PWM is done by using one of the timers in the ATtiny85 to generate a periodic interrupt, and the ISR for the interrupt takes care of setting the necessary ratios of on and off times for each charlieplexed output. The result? Twelve flicker-free LEDs with individually addressable brightness levels, using an 8-pin microcontroller and just a few passive components on a tiny breadboard. There’s even one I/O pin left on the ATtiny85, for accepting commands or reading a sensor.

[David] really wrings a lot out of the ATtiny series of microcontrollers with his compact projects, like his Tiny Function Generator (which recently got an update.) He also demonstrated that while charlieplexing is usually used with LEDs, charlieplexing can be used with switches just as easily.

Hackaday Links Column Banner

Hackaday Links: February 24, 2019

Back To The Future Part II, released in 1989, told us the far-off future of 2015 would have flying cars, drones working for national newspapers, and self-lacing sneakers. Our best hope for flying cars is Uber, and that’s going to be hilarious when it fails. (Note to Uber: buy KSMO, Santa Monica airport, as an air taxi hub because that’s the most hilarious of all possible realities.) National newspapers — heck, even newspapers — don’t exist anymore. Self-lacing sneakers? Nike’s self-lacing sneakers brick themselves with a firmware update. Don’t worry, it’s only the left shoe.

HackSpace magazine Vol. 16 is out, and there’s a few pages dedicated to Tindie from the person who runs it, our fabulous [Jasmine]. There’s some good tips in here for Tindie sellers — especially shipping — and a good introduction to what Tindie actually is. The three-second elevator pitch of, ‘Etsy but for DIY electronics’ is not in the feature, though.

Is it duct tape or duck tape? That’s a silly question, because it’s ‘duck’ tape, but that’s not important. Gaffer tape is superior. [Ross Lowell], the inventor of gaffer tape, passed away last week at the age of 92.

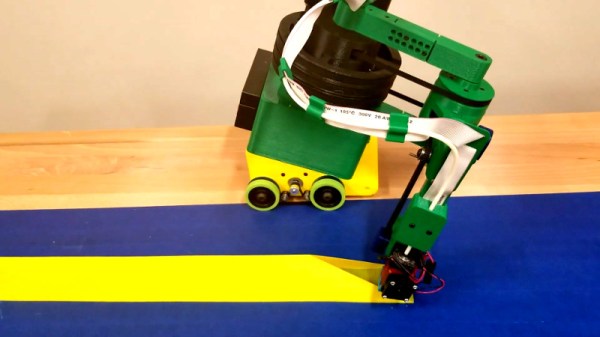
[Peter Stripol] has a hobby of building ultralights in his basement. Actually, he has a hangar now, so everything’s good. His first two planes flew as Part 103 ultralights, however, there were design problems. [Peter] is using an electric powerplant, with motors and batteries, which is much lighter than a gas-chugging Rotax. However, he was still basing his designs on traditional ultralights. His now third build will be slightly more trimmed down, probably a little bit faster, and might just use 3D-printed control surfaces. Check out the intro to the mk3 airplane here.

[Matthias Wandel], the woodworking Canadian famous for designing the pantorouter, just built a three-legged stool. Sure, that doesn’t sound impressive, but check this out. All the weird mortises were done on the pantorouter, and there are some weird mortises here.

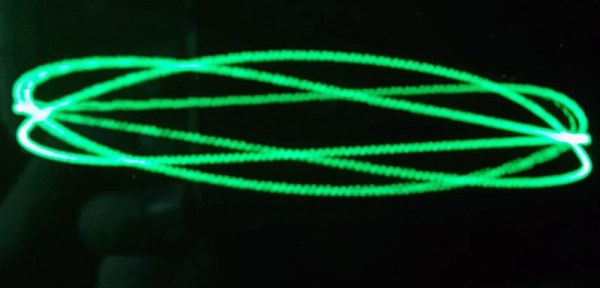
You’re only cool if you got chainz, so here’s some PCB chainz. This was done by [@jeffwurz] with OSHPark PCBs. The design, from as far as we can tell, is simple. It’s just a PCB without a soldermask, and a small cutout in one of the links. Assemble it into a chain, and if you’re clever, solder some resistor leads across the gap to make it a bit more solid.

ASMR, or officially, ‘autonomous sensory meridian response’, is the tingling sensation moving down your back induced by specific auditory (or visual) stimuli. That’s the scientific definition. On the Internet, it’s people breathing into microphones and smacking their lips. Yes, there are videos of this. Thousands of them. There are 11-year-old girls raking in the YouTube money posting ASMR videos. It’s weird and gross, and don’t get me started on slime videos. You’ve also got unboxing videos. The Raspberry Pi foundation found a way to combine ASMR with unboxing videos. I gotta respect the hustle here; ASMR and unboxing videos are some of the most popular content available, and the Pi foundation is not only combining the two, but doing so ironically. It’s exactly the content everyone wants to see, and it’ll bring in people who hate ASMR and unboxing videos. Someone over at the Pi foundation really knows what they’re doing here.

Curve Tracing On Spray Painted CRTs

A Lissajous curve is formed when two sine waves plotted on their respective X and Y axes. You can see one using an oscilloscope and a couple of signal generators, if you play with one of those ‘pendulums tracing in the sand’ toys, or if you really need something sciencey for your home decor you can trace them out with a disassembled CRT. That’s what [Emily] did with the LissaJukebox. It traces curves. No, it’s not a curve tracer, that’s another tool altogether

If you’re going to put squigglies on a CRT, you obviously need a CRT, and it needs to look good. There are a few options out there, from old oscilloscope tubes, the CRTs found in old VHS camcorders, to tiny electrostatic tubes that are slightly easier to drive. For this build, [Emily] chose an old, bog-standard, black and white television. But the screen is green, right? Yeah, but if you carefully mask off a CRT and buy some stained glass spray paint, a CRT can be any color you want. Except for purple, the purple stained glass spray paint didn’t work for some reason.

To generate the various functions, [Emily] used an XR2206 function generator, sold in kit form on Amazon, eBay, and various other online retailers for a pittance. One of these function generators controls the X axis, another the Y, and both of these generators are fed into a 15 Watt stereo amplifier board to run the deflection coils in the CRT. If you’re following along at home, yes, this is dangerous. Don’t touch the CRT or it will stop your heart. Those of us whose hearts are as black as coal are safe.

There were a few modifications needed to turn the XR2206 function generator ‘kit’ into something a bit more useful for this project. The through-hole pots were replaced with panel-mount pots, and the range/amplitude setting is now controlled with a rotary switch.

Is it useful? Well, actually, if you’re building a set for a TV show and you need something that looks ‘sciencey’, a LissaJukebox should be right up your alley. Other than that it looks pretty, and we now know there’s a spray paint that will turn your old, boring black and white CRT into a glorious amber phosphor. Can’t beat that.

Well-Protected USB Power Strip Makes It Easy To Plug In

When we get a new device these days, somewhere in the package is likely to be a wall-wart USB power supply. We look for a place to plug in the little switch-mode dongle, rearrange a few plugs in the mains power strip, and curse its designers for the overly cozy outlet spacing. And all the while that USB-A plug on the power supply cable taunts us with its neat, compact form factor. If only there were a USB power strip.

Unwilling to suffer such indignity any longer, [Scott M. Baker] took matters into his own hands and designed this USB power distribution system. We were surprised to hear that he was unable to find a commercial USB power strip, but even if he had, it likely wouldn’t have had the bells and whistles that he added to his. The circuit went through a couple of revs, but each was focused on protection of the connected USB devices. He included both overcurrent protection, in the form of an electronic fuse built around a TPS2421 hot-swap controller, and overvoltage protection using a crowbar circuit with the usual zener-SCR arrangement. There’s also a transient voltage suppression diode to keep any inductive spikes at bay. Interestingly, each USB outlet has all these protections – it’s not just one protected bus feeding a bunch of USB outlets in parallel, but individual modules with all the circuitry. The modules are gangable and live inside a laser-cut acrylic case. The video below shows the design and build process in some detail.

We have to say that we always learn a lot about circuit design from [Scott]’s projects. You may recall his custom Atari 2600 controller or his dual-port memory retro game console, both interesting and instructive builds in their own right.

Continue reading “Well-Protected USB Power Strip Makes It Easy To Plug In”

Mustang Dash Becomes Bookshelf Art Piece

Despite most of the common gauges remaining the same over the last 60 years, the automotive dashboard of days past used very different technology to those today. Cable driven speedometers were common, along with mechanical drive for the odometer, too. Fuel and temperature gauges were often wired directly to their senders, and some oil pressure gauges actually ran an oil line right up to the back of the dash. Now, things are mostly handled over the CAN bus, which inspired [Thomas]’s bookshelf-based Mustang build.

The idea behind the project is to build a nice piece of bookshelf art, using a modern CAN-driven Mustang dashboard. Through research and much trial and error, [Thomas] was able to figure out the CAN messages necessary to interface with a 2009 Mustang dashboard. There were innumerable hiccups along the way – [Thomas] had to 3D print his own connectors, reflash CAN bus interfaces, and make more than a few educated guesses to get things working.

The dash is combined with an Arduino with an MP3 shield and a 30 watt audio system, which provides both CAN signals to drive the dash as well as the obligatory sound effects of a Mustang tearing about town. It’s all finished up with an ignition keyswitch and 3 LED-lit buttons in the traditional Mustang colors.

It’s a fun build which does a great job of showcasing the basic tools and techniques required to interface with modern automotive subsystems. Salvaging an instrument cluster can be a great way to add immersion to your home racing sim, too. Video after the break.

Continue reading “Mustang Dash Becomes Bookshelf Art Piece”

Pathio: New 3D Slicer From E3D

Having a great word processor won’t actually help you write the next bestselling novel. It might make it easier, but if you have a great novel in you, you could probably write it on paper towels with a crayon if you had to. A great 3D printer isn’t all you need to make great 3D prints. A lot depends on the model you start with and that software known as a slicer. You have several choices, and now you have one more: PathIO, a slicer sponsored by E3D, is out in beta. You can see a video about its features below.

The software has a few rough edges as you might expect from a beta. The slicer doesn’t feed Gcode to a printer directly, although Octoprint integration is forthcoming. Developers say they are focusing on the slicing engine which is totally new. According to their website, conventional slicers immediately cut a model into 2D slices and then decide how to realize each slice with respect to the shell and infill. Pathio works in 3D space and claims this has benefits for producing correct wall thickness and an increase in self-supporting geometries.

Continue reading “Pathio: New 3D Slicer From E3D”