Cooking A Turkey With 880 AA Batteries

Cooking a turkey right is serious business this time of year. With major holidays on the line, there’s no room for error – any mistake can leave guests disgruntled and starving. [Stephen Farnsworth] took a risk, though, and attempted to cook a turkey using AA batteries.

The allure of the AA for such a task is precisely because it’s such a poor choice. Designed for portability rather than high power output, it was never designed to be the energy source for a major cooking job. To get things over the line, [Steve] busted out the math to figure out how many batteries would be required. This involved computing cooking efficiencies, battery thermal performance, and the specific heat of the bird itself. With the numbers coming together a 300W slow cooker was put on duty, in order to avoid over-draining the batteries.

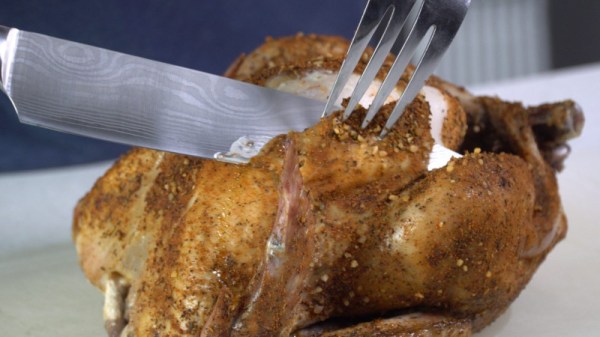
With 880 AAs loaded into a custom carrier, [Steve] hooked up the power meter and the cooker and kept a close eye on the temperatures. After a couple of hours, the battery pack started to heat up, so additional cooling was brought in to avoid fire. At just before the six hour mark, the turkey was cooked through and ready to eat. Estimates are that the batteries still had plenty of capacity to keep going for a few hours yet, too.

It’s not a fast or effective way to cook a turkey, but it’s certainly achievable. We fully expect [Steve] to submit the coin-cell turkey cook-off next year, too. Remember, a little engineering always helps, especially in the kitchen. Video after the break.

Continue reading “Cooking A Turkey With 880 AA Batteries”

John McMaster Explains Crypto Ignition Phone Keys And How To Reproduce Them

When you’re a nation state, secure communications are key to protecting your sovereignty and keeping your best laid plans under wraps. For the USA, this requirement led to the development of a series of secure telephony networks over the years. John McMaster found himself interested in investigating the workings of the STU-III secure telephone, and set out to replicate the secure keys used with this system.

An encryption key in a very physical, real sense, the Crypto Igntion Key was used with the STU-III to secure phone calls across many US government operations. The key contains a 64KB EEPROM that holds the cryptographic data.

[John] had a particular affinity for the STU-III for its method of encrypting phone calls. A physical device known as a Crypto Ignition Key had to be inserted into the telephone, and turned with a satisfying clunk to enable encryption. This physical key contains digital encryption keys that, in combination with those in the telephone, are used to encrypt the call. The tactile interface gives very clear feedback to the user about securing the communication channel. Wishing to learn more, John began to research the system further and attempted to source some hardware to tinker with.

As John explains in his Hackaday Superconference talk embeded below, he was able to source a civilian-model STU-III handset but the keys proved difficult to find. As carriers of encryption keys, it’s likely that most were destroyed as per security protocol when reaching their expiry date. However, after laying his hands on a broken key, he was able to create a CAD model and produce a mechanically compatible prototype that would fit in the slot and turn correctly.

Continue reading “John McMaster Explains Crypto Ignition Phone Keys And How To Reproduce Them”

How To Get Into Cars: Choosing Your First Project Car

The automobile is a wonderous invention, perhaps one of the most transformative of the 20th century. They’re machines that often inspire an all-consuming passion, capturing the heart with sights, sounds, and smells. However, for those who grew up isolated from car culture, it can be difficult to know how to approach cars as a hobby. If this sounds like you, fear not – this article is a crash course into getting your feet wet in the world of horsepower.

So You Like Cars, Eh?

Project cars let you do things that you’d never dare attempt in a daily.

The first step to becoming a true gearhead is identifying your specific passion. Car culture is a broad church, and what excites one enthusiast can be boring or even repulsive to another. Oftentimes, the interest can be spawned by a fond memory of a family member’s special ride, or a trip to a motor race during childhood.

Knowing what kind of cars you like is key to your journey. You might fall in love with classic American muscle and drag racing, or always fancied yourself in the seat of a tweaked-out tuner car a la The Fast And The Furious. Movies, posters, magazines, and your local car shows are a great way to figure out what excites you about cars. Once you’ve got an idea of what you like, it’s time to start thinking about picking out your first project car. Continue reading “How To Get Into Cars: Choosing Your First Project Car”

AMSAT CubeSat Simulator Hack Chat

Join us on Wednesday, December 4th at noon Pacific for the AMSAT CubeSat Simulator Hack Chat with Alan Johnston!

For all the lip service the world’s governments pay to “space belonging to the people”, they did a pretty good job keeping access to it to themselves for the first 50 years of the Space Age. Oh sure, private-sector corporations could spend their investors’ money on lengthy approval processes and pay for a ride into space, but with a few exceptions, if you wanted your own satellite, you needed to have the resources of a nation-state.

All that began to change about 20 years ago when the CubeSat concept was born. Conceived as a way to get engineering students involved in the satellite industry, the 10 cm cube form factor that evolved has become the standard around which students, amateur radio operators, non-governmental organizations, and even private citizens have designed and flown satellites to do everything from relaying ham radio messages to monitoring the status of the environment.

But before any of that can happen, CubeSat builders need to know that their little chunk of hardware is going to do its job. That’s where Alan Johnston, a teaching professor in electrical and computer engineering at Villanova University, comes in. As a member of AMSAT, the Radio Amateur Satellite Corporation, he has built a CubeSat simulator. Built for about $300 using mostly off-the-shelf and 3D-printed parts, the simulator lets satellite builders work the bugs out of their designs before committing them to the Final Frontier.

Dr. Johnston will stop by the Hack Chat to discuss his CubeSat simulator and all things nanosatellite. Come along to learn what it takes to make sure a satellite is up to snuff, find out his motivations for getting involved in AMSAT and CubeSat testing, and what alternative uses people are finding the platform. Hint: think high-altitude ballooning.

join-hack-chatOur Hack Chats are live community events in the Hackaday.io Hack Chat group messaging. This week we’ll be sitting down on Wednesday, December 4 at 12:00 PM Pacific time. If time zones have got you down, we have a handy time zone converter.

Click that speech bubble to the right, and you’ll be taken directly to the Hack Chat group on Hackaday.io. You don’t have to wait until Wednesday; join whenever you want and you can see what the community is talking about.

Winter Is Coming, This Clock Will Let You Know When

For Game of Thrones fans, it’s an awkward time. The show has ended its run on HBO (not without a certain level of controversy), the planned prequel is still years away, and who knows when George R. R. Martin will actually get around to writing the final books in the series. Fans have no choice but to entertain themselves while waiting for further tales of adventure from Westeros, which is how we get things like this motorized clock from [Techarge].

Inspired by the now iconic opening sequence from the HBO series, elements of the 3D printed model spin around while the theme song is played courtesy of a DFPlayer Mini MP3 player module and small 2 watt speaker. The audio hardware, motor, and four digit LED display module in the front are all connected to an Arduino with a custom PCB shield, giving the inside of the clock a very clean and professional appearance.

Around the back side [Techarge] has two small push buttons to set the hour and minutes, and a large toggle to control the music and movement. As of right now it needs to be switched on and off manually, but a future enhancement could see it kick on hourly.  We’d also like to see an RTC module added to the PCB, or better yet, switch over to the ESP8266 and just pull the time down from NTP.

Who knows? By the time you’ve built one of these clocks for yourself, and the hand-made Iron Throne phone charger stand to go with it, maybe ol’ George will have slipped out a new book. But don’t count on it.

Supercon: The Things You Brought, And A Few You Forgot

Part of the fun of Supercon is that there is so much available in one place. For the price of admission, you’re surrounded by expertise, power, and soldering irons. Digi-Key brought several large parts bins stuffed full of everything from passives to LEDs to chips for people use in hacking away on their badges. But one thing that makes the whole experience really special is the stuff people bring. We don’t just mean the projects you brought to show off, we mean the stuff you bring to enhance your Supercon experience, whether it be tools, bits and bobs, or other fun stuff to play with.

This year was my first Supercon, and you never forget your first. I had a great time, and was overwhelmed by how much awesomeness was going on in one place. I wish Supercon was a simulation I could run again and again so I could listen to every talk, attend every workshop, and spend time talking to everyone about the things they brought and the cool things they’re doing with their time and badges.

Continue reading “Supercon: The Things You Brought, And A Few You Forgot”

Making Your Own Caving Headlamp

An important distinction between equipment used for caving, climbing, biking, and other outdoor activities is the level of stress that’s generally applied. For instance, while climbing helmets are built to withstand the impact of sharp rocks, they’re not made to protect a biker’s head from suddenly hitting the ground. Likewise, while camping headlamps may be able to survive a light rainfall, they’re probably not made to shine at the 800 lumens after being submerged underwater.

[LukeM] built himself a caving headlight, after being “fed up with what was available on the market”. While his project is a bit older, it’s still pretty helpful for any newer hobbyists looking to try their hand at building a custom headlamp. Many cavers have to carry around a few primary – one main light for general visibility and a secondary light for focusing on specific objects. These are typically worn on the helmet, attached somehow to prevent the light source from falling off mid-climb. From tricky operations, varying distances, cost, and ease of battery replacement, there are a number of reasons why a caver might want to build their own customizable head lamp.

The result is rugged, waterproof, reliable, bright enough to supplement flashes in caving photos and also dim enough for general use (30-700 lumens). It has options for wide and narrow beams, displays a neutral to warm color, and is relatively upgradeable without too much trouble. At the same time, it’s also fairly compact, with all of the components packed inside of a short section of 3″x2″ aluminum tubing, protected at the back and front by aluminum and acrylic backings. The LEDs used are four Cree XP-E R2 bin LEDs and a hipFlex driver from TaskLED with programmable settings for max output, thermal protection temperature, warning voltage, and lighting modes. I’m personally already smitten with the level of customizability of this build.

On top of all of that, it’s been cave tested and approved!