An HDMI Monitor From Your Phone

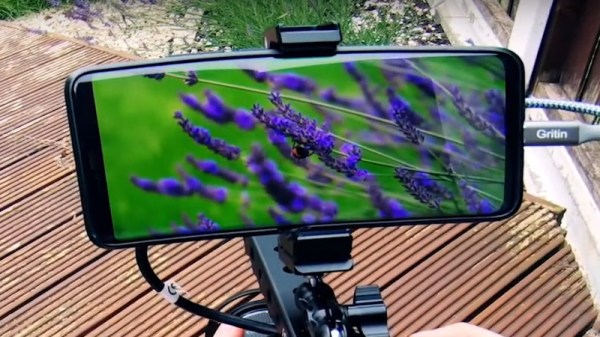
Digital video has proceeded to the point at which we have near-broadcast-quality HD production capabilities in the palm of our hand, and often for a surprisingly affordable price. One area in which the benefits haven’t quite made it to our wallets though is in the field of small HD monitors of the type you might place on top of a camera for filming. It’s a problem noted by [Neon Airship], who has come up with a solution allowing the use of an Android mobile phone as an HDMI monitor. Since many of us will now have a perfectly capable older phone gathering dust, it’s an attractive proposition with the potential to cost very little.

The secret isn’t the most elite of hacks in that it uses all off-the-shelf hardware, but sometimes that isn’t the only reason to be interested in a project such as this one. [Neon] is using an HDMI-to-USB capture card of the type that has recently become available from the usual sources for an astoundingly small sum. When paired with a suitable USB OTG cable, the adapter can be seen by the phone as just another webcam.

We see him try a few webcam viewer apps including one that rather worryingly demands a direct APK download, and the result is a very good quality HDMI monitor atop his camera that really didn’t break the bank. Sometimes the simplest of solutions deliver the most useful of results.

This is something of special interest to those of us who experiment with our own camera form factors.

Continue reading “An HDMI Monitor From Your Phone”

Faux Radar Uses Ultrasound & Python

Radars are simply cool, and their portrayal in movies and TV has a lot to do with that. You get a sweet glowing screen that shows you where the bad guys are, and a visual representation of your missiles on their way to blow them up. Sadly, or perhaps thankfully, day to day life for most of us is a little less exhilarating. We can make do with a facsimile of the experience instead.

The project consists of an Arduino Uno outfitted with an ultrasound module that can do basic range measurements on the order of tens of centimeters. The module is then placed on a servo and scanned through a 180 degree rotation. This data is passed back to a computer running a Python application, which plots the results on a Plan Position Indicator, or PPI – the sweeping display we’re all so familiar with.

While it’s unlikely you’ll be using such a setup to engage bandits, it could prove as a useful module for robot navigation or similar applications. We’ve seen ultrasonic transducers used for exactly that. Video after the break.

Continue reading “Faux Radar Uses Ultrasound & Python”

Reverse Engineering Teaches An Old Scope New Tricks

[PMercier] clearly loves his old Tektronix TDS3014 scope, which did however lack essentially modern connectivity such as an Ethernet port for control and a USB port for a convenient way to capture screenshots. So he decided to do some in-depth reverse engineering and design his own expansion card for it. The scope already has an expansion port and an expansion card, but given this model was first released in 1998, purchasing an OEM part was not going to be an option.

They don’t make ’em like they used to. Test equipment is today is built to last a decade — but usually lives on much longer. This is certainly true for the previous generations of kit. It’s no surprise that for most of us, hand-me-downs from universities, shrewd eBay purchasing, and even fruitful dumpster dives are a very viable way to attain useful and relevant test equipment. Now, while these acquisitions are more than adequate for the needs of a hobbyist lab, they are admittedly outdated and more to the point, inaccessible from a connectivity and communication standpoint. A modern lab has a very high degree of automated data acquisition and control over ethernet. Capturing screen dumps on a USB is a standard feature. These modern luxuries don’t exist on aging equipment conceived in the age of floppy disks and GPIB.

Continue reading “Reverse Engineering Teaches An Old Scope New Tricks”

Tool Changing 3D Printers Shouldn’t Break The Bank

Close-up on the magnetic coupling

One of the Holy Grails of desktop 3D printing is the ability to print in multiple materials, for prints that mix colours or textures. There are printers with multi-way hot ends, add-ons that change your filament, or printers with tool changers, that swap hot ends as needed. [Amy] has taken the final route with her Hypercube, and her Doot Changer allows her to print in two materials with ease. Best of all, she tells us it only cost her $20 to make.

For those not familiar with Hypercube-style printers, they have a roughly cubic frame made using aluminium extrusion. On the rear upper rail are a couple of receptacles with metal locating pins onto which a hot-end unit can be slotted. The printer carriage has a magnetic coupling that can pick up or disengage a hot end from its receptacle at will, as can be seen in action in a short video clip.

All the parts can be found on Thingiverse, and there is a photo album with plenty of eye-candy should you wish to see more. Meanwhile as far as tool changers go, we’ve been there before in great depth.

The Sincerest Form Of Flattery

In the art world, it’s often wistfully said that imitation is the sincerest form of flattery. In the open-source hardware world, this flattery takes the shape of finding your open-source project mass produced in China and sold at outrageously low markups. Looking around on my lab, I’ve been the direct beneficiary of this success.

I see an AVR Transistor Tester that I picked up for a few bucks a long time ago. Lacking anything better, it’s my go-to device for measuring inductance and capacitor ESR. For $7, it is worth much more than I paid for it, due to some clever design work by a community of German hackers and the economics of mass production. They’re so cheap that we’ve seen people re-use them just for the displays and with a little modification, turned them into Tetris consoles. That’s too cool. Continue reading “The Sincerest Form Of Flattery”

Techniques For Making Complex Carbon Fibre Tube Parts

Many a hacker spent their high school years picking up a few new skills in workshop classes. Whether it be woodworking, welding, or the patient, delicate skill of technical drawing, they’ve been a mainstay of secondary education for decades. However, composites are new enough that they aren’t a major feature of the curriculum. For those wishing to fill in a few gaps, [Easy Composites] have some great videos on carbon fibre techniques.

The video in question concerns the manufacture of a complex cross-section tube part, but these techniques can also apply to more complex hollow sections, like a bike frame, for example. Starting with a mold, the first step is to cut a rough template. This is then used to lay down the first layer of pre-preg carbon fibre material, and a more accurate template is made. The rest of the steps involve the production of a secure lap joint between subsequent layers, and how to properly use vacuum bag techniques on hollow parts.

It’s a useful primer on the basics of producing hollow carbon fibre parts with prepreg material. We’ve featured composites before, with this bulletproof armor a particularly good example. Video after the break.

Continue reading “Techniques For Making Complex Carbon Fibre Tube Parts”

Forget LED Matrices, How About Neon!

The low-cost LED has changed the way we approach lighting in all its forms, allowing complex addressable displays and all sorts of lighting goodness. But what did we do before we had cheap LED arrays? Use neon bulbs, perhaps? That’s exactly what [Manawyrm] has done with her chainable 8×8 neon matrix boards, taking 64 neon indicator bulbs and driving each from mains potential with an individual triac. A line of 74HC595s handle the data transfer, floating at mains voltage while their ESP32 driver is kept safe by a set of isolators.

A Twitter post shows it in action, but perhaps the most hackworthy praise should be reserved for the test rig. Unable to source a variable 230 V mains supply for testing the array, she applied a 50 Hz sine wave to an audio power amplifier, and replaced the speaker with the low voltage side of a mains transformer. It’s the sort of hack we can’t help liking.

Neons have generally featured here as novelties rather than as significant displays in their own right. They’re interesting components that everyone should have a play with, not least because the possess negative resistance, and can be made to oscillate.