Save Your Original Xbox From A Corrosive Death

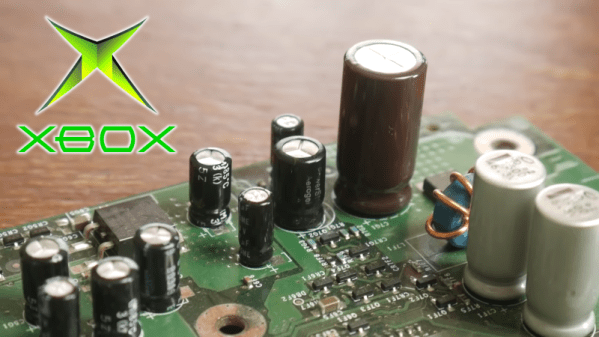
Fans of retro computers from the 8-bit and 16-bit eras will be well aware of the green death that eats these machines from the inside out. A common cause is leaking electrolytic capacitors, with RTC batteries being an even more vicious scourge when it comes to corrosion that destroys motherboards. Of course, time rolls on, and new generations of machines are now prone to this risk. [MattKC] has explored the issue on Microsoft’s original Xbox, built from 2001 to 2009.

Despite looking okay from above, the capacitor inside the Xbox had already started leaking underneath. Leaving this in the console would inevitably cause major damage.

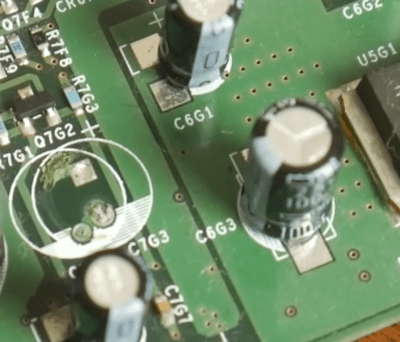
The original Xbox does include a real-time clock, however, it doesn’t rely on a battery. Due to the RTC hardware being included in the bigger NVIDA MCPX X3 sound chip, the current draw on standby was too high to use a standard coin cell as a backup battery. Instead, a fancy high-value capacitor was used, allowing the clock to be maintained for a few hours away from AC power. The problem is that these capacitors were made during the Capacitor Plague in the early 2000s. Over time they leak and deposit corrosive material on the motherboard, which can easily kill the Xbox.

The solution? Removing the capacitor and cleaning off any goop that may have already been left on the board. The fastidious can replace the part, though the Xbox will work just fine without the capacitor in place; you’ll just have to reset the clock every time you unplug the console. [MattKC] also points out that this is a good time to inspect other caps on the board for harmful leakage.

We’ve seen [MattKC] dive into consoles before, burning his own PS1 modchip from sourcecode found online. Video after the break.

Edit: As noted by [Doge Microsystems], this scourage only effects pre-1.6 Xboxes; later models don’t suffer the same problem, and shouldn’t be modified in this way.

Continue reading “Save Your Original Xbox From A Corrosive Death”

Peeking Inside A VW Gearbox Reveals Die Casting Truths

Recently, I was offered a 1997 Volkswagen Golf for the low, low price of free — assuming I could haul it away, as it suffered from a thoroughly borked automatic transmission. Being incapable of saying no to such an opportunity, I set about trailering the poor convertible home and immediately tore into the mechanicals to see what was wrong.

Alas, I have thus far failed to resurrect the beast from Wolfsburg, but while I was wrist deep in transmission fluid, I spotted something that caught my eye. Come along for a look at the nitty-gritty of transmission manufacturing!

Continue reading “Peeking Inside A VW Gearbox Reveals Die Casting Truths”

15 Volts To 110,000 Volts

There’s something satisfying about creating high voltages. Sure, there are practical uses like neon signs or doing certain experiments, but be honest — you really just want to see some giant arcs lighting up your dark mad scientist lair. [Mircemk] has just the prescription for what ails you. Using a two-stage approach, he shows a simple setup that generates about 110KV from a pretty tame 15V supply.

From the 15V, there is a stage that uses a flyback transformer and a switch to generate a reasonably high voltage. The final stage is a Cockroft-Walton voltage multiplier that can produce quite a bit of voltage. You can see the impressive arcs in the video below.

The multiplier circuit found fame with experiments by Cockroft and Walton, obviously, but was actually originated in the early 1900s with a physicist named Greinacher. The circuit uses diodes as switches and charges a bank of capacitors in parallel. The discharge, however, puts the capacitors in series. Neglecting losses and loads, the output voltage is equal to the peak-to-peak input voltage times the number of stages present. Real-world considerations mean you won’t quite get that voltage out of it, but it can still provide a potent punch. Click through the break for a video of the circuit in action!

Continue reading “15 Volts To 110,000 Volts”

Building A Tiny Finger Plane For Detailed Work

A plane is a tool familiar to all woodworkers, used to shape a workpiece by hand by shaving away material. Regular planes are two-handed tools available at all good hardware stores. For finer work, a finger plane can be useful, though harder to find. Thankfully, [Daniel] put together a video showing how to make your own.

[Daniel]’s build relies on stabilized wood, useful for its density and consistent quality, though other woods work too. A 6″ pen blank is enough to make a pair of matching finger planes. A block and two side panels are cut out from the material, with attention paid to making sure everything remains square for easy assembly. The parts are glued together with a block set at the desired cutting angle for the plane. With the assembly then tidied up on the bandsaw and sander, [Daniel] installs the cutting blade. This can be made from a larger standard plane blade, or a cutdown chisel can be pressed into service. The blade is held in place with a wooden wedge beneath a metal pin. The pin itself is crafted from an old drill bit, cut down to size.

It’s a useful tool for doing fine plane work, for which a full-size tool would be ungainly. We can imagine it proving particularly useful in producing accurate scale models in smaller sizes. If you’re big into woodworking, consider giving your tools a good sharpen on the cheap, too. Video after the break.

Continue reading “Building A Tiny Finger Plane For Detailed Work”