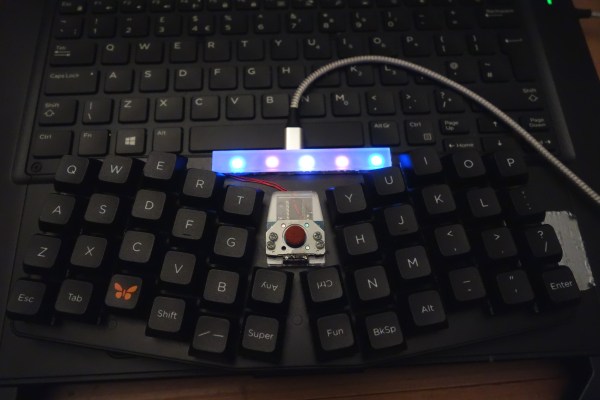
Fancy, split keyboards are cool and all, and they can really help with repetitive strain injury issues depending on a lot of different factors. But the big, glaring problem is that they often lack nice features that regular keyboards have — things like a number pad, media buttons, or in [discordia]’s case, a ThinkPad-style pointing stick. Fortunately, there’s a perfect spot for one between the two halves of the Keyboardio Atreus.
[discordia] is happy with the Atreus, but the whole layers thing can take some getting used to. Since Atreus only has 44 keys, it utilizes a layering system to change their function to cover all the keys you’d find on a full keyboard. After getting stuck in one rarely-used layer for a while, they decided to remedy the situation with some RGB LEDs to indicate the active layer. If you’ve got an Atreus that could use a few upgrades, check out [discordia]’s step-by-step instructions for adding a trackpoint and one-wire RGB LEDs.
Hackaday editors Mike Szczys and Elliot Williams are talking turkey about the world of hardware hacking. This short episode brings news updates about the Nintendo Game and Watch hacking progress, the sad farewell to Areceibo, the new chip from Espressif, and the awesome circuit sculptures from our recent contest. We wrap up the show with a lightning round of quick hacks.
Take a look at the links below if you want to follow along, and as always, tell us what you think about this episode in the comments!
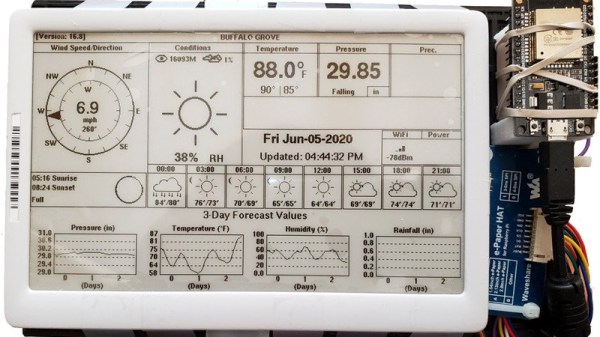
If you’ve recently braved the pandemic long enough to make a trip to a big box retailer, you may have spotted a few massive e-paper price tags affixed to large items like appliances. These seven inch displays were likely designed to be used in e-readers such as the Kindle, but through some surplus deal, are now shouting out clearance savings on last year’s washing machine. After checking out a particularly good price for a Samsung refrigerator at the local Home Depot, [YodaLogic] got to wondering if they could be bent to the hacker’s will.
Now to be clear, [YodaLogic] didn’t steal any of these tags. It turns out you can pick them up on eBay for less than $15 a pop, or at least that’s what they cost before this article went out. It’s an exceptionally good price when you realize that these displays are actually capable of color…albeit only two. Apparently when the retailer orders the so-called “Chroma 74” tags, they can pick between either yellow or red as the secondary color. While not quite as exciting as a full-color display, it certainly sets them apart from most of the e-paper panels we’ve seen used in DIY projects thus far.
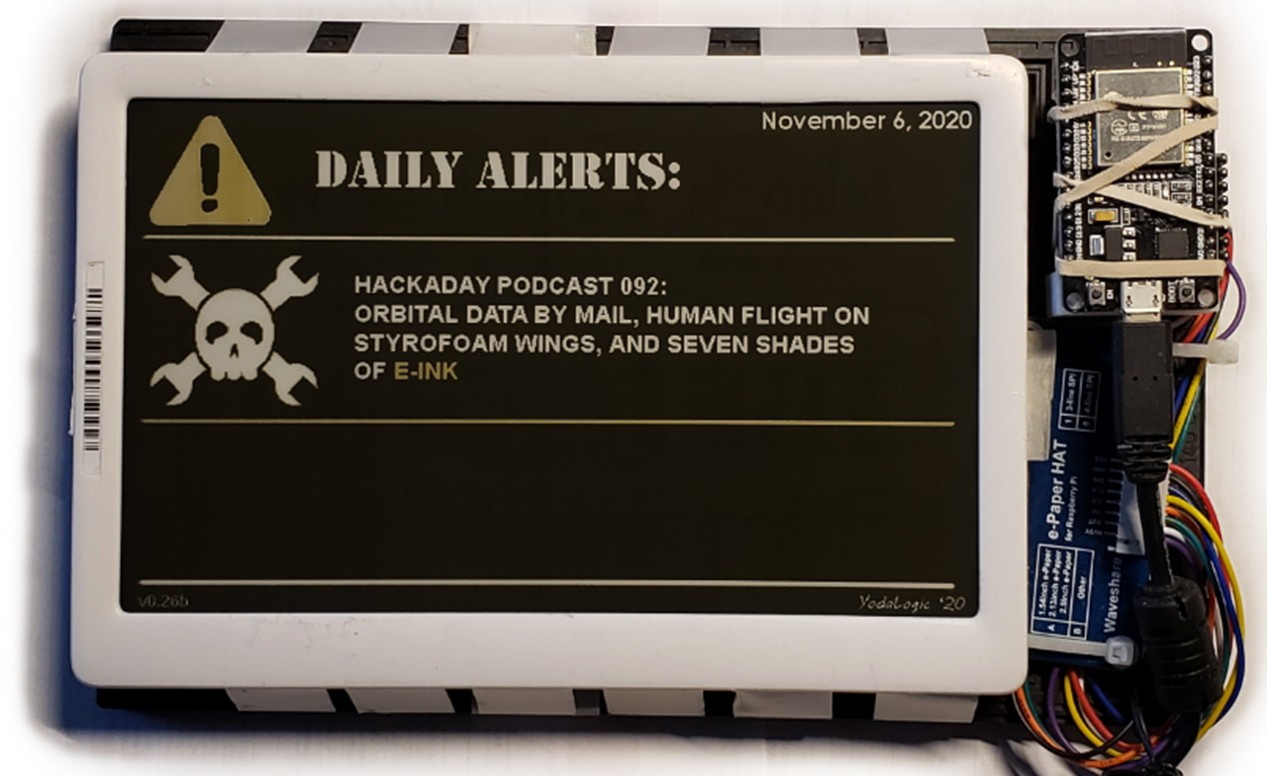
The panel gets mighty close to the HaD color scheme
We’d like to tell you that [YodaLogic] cracked one of these things open and was able to wire it right up to a Pi or microcontroller, but the truth is a bit more complicated. Connecting the Chroma 74’s panel to the control board intended for a similar Waveshare 7.5 inch display didn’t seem to do anything. After some poking and prodding, it became clear that the WFD0750BF19 e-paper panel used in the Chroma needed a custom software profile to bring it to life. Unfortunately, there doesn’t seem to be a datasheet available for this particular panel.
By combining what could be gleaned from the datasheets of similar displays with a bit of experimentation, [YodaLogic] came up with a configuration profile that mostly works. It doesn’t seem like the yellow is as vibrant as it should be, and a refresh can take as long as 20 seconds, but it’s certainly a start. Perhaps the code can be tightened up with some input from the community, or even better, maybe somebody out there knows where we can get our hands on the datasheet for this panel.
We’ve become so used to seeing SpaceX boosters land themselves back on the pad with clockwork reliability, that it’s easy to forget it took them a good number of attempts to get right. Inspired by SpaceX’s work, [Joe Barnard] of [BPS.Space] started working to replicate it at the model scale five years ago, with no engineering education or experience. On the latest attempt with a brand-new thrust vectoring Scout E rocket, he has gotten tantalizingly close to doing a controlled propulsive landing with a solid-fuel rocket motor.
We’ve all been thrilled to see the SpaceX rockets return to earth, landing elegantly on a floating pad. But those are liquid-fueled. The trick with a solid-fuel rocket motor is it can’t be throttled directly, which is a challenge when you need precision control to land. Thanks to [Joe]’s custom AVA flight computer and the remarkably consistent thrust curve of the Estes F15 black powder motors he used, it becomes a matter of igniting the descent motor at the right moment to make the vertical velocity zero at touchdown. However, [Joe] found that the time between sending the ignition signal and when peak thrust is reached was inconsistent, so he had to work around that. He did this by controlling how much of the thrust is spent in the vertical direction, by vectoring the motor side to side to spend some trust horizontally.
View from rocket of the ascent motor falling away immediately after being ejected
In this attempt, the rocket tipped over on landing due to excessive horizontal movement at touchdown. Joe tracked the cause down to a weak GPS signal caused by antenna position and a possible bug in the Kalman filter that fuses all the sensor data for position and velocity estimation. Thanks to incredibly detailed telemetry and logging done by the flight computer, data from every launch are used for future improvements. We are looking forward to the next flight in a few weeks, during which [Joe] plans to tune and test the control software, among other minor improvements.
Almost every single part of this rocket is a display of engineering ingenuity. The landing struts are designed to absorb as much impact as possible without bouncing while being light and quick to deploy. The ascent motor is ejected simply by moving the thrust vectoring mount to one of its extremes, allowing the descent motor to drop into place. The rocket also features a complete emergency abort system with a parachute, which can be activated manually, or by the flight computer if it calculates that landing isn’t feasible. We already covered [Joe]’s latest launch pad, which is a very interesting project all by itself.
There are millions of IoT devices out there in the wild and though not conventional computers, they can be hacked by alternative methods. From firmware hacks to social engineering, there are tons of ways to break into these little devices. Now, four researchers at the National University of Singapore and one from the University of Maryland have published a new hack to allow audio capture using lidar reflective measurements.
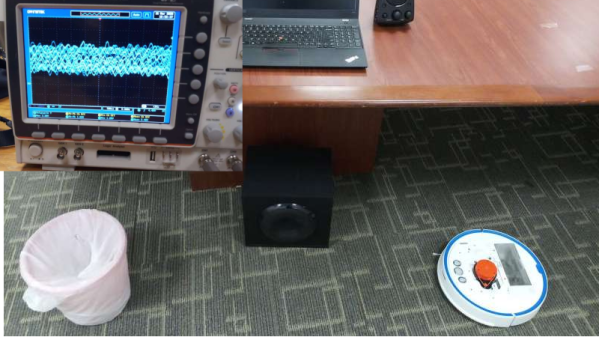
The hack revolves around the fact that audio waves or mechanical waves in a room cause objects inside a room to vibrate slightly. When a lidar device impacts a beam off an object, the accuracy of the receiving system allows for measurement of the slight vibrations cause by the sound in the room. The experiment used human voice transmitted from a simple speaker as well as a sound bar and the surface for reflections were common household items such as a trash can, cardboard box, takeout container, and polypropylene bags. Robot vacuum cleaners will usually be facing such objects on a day to day basis.
The bigger issue is writing the filtering algorithm that is able to extract the relevant information and separate the noise, and this is where the bulk of the research paper is focused (PDF). Current developments in Deep Learning assist in making the hack easier to implement. Commercial lidar is designed for mapping, and therefore optimized for reflecting off of non-reflective surface. This is the opposite of what you want for laser microphone which usually targets a reflective surface like a window to pick up latent vibrations from sound inside of a room.
Deep Learning algorithms are employed to get around this shortfall, identifying speech as well as audio sequences despite the sensor itself being less than ideal, and the team reports achieving an accuracy of 90%. This lidar based spying is even possible when the robot in question is docked since the system can be configured to turn on specific sensors, but the exploit depends on the ability to alter the firmware, something the team accomplished using the Dustcloud exploit which was presented at DEF CON in 2018.
Years ago, [Leo Neumann]’s girlfriend gave him a 1970s chess computer game that was missing almost everything but the super cool clicky keyboard. Noting the similarity of chess move labeling to chord notation, [Leo] decided to turn it into something even nerdier — a jazz chord game where you jam with the computer.
To play the game, you and the computer take turns entering jazz chords that progress musically from the last one played. The hardware is simple — a Raspberry Pi Zero and a WM8960 audio hat with amplifier in speakers. [Leo] also put in a slightly larger display than the original and printed a new bottom half for the case. We love the look of this build, especially the groovy custom line font [Leo] designed.
On the software side, [Leo] made a Python prototyping environment using PYO Module and Kivy UI. Not content with other approaches to tonal consonance, [Leo] played a couple thousand chords and rated them according to their progressive harmony. Shake out those jazz hands and check it out after the break.
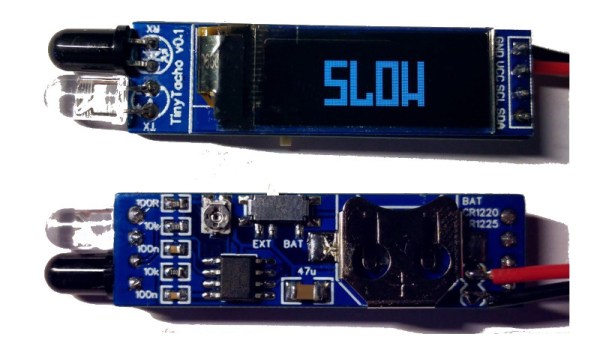
An electronic tachometer is a straightforward enough device, in which the light reflections from a white spot on a rotating object are detected and counted over time, measuring the revolutions per minute (RPM). It’s a technique that has its roots in analogue electronics where the resulting pulses would have fed a charge pump, and it’s a task well suited to a microcontroller that simply counts them. But do you need an all-singing, all-dancing chip to do the job? [Stefan Wagner] has done it with a humble ATtiny13.
His TinyTacho is a small PCB with an IR LED and photodiode on one end, a small OLED display on its front, and a coin cell holder on its rear. The electronics may be extremely simple, but there’s still quite some effort to get it within the ATtiny’s meagre resources. Counting the revolutions is easy enough, but the chip has no I2C interface of its own and some bitbanging code is required. You can find all the design files and software you need in a GitHub repository, and he’s put up a video of the device in action that you can see below the break.
Tachometers are a popular project hereabouts, and we’ve featured a lot of them over the years. Perhaps the best place to direct readers then is not to another project, but to how to use a tachometer.