CRISS CP/M Provides Modern Hardware For A Classic OS

Today you might choose run Windows, Linux, MacOS or some other OS on your computer. Back in the 1980s however, you generally had little choice: a certain home computer came with a certain OS, and that was it. If yours was based on a Z80 processor, chances are it ran CP/M. While differences in hardware often made direct data exchange difficult, CP/M provided at least a basic level of software compatibility between various Z80-based computers. Although eventually supplanted by MS-DOS (which initially aimed to be compatible with CP/M), enthusiasts kept the classic OS running on old hardware throughout the 90s and even beyond.

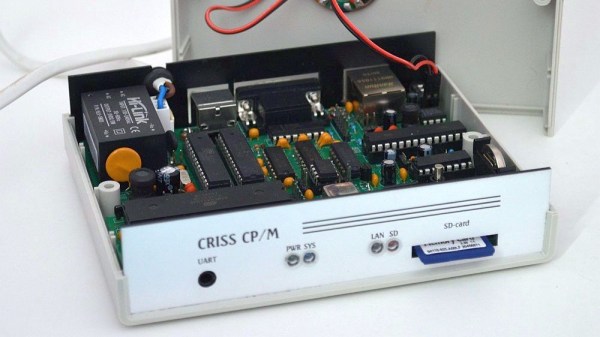
[Igor] decided to make a 21st-century CP/M machine by designing the CRISS, a single-board computer based mainly on AVR microcontrollers. The CPU is a 20 MHz ATMEGA1284P, which imitates a 4 MHz Z80 through machine-code emulation. A pair of ATMEGA328s run the peripheral controller and a VGA output, so the CRISS can be used with modern monitors. True to its heritage however, the image is monochrome green-on-black, looking instantly familiar to users of Kaypros, Osbornes and other contemporary CP/M machines.

Software is loaded through an SD card that holds floppy images. The CRISS can directly run programs written for the Kaypro II and Robotron 1715 computers, although other platforms can be supported as well with a software upgrade. [Igor] shows it running programs ranging from the Turbo Pascal compiler to games like Xonix and Tetris.

Housed in a neat little case, the CRISS can communicate with standard PS/2 keyboards and serial printers. Even an Ethernet port is provided for those willing to experiment with network connectivity (a rare feature in the 1980s).

We love seeing modern retro builds like this; similar projects we’ve covered before include the compact ZZ80MB and the huge Z20X. Others have used different ways of running CP/M on modern hardware, such as booting it directly on a Raspberry Pi or emulating an Altair on an ESP32.

Printing Ceramics Made Easier

Creating things with ceramics is nothing new — people have done it for centuries. There are ways to 3D print ceramics, too. Well, you typically 3D print the wet ceramic and then fire it in a kiln. However, recent research is proposing a new way to produce 3D printed ceramics. The idea is to print using TPU which is infused with polysilazane, a preceramic polymer. Then the resulting print is fired to create the final ceramic product.

The process relies on a specific type of infill to create small channels inside the print to assist in the update of the polysilazane. The printer was a garden-variety Lulzbot TAZ 6 with ordinary 0.15mm and 0.25mm nozzles.

Continue reading “Printing Ceramics Made Easier”

An open-source chording keyboard with trackball support.

Chordie Chording Keyboard Speaks No Qwerty

What is the fastest way to get thoughts out of your brain and into relative permanence? Well, yeah, probably a voice recorder. But after voice recorders comes typing in a distant second. Typing, especially QWERTY-style, has its limitations. The holy grail method it comes to typing quickly has got to be a chording keyboard, hands down. How can court reporters possibly keep up with everything that’s uttered during a trial? When you can press a few keys at the same time and type entire words, it’s not that difficult. It just takes a whole lot of memorization and muscle memory to get to that point.

An open-source chording keyboard with trackball support.So if you’re going to go for the glory, check out Chordie, a snazzy little chording keyboard that does it all with just 14 keys. [kbjunky] based Chordie on the Ginny, a cute little bare-bones bat-wing chording keyboard that uses the ASETNIOP chording engine originally built for soft keyboards.[kbjunky] added open-face trackball support via printed cradle, but it’s not necessary to use a trackball since there’s a pair of rotary encoders and a mouse layer.

This keyboard looks fantastic with its rocket ship MCU holder and its flush-mounted I/O expander breakout boards. Apparently [kbjunky] used polyimide tape to keep the solder from making blobs. It’s all there in the nice build guide.

We would probably argue that chording is not totally ergonomic. Sure, you barely move your hands or wrists, but chording itself can be hard on the digits, especially the pinkies. To that end, [kbjunky] used low-profile switches with light springs. Totally ergonomic or not, we have to admit that we love the idea of clacking along at 300 WPM someday far, far down the learning curve of ASETNIOP. Take a look at the key map, and check out [kbjunky]’s follow-up post if you want to see a demo.

Maybe you prefer a completely different typing experience. Well, ASETNIOP works with digital pianos, too.

Via r/ErgoMechKeyboards

Impromptu Metal Detector Built From The Junk Bin

Have you ever found yourself suddenly in need of finding a small metal object hidden in the woods? No? Well, neither have we. But we can’t say the same thing for [zaphod], who’s family was hoping to settle a dispute by finding the surveyor stakes that marked the corners of their property. It was a perfect job for a metal detector, but since they didn’t own one, a serviceable unit had to be assembled from literal garbage.

To start with, [zaphod] had to research how a metal detector actually works. After reviewing the pros and cons of various approaches, the decision was made to go with a beat frequency oscillator (BFO) circuit. It’s not the greatest design, it might even be the worst, but it could be built with the parts on hand and sometimes that’s all that matters. After packing a 2N3904 transistor, an LM386 amplifier, and every Hackaday reader’s favorite chip the 555 timer into an enclosure along with some of their closest friends, it was time to build the rest of the metal detector.

Look ma, no MCU!

The sensor coil was made by salvaging the wire from an old fluorescent lamp ballast and winding it around the lid of a bucket 27 times. This was mounted to the end of a broom handle with some angle pieces made from PVC sheet material, being careful not to use any metal fasteners that would throw off the detector. With the handle of an old drill in the middle to hold onto, the metal detector was complete and actually looked the part.

So did [zaphod] save the day by finding the surveyor stakes and reconnoitering the family’s plot? Unfortunately, no. It wasn’t a technical failure though; the metal detector did appear to work, although it took a pretty sizable object to set it off. The real problem was that, after looking more closely into it, the surveyors only put down one stake unless they are specifically instructed otherwise. Since they already knew where that one was…

If your homemade metal detector can’t find something that was never there, did it really fail? Just a little something to meditate on. In any event, when even the cheapest smart bulb is packing a microcontroller powerful enough to emulate early home computers, we’re always happy to see somebody keep the old ways alive with a handful of ICs.

Mice with capactive sensors instead of buttons. Designed for people with low mobility.

Capacitive Mouse Built For A Friend Makes For A Touching Tale

Those tiny switches inside your mouse may be rated for 50 million clicks or more, but your fingers will likely wear out much sooner than that. Trust us — mouse arm and/or hand fatigue is no fun at all. If you’ve never had the displeasure, just try to imagine not being able to click or move the mouse around without extreme discomfort.

TTP223 touch sensor modules and the modifications necessary for this project.For this year’s Hackaday Prize, [BinSun] hacked together a capacitive mouse for a friend who has ALS. Instead of micro switches, it uses touch sensors to detect left and right clicks and LEDs to indicate when a click has taken place. That makes us think that haptic feedback could be cool, but it might get old quickly, or even worse, you might get used to it after a while and not feel it anymore.

This mouse would be a good alternative for anyone with limited mobility from any condition — ALS, arthritis, trigger finger, or carpal/cubital tunnel syndrome. It would also benefit anyone who wants to mouse much more stealthily, like in a library, a small shared space, or late at night. The only downside we can see is that you’d either have to get used to hovering your fingers, or else learn to rest them out of the way of the capacitive buttons. Otherwise, you’re gonna actuate them more often than you really want to.

If you want to build one of these, you’ll find a nice set of instructions over on IO that includes the minor modifications necessary to make the TTP223 capacitive modules sensitive enough to detect the presence of a finger. All you really have to do is bridge a couple of pads, add a capacitor and remove the SMD LEDs. [Bin Sun] says this is an ongoing project. He’s gotten a handful of beta testers involved at this point, and is planning to make a dedicated PCB pretty soon. Squeak past the break for a couple of brief demonstrations.

The right kind of mouse can save your limbs, sure. Hack together a different type of mouse, and you might be able to save your crops from elephant raids.

Continue reading “Capacitive Mouse Built For A Friend Makes For A Touching Tale”

Fusion Ignition: What Does The NIF’s 1.3 MJ Yield Mean For Fusion Research?

Earlier this month, Lawrence Livermore National Laboratory (LLNL) announced to the world that they had achieved a record 1.3 MJ yield from a fusion experiment at their National Ignition Facility (NIF). Yet what does this mean, exactly? As their press release notes, the main advancement of these results will go towards the US’s nuclear weapons arsenal.

This pertains specifically to the US’s nuclear fusion weapons, which LLNL along with Los Alamos National Laboratory (LANL) and other facilities are involved in the research and maintenance of. This traces back to the NIF’s roots in the 1990s, when the stockpile stewardship program was set up as an alternative to nuclear weapons testing. Much of this research involves examining how today’s nuclear weapons degrade over time, and ways to modernize the existing arsenal.

In light of this, one may wonder what the impact of these experimental findings from the NIF are beyond merely ensuring that the principle of MAD remains intact. To answer that question, we have to take a look at inertial confinement fusion (ICF), which is the technology at the core of the NIF’s experiments.

Continue reading “Fusion Ignition: What Does The NIF’s 1.3 MJ Yield Mean For Fusion Research?”

Regen Receiver With Few Parts

We like regenerative receivers. They perform well and they are dead simple to create. Example? [Radio abUse] modified a few existing designs and built a one-transistor receiver. Well, one transistor if you don’t count the dozens that are probably on the audio amplifier IC, but we won’t quibble. You can watch a video about the simple receiver — which looks good on a neatly done universal board — below.

The coil of #22 wire dominates the visual layout, and we imagine winding it might have been the most time-consuming part of the project. The layout would work with a single-sided PCB and would be a great board to produce by hand if you were inclined to develop that skill.

Regenerative receivers work by holding an amplifier just shy of oscillating at a certain frequency. This provides extremely high gain at a particular frequency which allows just a single stage to really pull in signals.

We were a little sad to find out there was a plan to tear the radio down to build something else. But, we suppose, that’s progress. We’d be tempted to make a module out of the audio amplifier and then keep the RF section intact. But, then again, we have a lot of partial projects like that gathering dust on the shelf, so maybe that’s not such a great idea.

While regenerative receivers aren’t the most common architecture today, they still have their place. The inventor, Edwin Armstrong, developed quite a bit of radio tech that we still use today.