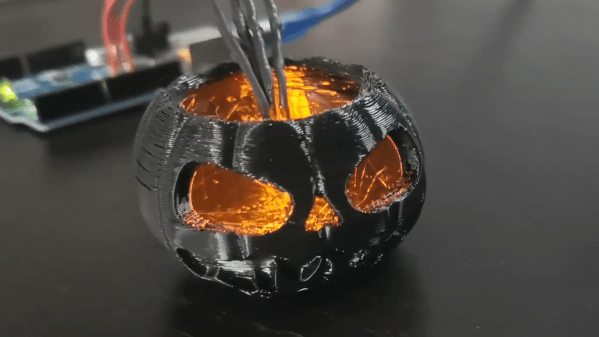
The Jack o’ Lantern is a fun Halloween tradition, though one that does come with a few risks. It’s pretty easy to slice off a bit of finger when carving a stiff pumpkin, and candles draw more enmity from fire crews than most household items. For the electronics beginner looking for a learning project, [Oyvind’s] build might be a nice safe bet.
The build starts with a 3D-printed pumpkin figurine with a suitably spooky face, though [Oyvind] notes there’s nothing stopping this project from being executed with a real orange gourd instead. Inside, an Arduino is hooked up to a trio of orange LEDs. They’re attached to PWM pins and each is given a random brightness value at regular intervals to create a pleasant flickering effect.
It’s a very simple project, but it’s also the kind of thing that’s perfect for introducing new people into the world of electronics. There’s little to get wrong, and mistakes aren’t costly, making it an ideal project for beginners. From there, the sky really is the limit! Video after the break.
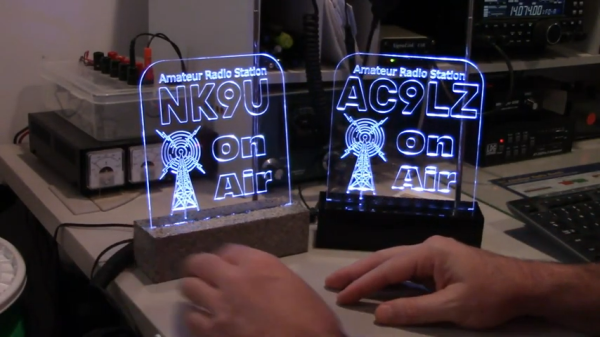
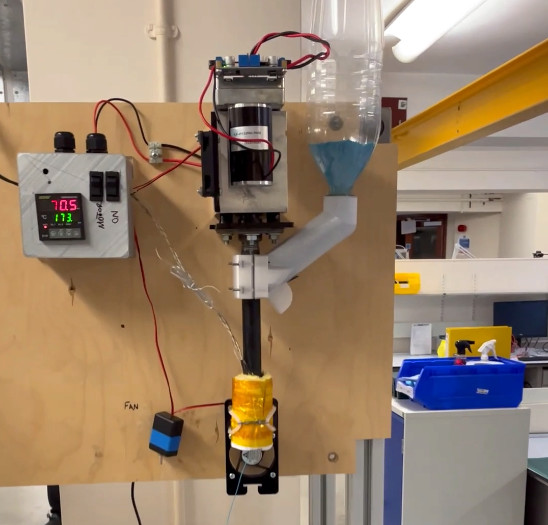
Like a lot of hams, [Stuart] wanted an “on the air” sign. These signs often connect to a PTT switch or maybe an output from the transmitter that also does things like switches antennas or switches in an amplifier. [Stuart’s] version, though, simply senses the radio frequency emissions from the transmitter and lights up that way. You can see two videos about the sign, below.
Honestly, we are a little worried that he might have too much RF at his operating position. Presumably, the device is pretty sensitive, especially if there’s any actual antenna on the sign. A comparator and a pot let you set the sensitivity so it doesn’t light up when your garage door opens.
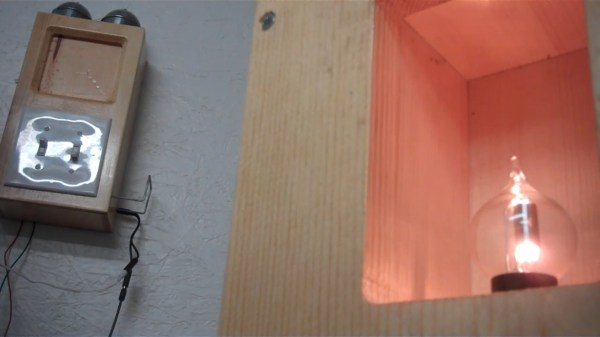
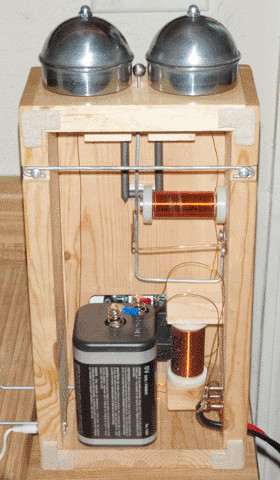
Hot on the heels of their carbon microphone build a few years ago, [Simplifier] strung up a two-phone network between the house and the workshop. Both telephones are completely DIY except for the pair of switches on the front. Each side has a bell, a microphone, and an audio transformer. Listening is done through a pair of headphones, and both users speak through a homebrew carbon microphone.
We particularly love the bell, which is made from fence post caps. Sitting between the bells and ready to strike is a ball bearing mounted on a really thick piece of wire that’s driven by an electromagnet. To make a call, you use both switches — the one on the left pulls either the bell or the microphone to ground, while the switch on the left right is used momentarily to send 6 V from the lantern battery down the 50 ft. line to the other phone to ring it. You’ll see what we mean in the demo video after the break. Check out the sound of those fence post caps!
[Simplifier] wound an audio transformer that provides the necessary impedance matching to use regular headphones as receivers. Since the homebrew microphones only need 1.5 V, [Simplifier] split the voltage across two carbon contacts placed in series. That’s still more than necessary, but [Simplifier] was able to make it work.
We’ve covered plenty of clocks powered by the ESP32, but this one from [Marcio Teixeira] is really something special. Rather than driving a traditional physical display, the microcontroller is instead generating a composite video signal of an animated digital clock. This could be fed into whatever device you wish, but given the 80’s synthwave style it’s pumping out, you’ll probably want to find a suitably retro CRT to do it justice.
Specifically this is a variant of the “Dali” clock, where each digit seems to melt and morph into its successor. Though his version doesn’t necessarily share code with all the previous iterations, [Marcio] does credit the developers who have pulled off similar visual tricks going all the way back to 1979. Given the vintage of this particular animation, the neon skyline and infinite scrolling grid certainly feel like a perfect fit.
Want to add a little vaporwave vibe to your own workbench? Assuming you’ve already got a 80s style CRT, all you need is an ESP32 and two wires stuck into the composite video port. One goes to ground, and the other goes to the chip’s analog pin. Once everything is powered up, you’ll be able to configure the clock with a web-based interface. It doesn’t get much easier than that.
In the documentation, [Marcio] calls out a few open source projects which were instrumental to getting his clock off the ground. The pioneering work [bitluni] did to get video out of the ESP32 is something of a given, but he also sends a hat tip to [rossumur] for his collection of 8-bit game console emulators written for the microcontroller. Projects like this are a fantastic example of what’s possible when a community works together to truly push the envelope.
Disposable masks have been a necessity during the COVID-19 pandemic, but for all the good they’ve done, their disposal represents a monumental ecological challenge that has largely been ignored in favor of more immediate concerns. What exactly are we supposed to do with the hundreds of billions of masks that are used once or twice and then thrown away?
If the research being conducted at the University of Bristol’s Design and Manufacturing Futures Lab is any indication, at least some of those masks might get a second chance at life as a 3D printed object. Noting that the ubiquitous blue disposable mask is made up largely of polypropylene and not paper as most of us would assume, the team set out to determine if they could process the masks in such a way that they would end up with a filament that could be run through a standard 3D printer. While there’s still some fine tuning to be done, the results so far are exceptionally impressive; especially as it seems the technique is well within the means of the hobbyist.
From masks to usable filament.
The first step in the process, beyond removing the elastic ear straps and any metal strip that might be in the nose, is to heat a stack of masks between two pieces of non-stick paper with a conventional iron. This causes the masks to melt together, and turn into a solid mass that’s much easier to work with. These congealed masks were then put through a consumer-grade blender to produce the fine polypropylene granules that’re suitable for extrusion.
Mounted vertically, the open source Filastruder takes a hopper-full of polypropylene and extrudes it into a 1.75 mm filament. Or at least, that’s the idea. The team notes that the first test run of filament only had an average diameter of 1.5 mm, so they’re modifying the nozzle and developing a more powerful feed mechanism to get closer to the goal diameter. Even still, by cranking up the extrusion multiplier in the slicing software, the team was able to successfully print objects using the thin polypropylene filament.
This is only-during-a-pandemic recycling, and we’re very excited to see this concept developed further. The team notes that the extrusion temperature of 260 °C (500 °F) is far beyond what’s necessary to kill the COVID-19 virus, though if you planned on attempting this with used masks, we’d imagine they would need to be washed regardless. If the hacker and maker community were able to use their 3D printers to churn out personal protective equipment (PPE) in the early days of the pandemic, it seems only fitting that some of it could now be ground up and printed into something new.
It didn’t take long to realize that the 2021 Vintage Computer Festival East — returning to the InfoAge Science and History Museum in Wall, New Jersey after being held virtually last year — was a massive success. In fact, the first clue came before I even got out of my car. When a volunteer came up to my window to apologetically explain that the primary parking lot was already full and I’d have to drive down the road to an overflow lot, there was no question about it; a whole lot of folks were more than ready to shake off those pandemic blues and get back to business.
They certainly picked a great event for it. While VCF East has always been a highlight of the East Coast hacker’s year, it was obvious things were really turned up to the max for this much-anticipated return to an in-person festival. With respect to all those involved in previous events, things just felt more cohesive and better organized this time around.
Veteran attendees I spoke to all felt like they were witnessing the event going through an evolutionary change into something bigger and better, while first time fliers were impressed with the buzz of activity and breadth of what was on display. In short, admiration for the event and the people working behind the scenes to make it possible was unanimous.
It’s simply not possible to adequately summarize a multi-day event like VCF East in a single post, so I won’t try to. This article, and the ones to follow it, serve only to document some of the highlights from my own personal time wandering through the sprawling InfoAge campus. Ultimately, there’s no real substitute for making the trip to Wall, NJ and experiencing this incredible event for yourself. But if that’s not an option for you, hopefully the following will give you a little taste of what the Vintage Computer Federation labors so hard over every year.
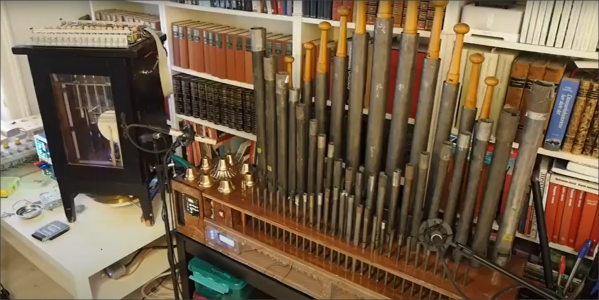
The Quadrivium EnsembleBot project is a mashup between old school musical instruments and the modern MIDI controlled world. Built by a small team over several years, these hand crafted instruments look and sound really nice.
The electronics side of things is taken care of with a pile of Arduinos and off-the-shelf modules, but that doesn’t mean the design isn’t well thought through, if a little more complicated than it could be in places. Control is taken care of with a PC sending commands over the USB to an Arduino 2560. This first Arduino is referred to as the Master Controller and has the immediate job of driving the percussive instruments as well as other instruments that are struck with simple solenoids. All these inductive loads are switched via opto-isolators to keep any noise generated by switching away from the microcontroller. A chain of four sixteen-channel GPIO expander modules are hung off the I2C bus to give even more opto-isolated outputs, as even the Arduino 2560 doesn’t quite have enough GPIO pins available. The are a number of instruments that have more complex control requirements, and these are connected to dedicated slave Arduinos via an SPI-to-CAN module. These are in various states of development, which we’ll be keeping our beady eyes on.
One of the more complex instruments is the PipeDream61 which is their second attempt to build a robotic pipe organ. This is powered by a Teensy, as they considered the Arduino to be a little too tight on resources. This organ has a temperature controller using an ATTiny85, in order to further relieve the main controller of such a burden and simplify the development a little.
Another interesting instrument is Robro, which is a robotic resophonic guitar which as they say is still work in progress despite how long they have been trying to get it to work. There’s clearly a fair bit of control complexity here, which is why it is taking so much fiddling (heh!) to get it work.