KiCAD 6.0: What Made It And What Didn’t

I’ve been following the development of KiCAD for a number of years now, and using it as my main electronics CAD package daily for a the last six years or thereabouts, so the release of KiCAD 6.0 is quite exciting to an electronics nerd like me. The release date had been pushed out a bit, as this is such a huge update, and has taken a little longer than anticipated. But, it was finally tagged and pushed out to distribution on Christmas day, with some much deserved fanfare in the usual places.

So now is a good time to look at which features are new in KiCAD 6.0 — actually 6.0.1 is the current release at time of writing due to some bugfixes — and which features originally planned for 6.0 are now being postponed to the 7.0 roadmap and beyond. Continue reading “KiCAD 6.0: What Made It And What Didn’t”

The threeboard simulator running

Threeboard: Short On Keys, Long On Documentation

As peripherals go, few are hacked on more than keyboards. The layouts, the shapes, the sizes, materials, and even the question of what a keyboard is are all on the table for tinkering. In that vein, [TaylorConor] released his simplified keyboard called the threeboard on GitHub, having only three keys and replicating a full keyboard.

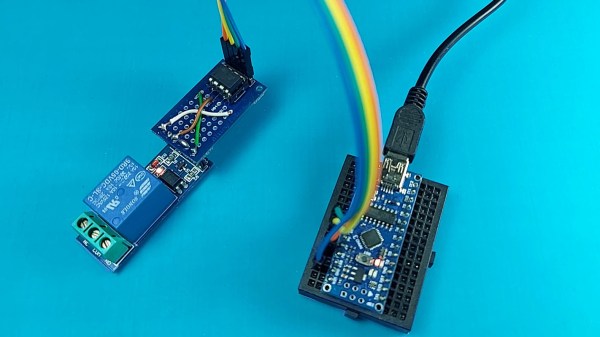
We’ve covered keyboards built with chording in mind, wrapped around coffee cups, and keyboards with joysticks for added speed. So why cover this one? What makes it different? The execution is superb and is a great example to look at next time you’re making a project you want to show off. The keyboard is just three mechanical switches, two 8-bit binary displays (16 LEDs total), three status LEDs, and three LEDs showing the current layer (four layers). The detailed user’s manual explains it all. There is a reliable Atmega32U4 microcontroller and two EEPROM chips at its heart.

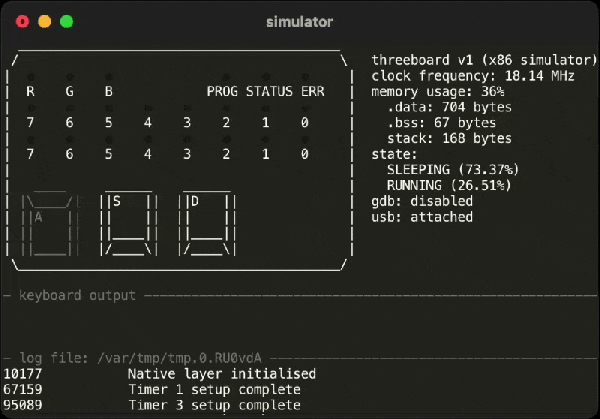
Where this project shows off is the testing. It has unit tests, simulated integration tests, and simulated property tests. Since all the code is in C++, unit testing is relatively straightforward. The integration and property tests are via a simulator. Rather than recompiling the code with some new flags, he uses the simavr AVR simulator, which means it simulates the same binary file that gets flashed onto the microcontroller. This approach means the design is tested and debugged via GDB. It’s an incredible technique we’d love to see more of in hobby projects. Marketing speak might call this a “digital twin” but the idea is that you have a virtual version that’s easier to work on and has a tighter iteration loop while being as close as possible to the physical version.

[TaylorConor’s] goal was to create a from-scratch microcontroller project with easy-to-read code, fantastic documentation, and best practices. We think he nailed it. So feel free to run the simulator or jump right into building one for yourself. All the hardware is under a CERN-OHL-P license, and the firmware is under GPLv3.

I2C To The Max With ATtiny

The Arduino is a powerful platform for interfacing with the real world, but it isn’t without limits. One of those hard limits, even for the Arduino MEGA, is a finite number of pins that the microcontroller can use to interface with the real world. If you’re looking to extend the platform’s reach in one of your own projects, though, there are a couple of options available. This project from [Bill] shows us one of those options by using the ATtiny85 to offload some of an Arduino’s tasks using I2C.

I2C has been around since the early 80s as a way for microcontrollers to communicate with each other using a minimum of hardware. All that is needed is to connect the I2C pins of the microcontrollers and provide each with power. This project uses an Arduino as the controller and an arbitrary number of smaller ATtiny85 microcontrollers as targets. Communicating with the smaller device allows the Arduino to focus on more processor-intensive tasks while giving the simpler tasks to the ATtiny. It also greatly simplifies wiring for projects that may be distributed across a distance. [Bill] also standardizes the build with a custom development board for the ATtiny that can also double as a shield for the Arduino, allowing him to easily expand and modify his projects without too much extra soldering.

Using I2C might not be the most novel of innovations, but making it easy to use is certainly a valuable tool to add to the toolbox when limited on GPIO or by other physical constraints. To that end, [Bill] also includes code for an example project that simplifies the setup of one of these devices on the software end as well. If you’re looking for some examples for what to do with I2C, take a look at this thermometer that communicates with I2C or this project which uses multiple sensors daisy-chained together.

Continue reading “I2C To The Max With ATtiny”