RIP John Birkett, Parts Vendor Extraordinaire

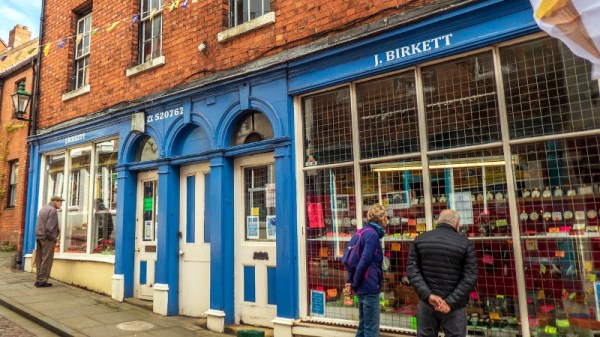
It is with sadness that we note the passing of John Birkett, proprietor of the legendary eponymous surplus radio and electronics store on an unassuming street in the British city of Lincoln, at the age of 93. He has been a fantastic source of esoteric parts and electronic assemblies for many decades, and though many of you from beyond where this is being written may never have heard of him the chances are that if you follow electronics enthusiasts from the UK you will have unwittingly seen parts which passed through his hands.

A typical Birkett advert from 1986
Gateway to a world of wonders: a typical Birkett advert from 1986.

There was a time when surplus stores were a relatively common sight, given their window of opportunity by the huge quantity of post-war and Cold War military gear at knock-down prices. My town had one when I was a kid, but though it sold its share of electronic goodies it was more of a place for sturdy olive green outdoor wear or all the 1930s British military uniform items you might ever need. J. Birkett was different, as a purely electronics store the shop rapidly became the go-to place for both the most necessary and the most unexpected of parts.

His motto was “Not a piece of junk in sight”, and though as with much surplus equipment there is plenty of junk to be found it was his eye in managing to stock the junk which was most interesting and useful that made his selection special. Such was its reach that most of his customers including me never made it to Lincoln and the store itself, instead we came to him through his mail-order business and attendance at radio rallies. I fondly remember the anticipation of receiving a Birkett parcel, and I still have plenty of parts that came from him. An FM tuner converted for use as a 2 meter receiver is still in a box somewhere, and I’m pretty certain my storage unit still holds a pair of Pye Cambridge VHF transceivers he supplied.

According to Google the shop remains open, and we hope that state of affairs will continue. Surplus may not be what it once was, but we thank John Birkett for what he gave to generations of British hardware hackers. May he rest in peace.

Header image: Oliver Mills, (CC BY-SA 2.0).

linear motor pcb model railroad track

PCB Linear Motors For Model Trains

Modeling a railroad is hard. Railroads are large, linear pieces of civil engineering. So many modelers are drawn to the smallest scale they can use. Recently a new scale, named T, at 1:450 has been pushing this barrier. But fitting a reliable mechanical drive mechanism and MCU board in a package this size is a challenge. In practice, even more of a problem is getting reliable electrical contact through a metal wheel on metal track (about the worst possible design for a contact).T scale electric locomotive held on a human finger

T always seemed to us a long way out on the bleeding edge. But all that may have changed. In a recent Hackaday.io writeup, author [Martin] describes a PCB technology based linear motor system to externally drive T scale locomotives.

The system uses 4mm planar coils. The underside of the PCB has another coil, so the effective pitch is 2mm. With microstepping, a step of 0.25mm is possible, and trains run smoothly. Current is 3-400mA. Continue reading “PCB Linear Motors For Model Trains”

Scott’s CPU From The Bottom Up

It isn’t for everyone, but if you work much with computers at a low level, you’ll probably sooner or later entertain the idea of creating your own CPU. There was a time when that was a giant undertaking, but with today’s tools and FPGAs it is… well, not easy, but certainly easier. If you have the urge to try your own, you might have a look at [Simply Explained’s] video series called “Building Scott’s CPU.

The 11 videos cover everything from basic transistor logic to sequential circuits and moves on to things like ALUs, clock units, and how jump instructions work.

Continue reading “Scott’s CPU From The Bottom Up”

Flexible Grip For Hammer Made With 3D Printing Pen

When it comes to putting a flexible grip on a tool, you might reach for a self-fusing silicone tape or other similar product. However, [Potent Printables] has discovered you can easily create a flexible grip using a 3D-printing pen and some flex filament.

In this case, a hammer first gets a layer of blue painters tape wrapped around its wooden handle. This serves as a base layer to promote good adhesion. A simple paper template was then printed as a guide for creating the graphics on the flexible grip. Flexible filament was fed through the 3D pen, with the red and black details of the graphics printed first. Then, white flex filament was used to make the rest of the flexible grip. A wood burning tool was then used to smooth out the first layer of flex filament, before a second layer was added on top.

The result is a flexible white grip on the hammer which is stuck fast, likely due to shrinkage as the plastic cooled after printing. We’ve seen some other creative grips made with 3D printing before, too. Video after the break.

Continue reading “Flexible Grip For Hammer Made With 3D Printing Pen”

OpenCV Running On A Tiny Microcontroller

At first blush, it might seem like projects that make extensive use of computer vision or machine learning would need to be based on powerful computing platforms with plenty of clock cycles and memory to handle this type of application. While there is some truth to this, as the field progresses it becomes possible to experiment with these tools on low-power devices as well. Take this OpenCV project which is built entirely on an ESP32 for example.

With that being said, there are some modifications that need to be made to the ESP32 in order to use OpenCV in any meaningful way. The most important of these is the use of the ESP32-DOWDQ6 module which increases the available memory of the ESP32 to allow it to make better use of camera functions. Even then, the ESP32 can’t run the entire OpenCV application, so a shrunken version of OpenCV is required before the device can run it natively. Once those two obstacles are out of the way, though, doing things like edge detection, as this project demonstrates, are well in the realm of possibility.

If running OpenCV on something as small as an ESP32 is possible, it is even easier to run on something orders of magnitude more powerful and yet still inexpensive, such as the Raspberry Pi. While the project’s code is available on its GitHub page for those interested, there are plenty of other OpenCV projects that we have featured on more powerful platforms as well, like this clock which falls off of the wall whenever someone looks at it.

Continue reading “OpenCV Running On A Tiny Microcontroller”

Hacking The Logitech Z906 Speaker System

The Logitech Z906 is a well-rounded 5.1 surround sound system. It’s capable of putting out 1000W in peak power, and can decode Dolby Digital and DTS soundtracks as you’d expect. It’s intended to be used as the heart of a home cinema system and used with a central command console. However, [zarpli] figured out the device’s serial secrets and can now run the device in a standalone manner.

As it turns out, the Z906 uses a main control console that speaks to the rest of the hardware over a DE15 connector (also known as the DB-15). [zarpli] realized that the hardware could instead be commanded by just about any device with a serial port. Thus, a library was whipped up that can be readily used with an Arduino to control all the major functions of the Z906. Everything from volume levels to effect modes and channel assignments can be commanded by microcontroller. As a finale, [zarpli] shows off the hardware playing a multi-channel composition without the console connected, with his own hardware running the show instead.

If you’ve got a Logitech Z906 or similar unit that you wish to automate, you might find this work useful. It’s also a good inspiration for anyone contemplating hacking away at the console ports on other hardware. Video after the break.

Continue reading “Hacking The Logitech Z906 Speaker System”

Put A New Spin On Your 3D Printed Parts

Once you get tired of printing keychains and earbud holders with your 3D printer, you’ll want to design things a bit more sophisticated. How about things that rotate? [3DSage] has a good how-to about how to integrate a simple motor and controller into a few different size boxes. Combined with some 3D printed linkages, these boxes can turn your project — printed or otherwise — into something that spins.

To demonstrate, he created a few cat toys, played with an idea for a magic trick, and refit a selfie light into… something. We have no doubt you can find something to do with these little motor modules. The boxes vary mostly in how big the battery packs are. There are also several interesting side pieces like a 3D holder for rechargeable button cells and their charger.

In addition, he also demonstrates how to use the motor as a (rather poor) generator. Attaching a water wheel wasn’t a success until he used compressed air to run the wheel. You would have thought water would have done the trick.

The video stresses that you should solder connections, but you don’t have to. Honestly, we think if you are building moving stuff with a 3D printer, you should probably just go ahead and learn to solder. It isn’t that hard and there are plenty of reasons to learn.

Of course, you could 3D print the motor itself. Adapting motor modules for different uses isn’t a new idea, of course, but it is always great to see more ways to apply basic components.

Continue reading “Put A New Spin On Your 3D Printed Parts”