Solar Powered Split Wireless Mechanical Keyboard

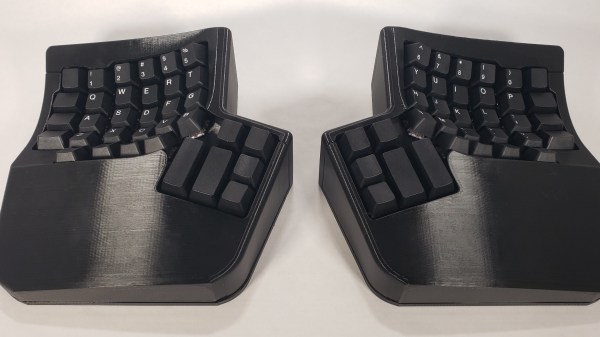
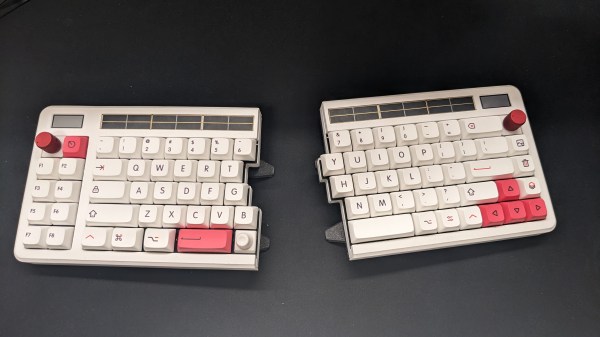
When thinking about a perfect keyboard, some of us have a veritable laundry list: split, hot-swapping, wireless, 3d printed, encoders, and a custom layout. The Aloidia keyboard by [Nguyen Vincent] has all that and more.

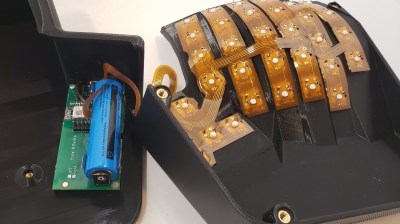
One of the first things to notice is a row of solar panels on the top, which trickle charge the keyboard. The keyboard uses 65uA in idle and 30uA when in a deep sleep. With the solar panels providing anywhere between 600-1200uAh a day, the battery should last a year and a half under even harsh conditions. The encoders were specially chosen to reduce pull-up power consumption. Given the focus on power and the lack of wires between the halves, you might wonder how the connection to the computer is handled. Does one-half handle the connection and use more power? The answer is that both talk to a dongle based around an nRF52840. This lets the keyboard halves idle most of the time and enables the dongle to handle the expensive communications to the host PC.

Instead of an e-paper screen in the top left, [Nguyen] placed a Sharp memory display. The 3D-printed case is stunning, with no visible screws on the top and tenting feet on the bottom. The two halves snap together very satisfactorily with the power of magnets (the printed palm rests also magnetically attach). Overall it is an incredibly well-thought-out keyboard with all sorts of bells and whistles.

There are project logs with detail to dig into and more videos and photos. We love a good keyboard journey like this one that went for a more ergonomic shape that meant more custom wiring.

Schematics are up on hackaday.io in the files section—video after the break.

Thanks [Shantanu] for the tip!

Continue reading “Solar Powered Split Wireless Mechanical Keyboard”

The keyboard, fully assembled, with black 3D printed body.

From Product To Burnout To Open-Source: The Ergo S-1 Keyboard Story

[Andrew] from [Wizard Keyboards] emailed us and asked if we were interested in his story of developing an ergonomic keyboard as a product. Many of us can relate to trying to bring one of our ideas to market. [Andrew], being a mechanical keyboard geek, knew a niche with no product to satisfy it, and had a vision he wanted to implement. He started meticulously going through steps for bringing his keyboard idea into life as a manufacturable product, and gave himself six months to get it done.

 Internals of the keyboard, showing the lower half with the mainboard on the left, and upper half of the keyboard with an FPC connecting keyswitches together on the right

After evaluating competing products and setting a price point, he designed the case, the keyboard’s mainboard, and even flexible circuit boards for wiring the keys up. The mechanical design alone had him go through many iterations and decisions, and he walks us through the different paths he’s faced. Whether it’s these insights, a story of a module with fraudulent FCC certification, or an approach to electronics design that led to him passing EMC tests with flying colors, there’s plenty to learn from [Andrew]’s journey.

Sadly, at some point, the project quickly outgrew the intended goal and became a drain. For instance, tuning the 3D printing processes alone took three months instead of one as planned. As the design was done, he got stuck on marketing material production – a field that turned out to be unexpectedly hostile to a hacker like him. After a year of work and five thousand hours of work spent on the project, he took a break, and afterwards, as he was trying to come back, [Andrew] realized that he has burned out. He took a few month long hiatus, and having recovered a bit, revisited the project. Still not thrilled about the product route, he decided that open-sourcing the keyboard would be the best outcome – doing justice to the time and effort spent working on it.

This is where the story ends – for now. [Andrew] has open-sourced everything one would need to create such a keyboard by yourself, designed assembly instructions, and even sells kit parts for those who’d like to take a shortcut. This wasn’t what he aimed for, but it’s a honorable ending – most commercial projects never get open-sourced even if they utterly fail to launch. Thanks to [Andrew], we got an insightful journey, a postmortem, and an open-source ergonomic keyboard project. Product stories grace our pages every now and then – here’s a similarly swerving story about a MIDI controller.

Spin The Video Track With A Mechanical Flair

One of the most difficult user interfaces to get right is video editing. It is complex and fiddly with large amounts of precision required even after four or five hours of straight editing. Seeking to bring some of that interface out into the real world, [Zack Freedman] built a mechanical video editing keyboard.

The keyboard in question features popular shortcuts and keys to breeze through different parts of editing. The biggest feature is, of course, the large scrubbing knob, allowing [Zack] to fly through long video with precision. We’ve seen our fair share of mechanical keyboards that aren’t traditional keyboards on Hackaday before, such as this number pad or this macro pad.

One of the unique constraints of this project was the fact that Zack had a deadline of two days. This self-imposed deadline was to help focus the work and drive it towards completion. This meant that it had to be designed in such a way that roadblocks or troublesome features could be designed around or cut out altogether. At its heart, this project is just 14 mechanical switches, 4 potentiometers, and a Teensy to drive it all. It is the design, prototyping, and thought that went into this project that makes it noteworthy. There are plenty of lessons here about how to manage a project’s timeline and advice about how to actually finish it.

Code, STL’s, diagrams, and instructions are all on his GitHub.

Continue reading “Spin The Video Track With A Mechanical Flair”

Print Your Way To Keyboard Stability

Keyboard key stabilizers, or stabs as they’re known in enthusiast circles, do exactly what you’d expect — they stabilize longer keys like the Shifts and the space bar so that they don’t have to be struck dead-center to actuate evenly. Stabs work by flanking the key switch with two non-functional switch actuators linked with a thick wire bar. Some people love stabs and insist on stabilizing every key that’s bigger than 1u, while other people think  stabs are more trouble than they’re worth for various reasons, like rattling.

[Riskable 3D Printing] has been working on a parametric, printable stabilizer system for Cherry MX caps that uses small disk magnets to keep the wire in place. As you can see in the video (embedded after the break), the result is a crisp clacker that doesn’t rattle. The magnets stabilize the wire, so it snaps back quite nicely.

Although the print is an easy one, [Riskable] says the design process wasn’t as cut and dried as it seems. The center points of the stabilizer stems aren’t supposed to be in the center of cutouts, even though it looks that way to the naked eye. After that, the pain point has shifted to the wire, and getting it as straight as possible before making the necessary bends. [Riskable] is going to make a straightener to help out, and we suggest something like this one.

Clacker hacking is quite the rabbit hole, especially when combined with 3D printing. We recently saw a completely 3D-printed macro pad, springs and all.

Continue reading “Print Your Way To Keyboard Stability”

3D Printing A Macro Pad, Switches And All

Building a macro pad inside of a 3D printed enclosure is hardly news these days. Neither is adding 3D printed keycaps to the mix. But if you go as far as [James Stanley] has, and actually print the switches themselves, we’ve got to admit that’s another story entirely.

Now you might be wondering how [James] managed to print a mechanical keyboard switch that’s the size of your garden variety Cherry. Well, the simple answer is that he didn’t. While his printed switches have the same footprint as traditional switches, they are twice as tall.

The switches could probably made much smaller if it wasn’t for the printed spring, but using a “real” one would defeat the purpose. Though we do wonder if the mechanical design could be simplified by making it an optical switch.

But can printed switches really stand up to daily use? [James] wondered the same thing, so he built a testing rig that would hit the switches and count how many iterations before they stopped working. This testing seems to indicate that the keys will either fail quickly due to some mechanical defect, or last for hundreds of thousands of presses. So assuming you weed out the duds early, you should be in pretty good shape.

Naturally, there are a few bits of copper inside each printed switch to act as the actual contacts. But beyond that, all you need to build one of these printable pads yourself is a USB-HID capable microcontroller like the Arduino Pro Micro. If you used the ESP32, you could even make it Bluetooth.

Continue reading “3D Printing A Macro Pad, Switches And All”

3D Printed Mechanical keyboard

3D Printed Mechanical Keyboard

Tired of buying boring keyboards with almost no customization available? We’ve seen lots of keyboard hacks before, but if you want to take it a step further — why not make it from scratch and have it 3D printed?

Reddit user [Wildpanic] has just finished his first attempt at a 3D printed keyboard and he’s even shared the files to make it over at Thingiverse. The frame is entirely 3D printed, but he’s chosen to use pre-manufactured key switches, which is probably for the best. They are the Cherry MX Green variety, which have these little clips in the side which make them super easy to install — especially on a 3D printed frame.

He’s wired them all using 20ga copper wire (which might be a bit overkill) to a Teensy 2.0 microcontroller. The diodes he chosen to use are 1N4148 which he was able to get fairly inexpensively. Total cost is just a bit over $50. Not bad!

Oh and in case you’re wondering, he’s chosen the style of keyboard that makes use of 4 keys for the space bar — as made popular by the planck style custom keyboards — you know, for people who love symmetry.

For more awesome keyboard hacks, check out this roundup [Adam Fabio] put together in a Hacklet last year!

[via reddit]