S15351 tube transmitter

Retro And New Tech Combine In This Hybrid Ham Transmitter

We’ve said it before and we’ll say it again: the best part about holding an amateur radio license is that it lets you build and use your own transmitting equipment. Hams have been doing this for more than a century — indeed, it was once the only way to get on the air — using whatever technology was available. But the mix of technologies in this low-power transmitter for the 80-meter band is something you don’t see every day.

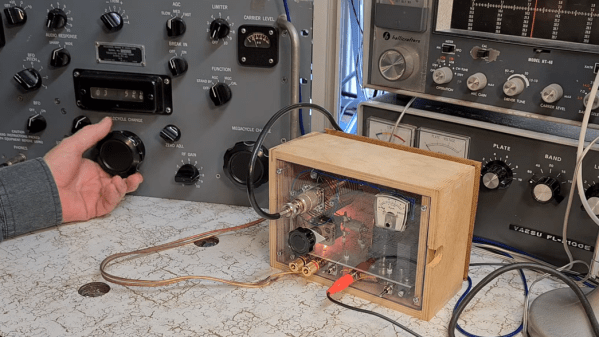
As ham [Helge Fykse (LA6NCA)] describes in the video below, the project began when he came into possession of a bonanza of vacuum tubes — 12A6 tetrodes, specifically. The new-old-stock tubes were perfect for an RF power amplifier, but that left the problem of what to use for an oscillator. [Helge] chose to meld the old with the new and used oscillator board that he designed. The board has an ATmega88 microcontroller and an Si5351 oscillator, along with a 3V3 regulator to let the module run on 12 volts. And for a nice retro touch, [Helge] put the board in a 3D printed case that looks like an old-fashioned quartz crystal.

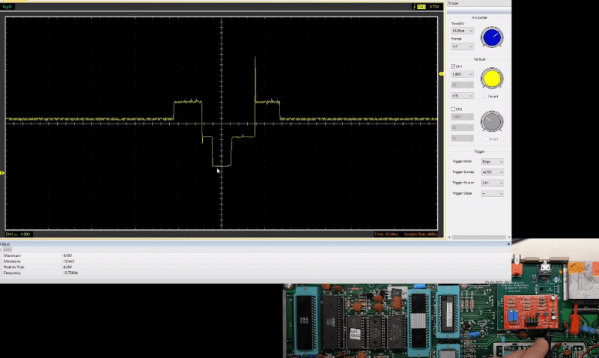
There are some other nice design touches here too. A low-pass filter cleans up the harmonics of the oscillator’s 3.5-MHz square wave output before feeding it to the amplifier, in a nod to proper spectrum hygiene. The primary for the amp’s air-core output transformer is hand-wound, with 3D printed spacers to keep the winding neat and even. The tuning process shown below is interesting, and the transmitter was used to make a solid contact with another ham about 100 km away. And we really liked the look of [Helge]’s shack, stuffed as it is with gear both old and new.

We’ve personally tried the Si5351 for QRP transmitters before, but this blend of the old and new really makes us want to find some tubes and get to playing.

Continue reading “Retro And New Tech Combine In This Hybrid Ham Transmitter”

screenshow showing the supposed AllSpice interface. It resembles the GitHub interface, and shows a pull request open to add some ESD protection to a device.

AllSpice Building A Hardware Development Ecosystem For Companies

In our “hardware development gets serious” news, we’ve recently learned about AllSpice, a startup building hardware development collaboration infrastructure for companies. Hardware developers are great at building hardware tools for themselves, but perhaps not always so when it comes to software, and AllSpice aims to fill that gap at the “hardware company” level. Nowadays, what commonly happens is that software development tools and integrations are repurposed for hardware needs, and the results aren’t always as stellar as they get in the software world. In other words, AllSpice is learning from the positive outcomes of software industry and building a platform that takes the best parts from these tools, aiming to get to similarly positive outcomes in areas where currently hardware team experiences are lacking.

What AllSpice is building seems to be an umbrella platform designed to augment, integrate and hook into a slew of different already-developed platforms like GitHub, GitLab, Jira (and some other ones), and add much-needed features that large-scale hardware developers can’t afford to maintain and develop themselves. “Design review by screenshot” isn’t unheard of in hardware circles, and likely a thing that everyone of us with hardware collaboration experience has partaken in. On a company scale, there’s a myriad of hardware-related problems like that to solve and polish over.

Continue reading “AllSpice Building A Hardware Development Ecosystem For Companies”

Bionic Implants Can Go Obsolete And Unsupported, Too

When a piece of hardware goes unsupported by a company, it can be frustrating. Bugs may no longer get fixed, or in the worst cases, perfectly good hardware can stop working entirely as software licences time out. Sadly, for a group reliant on retinal implants from company Second Sight, the company has since stopped producing and supporting the devices that give them a crude form of bionic sight.

The devices themselves consist of electrodes implanted into the retina, which can send signals to the nervous system which appear as spots of light to the user. A camera feed is used to capture images which are then translated into signals sent to the retinal electrodes. The results are low-resolution to say the least, and the vision supplied is crude, but it gives users that are blind a rudimentary sense that they never had before. It’s very much a visual equivalent to the cochlear implant technology.

The story is altogether too familiar; Second Sight Medical Products came out with a cutting-edge device, raised money and put it out into the world, only to go bankrupt down the road, leaving its users high and dry. Over 350 people have the implants fitted in one eye, while one Terry Byland is the sole person to have implants in both his left and right eyeballs. Performance of the device was mixed, with some users raving about the device while others questioned its utility.

Continue reading “Bionic Implants Can Go Obsolete And Unsupported, Too”

$60 PC Oscilloscope Review

Owning an oscilloscope is a real gamechanger and these days, scopes are more capable and less expensive than ever before. However, there is a big difference between scopes that cost several hundred dollars which are usually quite good and many of the very inexpensive — below $100 — instruments that are often — but not always — little more than toys. [Adrian] looks at a PC-based scope from Hantek that costs about $60. Is it a toy? Or a useful tool? He answers the question in the video below.

The Hantek 6022BE sports two channels with a 20 MHz bandwidth and 48 million samples per second. The device included probes, too. Of course, you also need a PC, although there is apparently third-party software for Android if you don’t want to lug a laptop around.

Continue reading “$60 PC Oscilloscope Review”

Here’s How Those Battery-Free Flashing Phone Stickers Worked

The late 90s and early 2000s were a breakout time for mobile phones, with cheap GSM handsets ushering in the era in which pretty much everybody had a phone. Back then, a popular way to customize one’s phone was to install a sticker that would flash when the phone rang. These required no batteries or any other connection to the phone, and [Big Clive] has dived in to explain how they worked. 

The simple schematic of the flashing sticker circuit. The flashing was generated by the pulses of RF energy from the smartphone.

It’s an old-fashioned teardown that requires a bit of cutting to get inside the sticker itself. A typical example had three LEDs in series for a total voltage drop of around 7V, hooked up to two diodes and a PCB trace antenna. A later evolution used raw unpackaged components bonded to the PCB. Future versions went down to a single diode, using the LEDs to serve as the second. The basic theory was that the PCB traces would pick up RF transmitted by the phone when a call was coming in, lighting the LEDs.

In the 2G era, the freuqencies used were on the order of 300 MHz to 1.9GHz. A combination of the change in frequencies used by modern phone technology and the lower transmit powers used by handsets means that the stickers don’t work properly with modern phones according to [Big Clive].

Incidentally, you might like to consider running your own old-school cellphone network. Video after the break.

Continue reading “Here’s How Those Battery-Free Flashing Phone Stickers Worked”

3D Printed Climbing Holds, Now With Texture

Technology enables all kinds of possibilities to mold our environments in the way we best see fit. Plenty of ski resorts use snowmaking to extend their seasons, there are wave pools for surfing hundreds of miles away from oceans, and if you don’t live near any mountains you can build your own climbing wall as well. For the latter, many have turned to 3D printers to create more rock-like climbing grips but plastic doesn’t tend to behave the same as rock unless you do what [Giles Barton-Owen] did and incorporate salt into the prints.

For small manufacturers, typically the way that the rock texture is mimicked is by somehow incorporating sand, permanently, into the grip itself. This works well enough but is often too rough on climbers’ hands or otherwise doesn’t faithfully replicate a rock climbing experience. For these grips, instead of including sand, salt crystals of a particular size were added to a resin that was formed over the 3D printed grip. Once the resin cures substantially, the water-soluble salt can be washed away leaving a perfect texture to grab onto with chalked hands.

While this might not be a scalable method for large-scale climbing grip manufacturers, [Giles] hopes this method will help smaller operations or even DIY climbers to build more realistic grips without having to break the bank. In fact, he has already found some success at his local climbing gym using these grips. The method may be more difficult to scale for larger manufacturers but for anyone who wants to try it out themselves, all that’s needed for this build is a 3D printer, salt, and time.

Continue reading “3D Printed Climbing Holds, Now With Texture”

A 3D-printed mechanical system that moves weather symbols around

3D Printed Mechanical Contraption Shows Live Weather Forecast

“What’s the weather going to be like today?” is a question that’s near-permanently on the mind of those living in places like Britain, where brilliant sunshine can follow thick clouds, only to turn into drizzle an hour later. Nowadays you simply need to glance at your phone to know whether you need to pack an umbrella, but where’s the fun in that? Why not have a huge mechanical display to show you a summary of today’s weather?

As a fan of automatons and other contraptions filled with gears and pulleys, [Mike] decided to build just such a machine for his latest Mikey Makes video. It uses brightly coloured indicators inspired by the BBC’s famous “fluffy cloud” symbols that can show various combinations of sunshine, clouds, rain and snow. These symbols are moved around by dozens of gears, levers, swinging arms and other moving parts which were all 3D printed. We especially like the system that folds out rays of sunshine from behind the cloud; you can see it working in the video embedded below.

Live weather data is fetched through an open weather API by an Arduino MKR WiFi 1010. This then drives the mechanical system through a pair of motor driver ICs. The heavy work is performed by stepper motors and servos, while micro-switches and optical detectors determine the end point of each movement.

If you’re into weather displays, you’re in luck: we’ve featured many different styles over the years, including e-paper screens, analog gauges, split-flap displays and even a miniature recreation of the local weather.

Continue reading “3D Printed Mechanical Contraption Shows Live Weather Forecast”