Don’t Panic: A Cooperative Bomb Defusing Game

[Heath Paddock] wanted to confound his friends with a game that mimics an escape room in a box. About six months after starting, he had this glorious thing completed. It’s a hardware version of a game called Keep Talking and Nobody Explodes where players have five minutes to defuse a suitcase bomb. This implementation requires at least two players, one with the box-bomb itself, and one who holds all the knowledge but can’t see the box-bomb to defuse it.
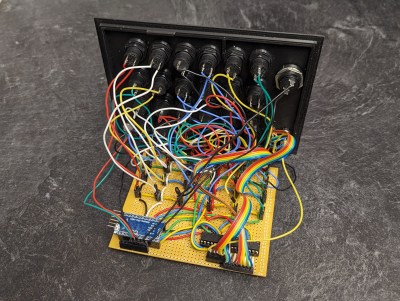
The wiring of the Mastermind module.

[Heath]’s version has twice as many modules as the original game, each hand-wired one driven by an Arduino. One of the modules is an LED maze. There are two green anchor LEDs in one of six configurations, and and blue and a red LED.

The object is to move the blue LED next to the red one without touching any walls. Of course, the box-holder can’t see the walls and must describe the configuration of the anchor LEDs to their partner in order to get started.

All of the modules are quite different, which likely makes for an extremely fun and challenging five minutes. [Heath] reports that getting inter-module communication down was a long road. Eventually, [Heath] settled on a mesh network configuration and connected everything in a big loop. Be sure to check out the walk-through video after the break.

This isn’t the first time we’ve seen a hardware implementation of this game. Here’s one that uses a Raspberry Pi.

Continue reading “Don’t Panic: A Cooperative Bomb Defusing Game”

How To Spend A Million Dollars On The Ultimate Stereo

We’ve all seen the excesses that the Golden Ears set revel in; the five-figure power conditioning boxes, the gold-plated HDMI cables. As covered by the Washington Post, however, [Ken Fritz] may have gone farther than most. Before he passed away, he estimated that he spent a million dollars on the greatest possible hi-fi setup he could imagine.

There’s plenty of hardcore gear in the rig. Massive cabinets loaded with carefully-tuned speaker drivers. A $50,000 record player built into a 1,500-pound weighted base for the utmost in stability and vibration resistance. Expensive cartridges, top-tier reel-to-reel decks, and amplifiers worth more than most used cars.

As the piece explores, [Fritz] knew that none of that was enough. Sound is all about the space as much as it is the equipment. Thus, the family home itself was transformed to become the ultimate listening environment in turn. The listening room got everything from concrete floors and its own HVAC and electrical systems. Much of the equipment was custom built to avoid wasting money on overpriced name-brand gear. The story of the kit was also the subject of a documentary shared online, by the name of One Man’s Dream.

The piece examines what goes into a top-tier setup like this, while also exploring the human cost that [Fritz’s] passion had on him and his family. The ending is sad and brutal in a way you wouldn’t think a story about hi-fi gear ever could be.  It’s an education in more ways then one, and teaches us that it’s worth keeping an eye on the rest of our lives while pursuing what we enjoy the most. Video after the break.

Continue reading “How To Spend A Million Dollars On The Ultimate Stereo”

Turning A 1:150 Scale Model Car Into A Real Driving Car With Lights

Closing up the remotely controlled 1:150 scale model car. (credit: diorama111)

For many people having a miniature version of something like a car is already a miracle in itself, but there’s always the possibility to take matters a bit further, as YouTube channels like [diorama111] demonstrate. In this particular case, they took a 1:150 scale model of a Nissan Micra and installed a microcontroller, battery, remote steering and front, rear and indicator lights. Considering the 24.5 x 11.4 x 10.5 mm (LxWxH) size of the scale model, this is no small feat.

The original plastic bottom and wheels are removed, and replaced with a metal frame, as well as steerable front wheels that have a neodymium magnet attached to follow a metal guidance track that can be underneath the road surface. For the brains an ATtiny1616 MCU in QFN format is used to receive commands from the PIC79603 infrared receiver module and drive the motor attached to the rear axle via a DRV8210 motor controller IC. The remaining MCU pins are mostly used for turning the LEDs on the lights and signals on or off.

In the video the miniscule RC car is driven around a course with traffic lights, which gives a good impression of how this could be used in a large scale model of a city, with a hidden rail system to determine car routes. As for keeping the 30 mAh Li-Po battery charged, there’s a charge port on the bottom, but at these low current rates you could have hidden conductive charging points throughout the route as well, assuming you can fit a small enough charging coil in this little space.

(Thanks to [Keith Olson] for the tip)

Continue reading “Turning A 1:150 Scale Model Car Into A Real Driving Car With Lights”

Lessons Learned From A High-Voltage Power Supply

When you set out to build a 60,000-volt power supply and find out that it “only” delivers a measly 50,000 volts, you naturally have to dive in and see where things can be improved. And boy, did [Advanced Tinkering] find some things to improve.

First things first: if you haven’t seen [Advanced]’s first pass at a high-voltage supply, you should go check that out. We really liked the design of that one, and were particularly impressed with the attention to detail, all of which seemed to be wisely geared to the safe operation of the supply. But as it turns out, the margin of safety in the original design wasn’t as good as it could be. Of most concern was the need to physically touch the supply to control it, an obvious problem should something go wrong anywhere along the HV path, which includes a ZVS-driven flyback and an epoxy-potted Crockcroft-Walton voltage multiplier.

To make things a little more hands-off, [AT] added a pneumatically actuated switch to the supply, along with some indicator lights to help prevent him from leaving the supply powered up. He also reworked the low-voltage DC supply section, replacing a fixed-voltage supply and a DC-DC converter with a variable DC supply. This had the side benefit of providing a little bit more voltage to the ZVS driver, which goosed up the HV output a bit. The biggest change, though, was to the potted part of the HV section, which showed signs of arcing to the chassis. It turns out that even at 100% infill, 3D printed PLA isn’t a great choice for HV projects; more epoxy was the answer to that problem. Along with rewinding the primary on the flyback transformer, the power supply not only hit the 60-kV spec, but even went a little past that — and all without any of that pesky arcing.

We thought [Advanced Tinkering]’s first pass on this build was pretty slick, but we’re glad to see that it’s even better now. And we’re still keen to see how this supply will be put to use; honestly, the brief teaser at the end of the video wasn’t much help in guessing what it could be.

Continue reading “Lessons Learned From A High-Voltage Power Supply”

Crippled Peregrine Lander To Make Fiery Return Home

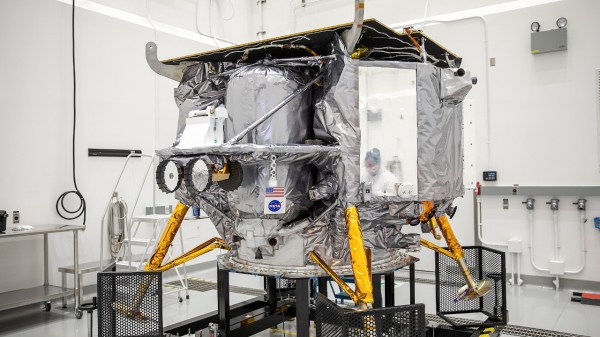
Within a few hours of this post going live, Astrobotic’s Peregrine spacecraft is expected to burn up in the Earth’s atmosphere — a disappointing end to a mission that was supposed to put the first US lander on the Moon since the Apollo program ended in 1972.

In their twentieth mission update since Peregrine was carried into space on the inaugural flight of the United Launch Alliance Vulcan Centaur rocket, Astrobotic explains that the craft has been put on a trajectory designed to ensure it breaks up over a remote area of the South Pacific.

Predicted re-renty point for the Peregrine lander.

It was previously hoped the lander, which suffered a severe system malfunction just hours after liftoff, could have at least made a close pass of the Moon in lieu of touching down. But mission controllers felt the more responsible approach was to have Peregrine make a controlled re-entry while they still had the ability to maneuver it. The alternative, allowing the craft to remain in an uncontrolled orbit between the Earth and Moon, could potentially have caused problems for future Artemis missions.

Over the last ten days, ground controllers at Astrobotic have been working to piece together what happened to the doomed lander, while at the same time demonstrating a remarkable level of transparency by keeping the public informed along the way. It’s now believed that the stream of gas being expelled from a rupture in one of the craft’s propellant tanks was acting as a sort of impromptu thruster. This not only made the craft difficult to keep oriented, but also wasted the propellants that were necessary to perform a soft landing on the lunar surface.

Although the craft was eventually brought under control, the damage to the mission had already been done. While this obviously isn’t the ending that Astrobotic was hoping for, we have no doubt that the company collected valuable data during the craft’s flight through space, which took it approximately 390,000 kilometers (242,000 miles) from Earth.

As for us space nerds, we won’t have to wait long before another lunar lander makes its attempt. Japan’s Smart Lander for Investigating Moon (SLIM) should be touching down at around 10 AM Eastern on Friday (YouTube Live Stream), and the Nova-C lander from Intuitive Machines is scheduled to be launched aboard a Falcon 9 rocket sometime next month.

Tech In Plain Sight: Windshield Frit

You probably see a frit every day and don’t even notice it. What is it? You know the black band around your car’s windshield? That’s a frit (which, by the way, can also mean ingredients used in making glass) or, sometimes, a frit band. What’s more, it probably fades out using a series of dots like a halftone image, right? Think that’s just for aesthetics? Think again.

Older windshields were not always attached firmly, leading to them popping out in accidents. At some point, though, the industry moved to polyurethane adhesives, which are superior when applied correctly. However, they often degrade from exposure to UV. That’s a problem with a windshield, which usually gets plenty of sunlight.

The answer is the frit, a ceramic-based baked-on enamel applied to both sides of the windshield’s edges, usually using silk screening. The inner part serves as a bonding point for the adhesive. However, the outer part blocks UV radiation from reaching the adhesive. Of course, it also hides the adhesive and any edges or wiring beneath it, too.

Continue reading “Tech In Plain Sight: Windshield Frit”

Deep Dive Into 3D Printing Nozzles

[Lost in Tech] set out to examine a variety of 3D printing nozzles. Before he got there, though, he found some issues. In particular, he found that his current crop of printers don’t take the standard E3D or MK8 nozzles. So, instead, he decided to examine various nozzles under the microscope.

Unsurprisingly, each nozzle had a tiny hole at the end, although the roundness of the hole varied a bit from nozzle to nozzle. As you might expect, more expensive nozzles had better orifices than the cheap ones. Grabbing pictures of nozzles at magnification isn’t easy, so he set up a special image stacking setup to get some beautiful images (and he has another video on how that works).

But the real star of the video is when he virtually travels into the orifice to show the innermost details of the nozzle from the inside out. This let him visualize the smoothness and finish. The Creality nozzles looked very good and weren’t terribly expensive. Many of the expensive nozzles were quite good. However, as you would expect, the quality of cheap nozzles were all over the place.

By the end, [Lost in Tech] speculates if the non-standard nozzles are a way to prevent you from buying low-cost nozzles and eating into sales or if they are a way to prevent you from buying low-cost nozzles that may give you poor print quality. What do you think?

There’s more than one way to look inside a nozzle. We just buy our nozzles, but some people make their own.

Continue reading “Deep Dive Into 3D Printing Nozzles”