Building A Pi-Powered LED Chess Board

If you live near Central Park or some other local chess hub, you’re likely never short of opponents for a good game. If you find yourself looking for a computer opponent, or you just prefer playing online, you might like this LED chessboard from [DIY Machines] instead.

At heart, it’s basically a regular chessboard with addressable LEDs of the WS2812B variety under each square. The lights are under the command of an Arduino Nano, which is also tasked with reading button inputs from the board’s side panel. The Nano is interfaced with a Raspberry Pi, which is the true brains of the operation. The Pi handles chess tasks—checking the validity of moves, acting as a computer opponent, and connecting online for games against other humans if so desired. Everything is wrapped up with 3D printed parts, making this an easy project to build for the average DIY maker.

The video tutorial does a great job of covering the design. It’s a relatively simple project at heart, but the presentation is great and it looks awfully fun to play with. We’ve featured some other great builds from [DIY Machines] before, too. Video after the break. Continue reading “Building A Pi-Powered LED Chess Board”

Solar Orbiter Takes Amazing Solar Pictures

There’s an old joke that they want to send an exploratory mission to the sun, but to save money, they are going at night. The European Space Agency’s Solar Orbiter has gotten as close as anything we’ve sent to study our star on purpose, and the pictures it took last year were from less than 46 million miles away. That sounds far away, but in space terms, that’s awfully close to the nuclear furnace. The pictures are amazing, and the video below is also worth watching.

Because the craft was so close, each picture it took was just a small part of the sun’s surface. ESA stitched together multiple images to form the final picture, which shows the entire sun as 8,000 pixels across. We’ll save you the math. We figure each pixel is worth about 174 kilometers or 108 miles, more or less.

Continue reading “Solar Orbiter Takes Amazing Solar Pictures”

An Over-Engineered Basement Monitor

[Stephen] has a basement that depends on a sump pump. What that means is if the pump fails or the power goes out, the basement floods—which is rather undesirable. Not wanting to rely on a single point of failure, [Stephen] decided to build a monitor for the basement situation, which quickly spiralled to a greater degree of complexity than he initially expected.

The initial plan was just to have water level sensors reporting data over a modified CATS packet radio transmitter. On the other end, the plan was to capture the feed via a CATS receiver, pipe the data to the internet via FELINET, and then have the data displayed on a Grafana dashboard. Simple enough. From there, though, [Stephen] started musing on the possibilities. He thought about capturing humidity data to verify the dehumidifier was working. Plus, temperature would be handy to get early warning before any pipes were frozen in colder times. Achieving those aims would be easy enough with a BME280 sensor, though hacking it into the CATS rig was a little challenging.

The results are pretty neat, though. [Stephen] can now track all the vital signs of his basement remotely, with all the data displayed elegantly on a nice Grafana dashboard. If you’re looking to get started on a similar project, we’ve featured a great Grafana guide at a previous Supercon, just by the by. All in all, [Stephen’s] project may have a touch of the old overkill, but sometimes, the most rewarding projects are the ones you pour your heart and soul into!

E-Ink Screen Combined With Analog Dial Is Epic Win

Analog dials used to be a pretty common way of displaying information on test equipment and in industrial applications. They fell out of favor as more advanced display technologies became cheaper. However, if you combine an analog dial with a modern e-ink display, it turns out you get something truly fantastic indeed.

This build comes to us from [Arne]. The concept is simple—get an e-ink display, and draw a dial on it using whatever graphics and scale you choose. Then, put it behind a traditional coil-driven analog dial in place of the more traditional paper scale. Now, you have an analog dial that can display any quantity you desire. Just update the screen to display a different scale as needed. Meanwhile, if you don’t need to change the display, the e-ink display will draw zero power and still display the same thing.

[Arne] explains how it all works in the writeup. It’s basically a LilyGo T5 ESP32 board with an e-ink screen attached, and it’s combined with a MF-110A multimeter. It’s super easy to buy that stuff and start tinkering with the concept yourself. [Arne] uses it with Home Assistant, which is as good an idea as any.

You get all the benefits of a redrawable display, with the wonderful visual tactility of a real analog dial. It’s a build that smashes old and new together in the best way possible. It doesn’t heart that [Arne] chose a great retro font for the dial, either. Applause all around!

Square Roots 1800s Style — No, The Other 1800s

[MindYourDecisions] presents a Babylonian tablet dating back to around 1800 BC that shows that the hypotenuse of a unit square is the square root of two or 1.41421. How did they know that? We don’t know for sure how they computed it, but experts think it is the same as the ancient Greek method written down by Hero. It is a specialized form of the Newton method. You can follow along and learn how it works in the video below.

The method is simple. You guess the answer first, then you compute the difference and use that to adjust your estimate. You keep repeating the process until the error becomes small enough for your purposes.

Continue reading “Square Roots 1800s Style — No, The Other 1800s”

Illustrated Kristina with an IBM Model M keyboard floating between her hands.

Keebin’ With Kristina: The One With The TRON Keyboard

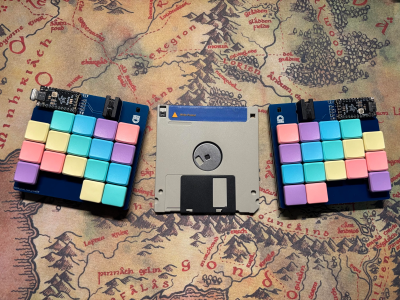
[Folaefolc] was craving a new keyboard build a few weeks ago and got inspired by the humble 3.5″ floppy disk. So much so that he decided to make a split keyboard with each half having the exact footprint of a floppy — 90 mm x 94 mm. And you know the PCBs have floppy details silkscreened on the back. Just check out the gallery.

A split keyboard with a 3.5" floppy disk footprint for each half. An actual floppy sits between the two halves.
Image via [Folaefolc] via reddit
This bad boy uses a pair of Liatris microcontrollers, which are made by splitkb and are designed to be drop-in replacements for Pro Micros and an alternative to the RP2040.

The other fun part of this build is that [Folaefolc] used RJ9 connectors to join the halves instead of something like TRRS.

Beneath those candy keycaps are 34 Kailh choc v1 switches shoved into hot swap sockets in case [Folaefolc] changes his mind. Gerbers are available if you want to build one of these cuties!

Via reddit

Continue reading “Keebin’ With Kristina: The One With The TRON Keyboard”

Experimental Drone Flies Like A Bird

Most RC planes follow a simple control scheme: elevators for pitch, rudder for yaw, and ailerons for roll. This one-to-one mapping keeps things straightforward, and fewer actuators means less weight. But nature has other ideas. Birds achieve flight control through complex, coordinated movements where different body parts can affect multiple degrees of freedom simultaneously. Now, researchers at EPFL have brought this biological approach to robotics with the LisEagle, a drone featuring morphing wings and tail that demonstrate remarkable stability.

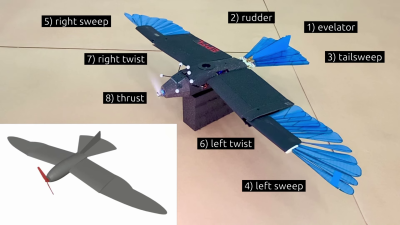
All the control surfaces and actuators
All the actuators!

The LisEagle packs seven different actuation methods alongside its nose-mounted motor. Three of these control the bird-like wingtips and spreading tail, while the remaining actuators handle more conventional controls: independently twisting wing bases (similar to ailerons) and a tail assembly that combines elevator and rudder functions in its vertical stabilizer.

Testing took place in controlled indoor conditions, with the maintaining position in front of an open wind tunnel. Optical position tracking provided closed-loop feedback and power was provided via a tether to minimize weight. A PID flight controller orchestrated all seven actuators in concert, achieving impressive stability even when faced with induced turbulence or being poked with a stick. In a demonstration of redundancy, the researchers deliberately disabled the twisting wing mechanisms, and the aircraft maintained control using just its wingtips and tail.

The team went further, employing Bayesian optimization to find the most efficient actuator combinations. This revealed potential energy savings of up to 11%, with optimal configurations varying based on airspeed as lift requirements changed.

While research into the flight mechanisms of bees, bats and birds might not immediately translate to practical applications, it deepens our understanding of flight control principles. Don’t be surprised if morphing wings become a more common sight in future aircraft designs.

Continue reading “Experimental Drone Flies Like A Bird”