In order to catch trash a bin needs to do two things: detect where trash will land; and then get there, fast. The second part is easy: three big motors with wheels under the bin. But how does a bin know where the trash will land? It uses a camera installed in the bin itself for that.
[HTX Studio] iteratively trained a model to process visual information from the camera to identify common types of trash. When it sees a trained object flying through the air it rushes to catch it where it will land. After many rounds of fine-tuning it finally started to work reliably.
OpenAI have just released gpt-oss, an AI large language model (LLM) available for local download and offline use licensed under Apache 2.0, and optimized for efficiency on a variety of platforms without compromising performance. This is their first such “open” release, and it’s with a model whose features and capabilities compare favorably to some of their hosted services.
OpenAI have partnered with ollama for the launch which makes onboarding ridiculously easy. ollama is an open source, MIT-licensed project for installing and running local LLMs, but there’s no real tie-in to that platform. The models are available separately: gpt-oss-20b can run within 16 GB of memory, and the larger and more capable gpt-oss-120b requires 80 GB. OpenAI claims the smaller model is comparable to their own hosted o3-mini “reasoning” model, and the larger model outperforms it. Both support features like tool use (such as web browsing) and more.
LLMs that can be downloaded and used offline are nothing new, but a couple things make this model release a bit different from others. One is that while OpenAI have released open models such as Whisper (a highly capable speech-to-text model), this is actually the first LLM they have released in such a way.
The other notable thing is this release coincides with a bounty challenge for finding novel flaws and vulnerabilities in gpt-oss-20b. Does ruining such a model hold more appeal to you than running it? If so, good news because there’s a total of $500,000 to be disbursed. But there’s no time to waste; submissions need to be in by August 26th, 2025.
The basic concept of the ferrofluid display. Note the header image of this article shows the electromagnet array without the ferrofluid pane in place.
The concept is straightforward enough. First, construct a tank of ferrofluid with a white panel behind it for contrast. Then, place it in front of a grid of electromagnets. Now you have many “pixels” you can turn on and off. You turn a magnet on to attract ferrofluid to that point, and turn it off to let it fall away. Since the ferrofluid contrasts with the white background, you have a viable display!
[beastie417] notes that while the concept is simple, the execution is hard. Ferrofluid can be very difficult to work with, instantly staining many materials like acrylic and even glass that isn’t properly prepared. It can also be quite expensive to construct a display like this, with [beastie417] noting their 16×12 pixel design costing approximately $700 thus far. Then you have to figure out how to drive all the pixels—this project uses DRV8908 coil driver ICs running off a microcontroller which controls the display and handles animations.
The regular Raspberry Pi line is a flexible single-board computer, but sometimes you might find yourself wishing for a form factor that was better designed for installation into a greater whole. This is why the Compute Module variants exist. Indeed, leveraging that intention, [Hans Jørgen Grimstad] has used the powerful Compute Module 5 as the heart of his “Overlord” robot controller.
The Compute Module 5 offers a powerful quad-core 64-bit ARM chip running at 2.4 GHz, along with anywhere from 2 to 16GB of RAM. You can also get it with WiFi and Bluetooth built in onboard, and it comes with a wide range of I2C, SPI, UART, and GPIO pins to serve whatever ends you envision for them. It’s a whole lot of capability, but the magic is in what you do with it.
For [Hans], he saw this as a powerful basis for a robot controller. To that end, he built a PCB to accept the Compute Module 5, and outfit it with peripherals suited to robotics use. His carrier board equips it with an MCP2515 CAN controller and a TJA1051 CAN transceiver, ideal for communicating in a timely manner with sensors or motor controllers. It also has a 9-axis BNO055 IMU on board, capable of sensor fusion and 100Hz updates for fine sensing and control. The board is intended to be easy to use with hardware like Xiaomi Cybergear motors and Dynamixels servos. As a bonus, there is power circuitry on board to enable it to run off anything from 5 to 36V. While GPIOs aren’t exposed, [Hans] notes that you can even pair it with a second Pi if you want to use GPIOs or camera ports or do any other processing offboard.
On an old fashioned bench a signal generator was once an indispensable instrument, but has now largely been supplanted by the more versatile function generator. Sometimes there’s a less demanding need for a clock signal though, and one way that might be served comes from [Rupin Chheda]’s square wave generator. It’s a small PCB designed to sit at the end of a breadboard and provide handy access to a range of clocks.
On the board is a crystal oscillator running at the usual digital clock frequency of 32.768 kHz, and a CMOS divider chain. This provides frequencies from 2048 Hz down to 0.5 Hz for good measure. It’s a simple but oh-so-useful board, and we can imagine more than a few of you finding space for it on your own benches.
When I was a student, I was a diehard Commodore Amiga user, having upgraded to an A500+ from my Sinclair Spectrum. The Amiga could do it all, it became my programming environment for electronic engineering course work, my audio workstation for student radio, my gaming hub, and much more.
One thing that was part of my course work it couldn’t do very well, which was be exactly like the PCs in my university’s lab. I feel old when I reflect that it’s 35 years ago, and remember sitting down in front of a Tulip PC-XT clone to compile my C code written on the Amiga. Eventually I cobbled together a 286 from cast-off parts, and entered the PC age. Alongside the Amiga it felt like a retrograde step, but mastering DOS 3.3 was arguably more useful to my career than AmigaDOS.
It’s DOS, But It’s Not MS-DOS
Where do I want to go today?
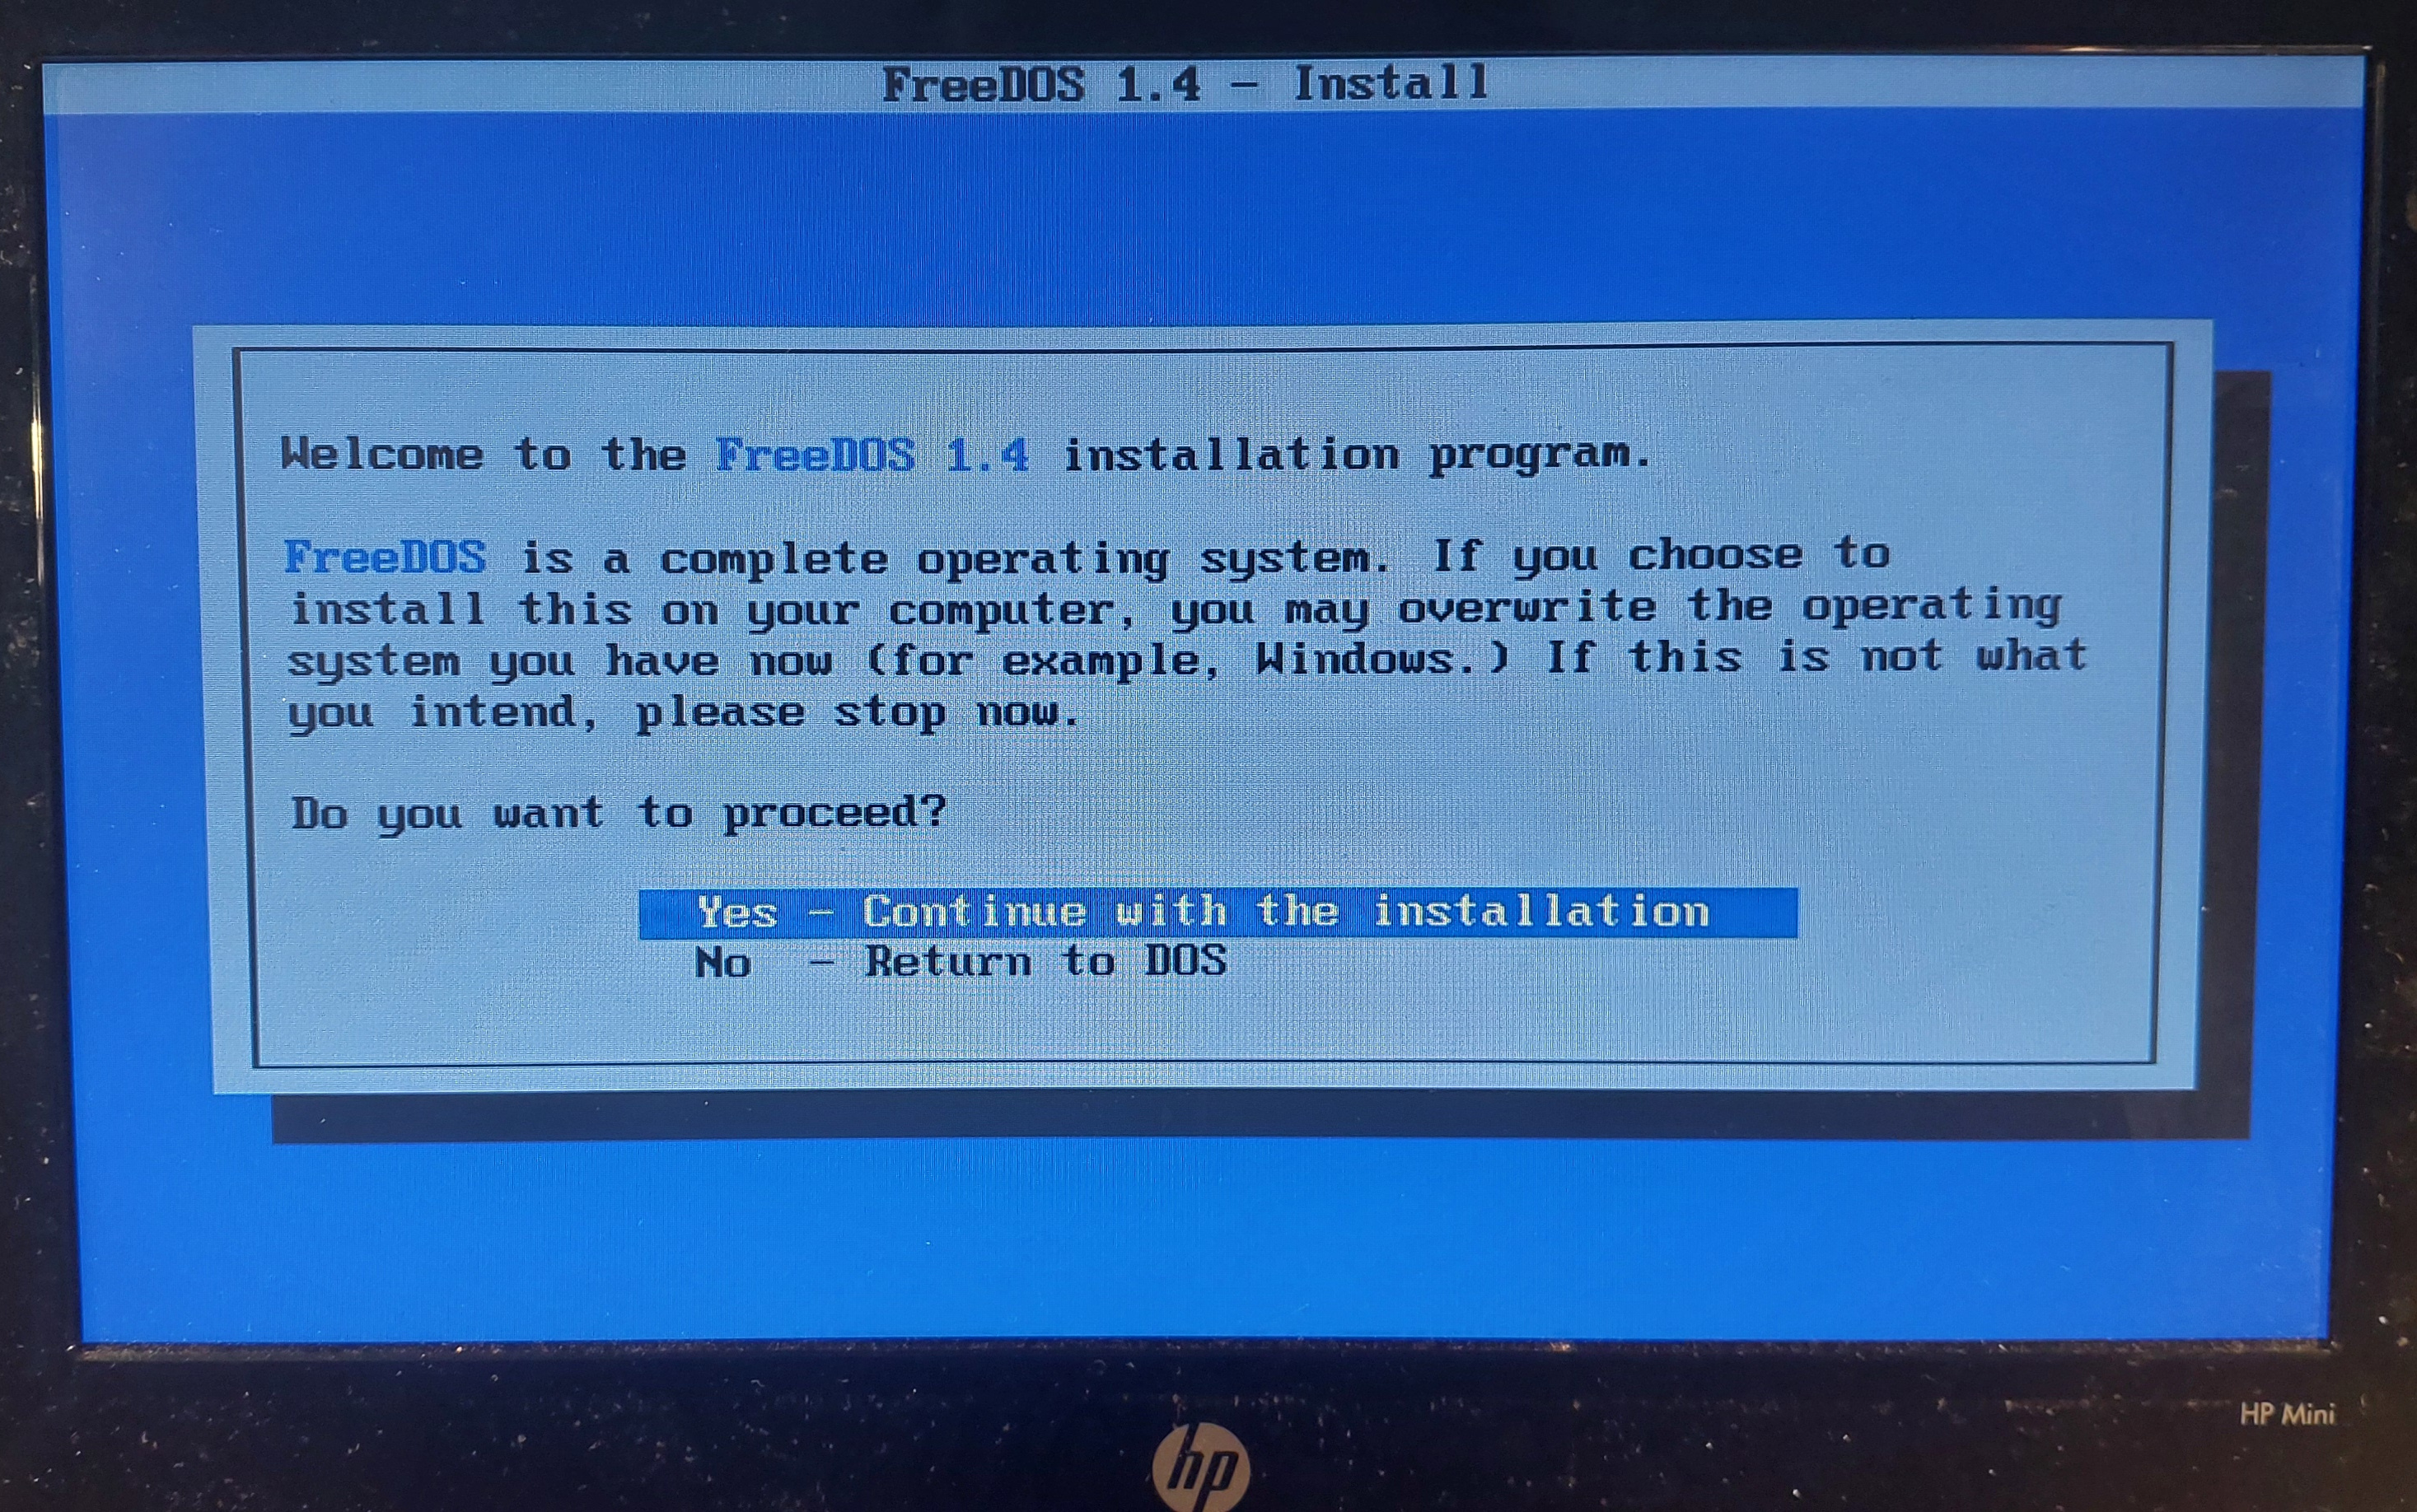
I don’t think I’ve used a pure DOS machine as anything but an occasional retrocomputing curio since some time in the late 1990s, because the Microsoft world long ago headed off into Windows country while I’ve been a Linux user for a very long time. But DOS hasn’t gone away even if Microsoft left it behind, because the FreeDOS project have created an entirely open-source replacement. It’s not MS-DOS, but it’s DOS. It does everything the way your old machine did, but in a lot of cases better and faster. Can I use it as one of my Daily Drivers here in the 2020s? There is only one way to find out.
With few exceptions, an important part of using an OS for this series is to run it on real hardware rather than an emulator. To that end I fished out my lowest-spec PC, a 2010 HP Mini 10 netbook that I hold onto for sentimental reasons. With a 1.6 GHz single core 32 bit Atom processor and a couple of gigabytes of memory it’s a very slow machine for modern desktop Linux, but given that FreeDOS can run on even the earliest PCs it’s a DOS powerhouse. To make it even more ridiculously overspecified I put a 2.5″ SSD in it, and downloaded the FreeDOS USB installer image. Continue reading “Jenny’s Daily Drivers: FreeDOS 1.4”→
Having a chiller is often essential for the chemistry laboratory, but what if you’re somewhere without easy access to water, nevermind a mains outlet to plug your usual chiller into? In that case you can build a portable one that will happily run off the 12 VDC provided by a mobile source like the accessory outlet in a car while reusing the water from its reservoir, as demonstrated by [Markus Bindhammer] in a recent video.
The build uses a compressor-based freezer as the base, which is significantly more capable than the typical Peltier-cooled refrigerators that cannot cool as fast or efficiently. The changes he made involve running in- and outlet tubing into the freezer’s compartment, with a submerged 12 VDC water pump providing the water to the outlet. This pump is controlled by a variable speed controller board that’s put in a box on the outside with the power lead also sneaking into the freezer. With these modifications in place the freezer’s functionality isn’t significantly impacted, so it can be used as normal.
After filling the compartment with water, the lid is closed and the freezer engaged. The pump controller is then switched on, with the water flow adjusted to fit the distillation job at hand. Although in this case a fairly small freezer was modified, nobody is saying that you cannot also do it with a much larger freezer, and fill it with ice cream and other treats to help it and lab critters cool down faster.