There’s More To Designing A PCB Business Card Than Meets The Eye

A curious custom that survives from the pre-computer era is that of the business card. If you walk the halls at a trade event you’ll come a way with a stack of these, each bearing the contact details of someone you’ve encountered, and each in a world of social media and online contact destined to languish in some dusty corner of your desk. In the 21st century, when electronic contacts harvested by a mobile phone have the sticking power, how can a piece of card with its roots in a bygone era hope to compete?

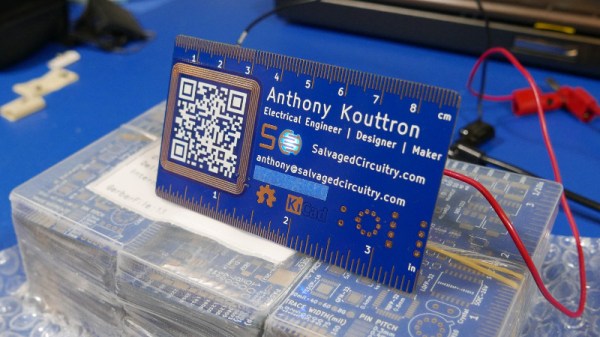
It’s a question [Anthony Kouttron] has addressed in the design of his thoroughly modern business card, and along the way he’s treated us to an interesting narrative on how to make the card both useful beyond mere contact details as well as delivering that electronic contact. The resulting card has an array of  rulers and footprints as an electronic designer’s aid, as well as an NFC antenna and chip that lights an LED and delivers his website address when scanned. There are some small compromises such as PCB pads under the NFC antenna, but as he explains in the video below, they aren’t enough to stop it working. He’s put his work in a GitHub repository, should you wish to do something similar.

There’s a rich vein of business card projects on these pages, but so far surprisingly few are NFC equipped. That didn’t stop someone from making an NFC-enabled card with user interaction though.

Continue reading “There’s More To Designing A PCB Business Card Than Meets The Eye”

Customizable PCB Business Card

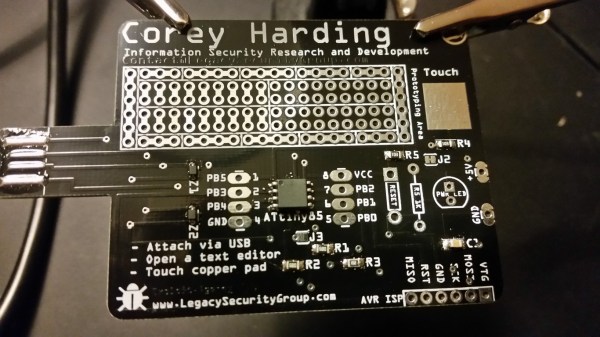
[Corey Harding] designed his business card as a USB-connectable demonstration of his skill. If potential manager inserts the card in a USB drive, open a text editor, then touches the copper pad on the PCB, [Corey]’s contact info pops up in the text box.

In addition to working as a business card, the PCB also works as a Tiny 85 development board, with a prototyping area for adding sensors and other components, and with additional capabilities broken out: you can add an LED, and there’s also room for a 1K resistor, a reset button, or break out the USB’s 5V for other uses. There’s an AVR ISP breakout for reflashing the chip.

Coolly, [Corey] intended for the card to be an Open Source resource for other people to make their own cards, and he’s providing the Fritzing files for the PCB. Fritzing is a great program for beginning and experienced hardware hackers to lay out quick and dirty circuits, make wiring diagrams, and even export PCB designs for fabrication. You can download [Corey]’s files from his GitHub repository.

For another business card project check out this full color business card we published last month.

Full Color PCB Business Card

[Sjaak], in electronic hobbyist tradition, started to design a PCB business card. However, he quickly became disillusioned with the coloring options made available by the standard PCB manufacturing process. While most learn to work with a limited color palette, [Sjaak] had another idea. PCB decals for full-color control.

As [Sjaak] realized early in his PCB journey, the downside of all PCB business cards (and PCBs in general) is the limited number of colors you can use which are dictated by the layers you have to work with: FR4, soldermask, silkscreen and bare copper. Some people get crafty, creating new color combinations by stacking layers for hues, but even that technique doesn’t come close to a full palette.

The commercial off-the-shelf out of the box solution [Sjaak] found was decal slide paper. For those of you not prone to candle making or car decorating, decals are printable plastic film that can be used to decorate ceramics, glass or other smooth surfaces. Both clear and white versions can be found in most hobby stores. Once obtained, an inkjet or laser printer can print directly onto the photo paper-like material, lending the decals an infinite range of colors.

[Sjaak] bought clear film and designed his PCB with black soldermask and white silkscreen. Once the PCBs had come in, [Sjaak] got to work applying the decals with a transfer method by placing one into water, waiting a bit until the decal lets loose and then are carefully applied to a PCB. [Sjaak] reports that the process is a bit trickery because the film is very thin and is easily crinkled. But, difficulties overcome, the PCB then needs to dry for twenty-four hours. From there, it’s into the oven for 10 minutes at 248 degrees Fahrenheit (120 degrees Celsius) followed by an optional clear coating. Although the process is a bit involved, judging from his pictures we think the results are worth it, producing something that would stand out; which, in the end, is the goal of a PCB business card.

With all this in mind, we think that the logical progression is to incorporate digital logic or go full DIY and CNC or laser engrave your own business card.

This PCB Business Card Is Logically Different

Having seen a number of PCB business cards [Will] decided to go against the more popular choice of a micro-controller based design and show some character with a logic based finite state machine. [Will] uses a single 7-segment display to scroll through the letters of his name with a state machine that outputs the desired combination of 1’s and 0’s to the LED display each time the tactile button is pushed.

[Will] uses a 4-bit counter made up of D Flip-Flops for the clock signal as a conditional input to 6 of the 4-input AND gates. He doesn’t go into the painful details of displaying each character through the process (thankfully) but he does mention that he uses the Quine-McCluskey technique for reduction instead of Boolean algebra. Since his name is 11 characters long and the 4-bit binary counter goes from 0000 to 1111 leaving 5 more pushes of the button before rolling the count back to 0000, during which time the display is left blank. [Will] kindly includes the eagle and Gerber files for your downloading pleasure over at his blog if you’re interested in getting a little deeper into the design.

Continue reading “This PCB Business Card Is Logically Different”

The Many Iterations Of [Joe’s] PCB Business Card

[Joe Colosimo] is putting on a show with his PCB business card project. The idea isn’t new, but his goal is to keep it simple and undercut the cost of all other PCB cards he’s seen. This is the third generation of the board design, and he’s just waiting on some solder mask solution before he tries running it through the reflow oven.

The first two prototypes used some through-hole parts. Notably, the battery was to be positioned in a circular cut-out and held in place by a metal strap and some bare wires. But he couldn’t quite get it to work right so this design will transition to a surface-mount strap for one side, and the large circular pad for the other. At each corner of the board there is a footprint for an LED. He tried milling holes in the board to edge-light the substrate. Now he just mounts the LED upside down to give the board a blue glow. The LEDs are driven by an ATtiny10 microcontroller which takes input from the touch sensor array at the bottom right.

He etched a QR code on the board which seems to work better than the milled QR experiments we saw back in April. The link at the top point’s to [Joe’s] main page on the card. Don’t forget to follow the links at the bottom which cover each part of the development more in-depth.

[Thanks Skitchin]

What Can You Do With Discarded Fish Aggregation Devices

Often we bring you projects at the end of their trajectory so that you can marvel at a job well done, but sometimes we point you instead to the start of the story. Such is the case with [Brett Smith]’s investigation of discarded fish aggregation buoys, referred to as FADs. These 700-plus dollar devices are deployed in the ocean in the thousands by commercial fishing fleets, and most are not recovered. He’s looking at them from the point of view of re-using their technology in the marine conservation business.

His progress has been documented in a series of short YouTube videos, starting with an introduction that we’ve placed below the break. So far he’s gone on to a complete teardown, and then a detailed look at the PCB. Inside they have a solar charger for a bank of NiCd cells, an echo sounder, a GPS receiver, and an Iridium satellite modem allowing the device to phone home. There’s certainly plenty in there to experiment with, including a few slightly exotic parts, so keep an eye on his channel as we’re sure to see more.

These devices have never made it to Hackaday before, but we have seen an echo sounder on a surfboard.

Continue reading “What Can You Do With Discarded Fish Aggregation Devices”

Blinky Business Card Plays Snake And Connect Four

There’s no better way to introduce yourself than handing over a blinky PCB business card and challenging the recipient to a game of Connect Four. And if [Dennis Kaandorp] turns up early for a meeting, he can keep himself busy playing the ever popular game of Snake on his PCB business card.

The tabs are 19 mm long and 4 mm wide.

Quite wisely, [Dennis] kept his design simple, and avoided the temptation of feature creep. His requirements were to create a minimalist, credit card sized design, with his contact details printed on the silk legend, and some blinky LED’s.

The tallest component on such a design is usually the battery holder, and he could not find one that was low-profile and cheap. Drawing inspiration from The Art of Blinky Business Cards, he used the 0.8 mm thin PCB itself as the battery holder by means of flexible arms.

Connect-Four is a two player game similar to tic-tac-toe, but played on a grid seven columns across and six rows high. This meant using 42 dual-colour LED’s, which would require a large number of GPIO pins on the micro-controller. Using a clever combination of matrix and charlieplexing techniques, he was able to reduce the GPIO count down to 13 pins, while still managing to keep the track layout simple.

It also took him some extra effort to locate dual colour, red / green LED’s with a sufficiently low forward voltage drop that could work off the reduced output resulting from the use of charlieplexing. At the heart of the business card is an ATtiny1616 micro-controller that offers enough GPIO pins for the LED matrix as well as the four push button switches.

His first batch of prototypes have given him a good insight on the pricing and revealed several deficiencies that he can improve upon the next time around. [Dennis] has shared KiCad schematic and PCB layout files for anyone looking to get inspired to design their own PCB business cards.

Continue reading “Blinky Business Card Plays Snake And Connect Four”