D.Va For Real: Playing An FPS With Flight Sticks

[Rudeism] loves playing Blizzard’s hit game Overwatch. He wanted to make his gaming experience a bit more realistic though. One of the characters is D.Va, who according to game lore is a member of the South Korean Mobile Exo-Force (MEKA). D.Va pilots her MEKA in game using two joysticks. Overwatch is a standard FPS with WASD and mouse controls, so the realism ends at the screen.

d.va-thumb[Rudeism] didn’t let that stop him. He used two flight sticks to create the  ultimate D.Va experience. [Twitch recording link – language warning] A commercial software package called Xpadder allowed him to map movements on the joystick to mouse and keystrokes. The left joystick maps to WASD, left shift, Q, and right click. The right stick corresponds to mouse movements, E, and left click.

This isn’t exactly the tank style steering we’re used to from classic mech games like Virtual-On, but it’s pretty good for a software solution. It makes us wonder what would be possible with a bit of hardware hacking – perhaps a Teensy handling the analog and button inputs.

People have been coming up with interesting ways to play video games for years. Check out this hack with the classic Microsoft Kinect, or these arcade hacks.

Via Reddit

Hacklet 121 – Tea Hacks

Last week on the Hacklet I covered coffee hacks. Not everyone likes coffee though. A good portion of the world’s population enjoys a nice cup of tea. Different cultures are rather particular with how they prepare their drink of choice. Americans tend to use teabags, while British, Chinese (and much of the rest of the globe) generally prefer loose tea leaves. Everyone has their own particular style, which has led to quite a few tea hacks. This week’s Hacklet is all about some of the best tea projects on Hackaday.io!

teapiWe start with [James P.] and Tea Pi. Tea Pi is designed to emulate commercial tea makers costing hundreds of dollars. The heart of the operation is a Raspberry Pi, making this one of the first Linux powered tea makers we’ve ever heard of. An Adafruit PowerSwitch Tail allows the Pi to control a standard tea kettle. The Pi monitors water temperature with a DS18B20 temperature sensor. A simple servo drops a tea basket into the water for brewing. When the time is up, the servo pulls the basket up and the tea is ready to serve. [James P] planned to add voice control to his tea creation. I’m betting that would be pretty easy with Amazon’s voice services for the Raspberry Pi.

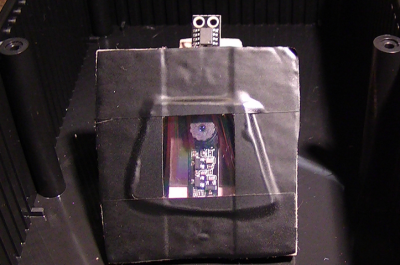
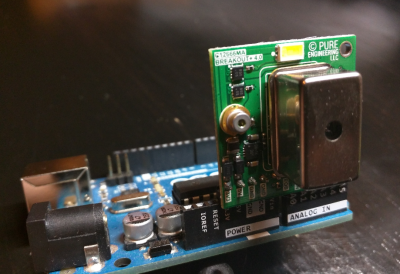
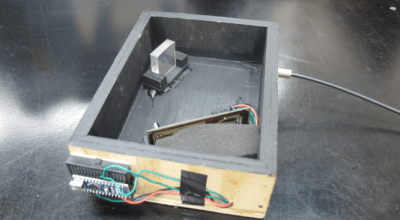
eyeoteaNext up is [Tom] with Eye-O-Tea. With this project, even your cup of tea can join the Internet of Things. Eye-O-Tea essentially is a web connected coaster with temperature monitoring built right in. Temperature is measured with a Melexis MLX90615 IR thermometer. An Arduino Pro Mini reads the temperature and passes it on to an ESP8266 WiFi module. The entire device is powered by a LiPo battery, and neatly housed in a gutted cup warmer. On the cloud side, [Tom] used ThinkSpeak and freeboard.io to make an interface he can access with his cell phone. If his tea is too hot, Eye-O-Tea will let him know. It will also send him an SMS if he’s forgotten his cup and it’s going cold.

chaiNext we have [Adrian] and ChaiBot. Chaibot was created by [Adrian’s] son [Oliver] to combat a common problem. Both father and son would pour cups of tea, then get involved in a project. By the time they came back, they had ink. ChaiBot steeps the tea for a set amount of time, stirring every minute. The mechanics of the project came from an old CD-ROM drive. A PIC16F887 runs the show, ensuring the steep time is accurate, and activating the motor drive. When the tea is done, an ESP8266 sends a push notification to the user’s phone. The project is housed in a wooden case that fits perfectly on the kitchen counter.

inductFinally, we have [Siggi] with Camper Induction Cooker, a 2016 Hackaday Prize entry. [Siggi] needed hot liquids on the go, but he didn’t want to fool around with heating elements. An induction heater was the way to go. A Cypress PSOC micro controls the system. Metal travel style mugs can be used without modification. For ceramic or plastic mugs, a metal washer (hopefully coated with something food safe) acts as an immersion heater. The project is definitely a bit unwieldy at the moment, but I could see [Siggi’s] idea being incorporated into automotive cup holders. [Siggi] put his project on hold back in June. I hope seeing his work on the front page will get development moving again.

If you want to see more tea projects, check out our new tea projects list. See a project I might have missed? Don’t be shy, just drop me a message on Hackaday.io. That’s it for this week’s Hacklet, As always, see you next week. Same hack time, same hack channel, bringing you the best of Hackaday.io!

Skin Bling: Wearable Electronics From Golden Temporary Tattoos

MIT Media Lab and Microsoft have teamed up to take wearable devices one step further — they’ve glued the devices directly to the user’s skin. DuoSkin is a temporary tattoo created with gold leaf. Metallic “Flash” temporary fashion tattoos have become quite popular recently, so this builds on the trend. What the team has done is to use them to create user interfaces for wearable electronic devices.

weeding-gold-leaf-temporary-tattooGenerally speaking, gold leaf is incredibly fragile. In this process to yield the cleanest looking leaf the gold is not actually cut. Instead, the temporary tattoo film and backer are cut on a standard desktop vinyl cutter. The gold leaf is then applied to the entire film surface. The cut film/leaf can then be “weeded” — removing the unwanted portions of film which were isolated from the rest by the cutting process — to complete the temporary tattoo. The team tested this method and found that traces 4.5 mm or more thick were resilient enough to last the entire day on your skin.

The gold leaf tattoos make excellent capacitive touch sensors. The team was able to create sliders, buttons, and even 2 dimensional diamond grids. These controls were used to move a cursor on a computer or phone screen. They were even able to create a wearable NFC tag. The gold leaf is the antenna, and the NFC chip itself is mounted on the temporary tattoo backer.

These devices all look great, but with the exception of the NFC chip, we’re not seeing the electronics driving them. Capacitive touch sensors used as a UI for a phone will have to have a Bluetooth radio and a battery somewhere. We’re that’s all hidden under the arm of the user. You can see what we’re taking about in the video after the break. That said, the tools and materials are ubiquitous and easy to work with. Take a quick read through the white paper (PDF) and you can be making your own version of this today.

Continue reading “Skin Bling: Wearable Electronics From Golden Temporary Tattoos”

Hacklet 120 – Coffee Hacks

Hackers need fuel to hack. In general that fuel comes in the form of food, water, and caffeine. Not necessarily in that order. While soda or energy drinks will do in a pinch, the best hackers know that the purest form of caffeine comes from coffee. This of course means that there have been decades of coffee hacks. The first Internet-connected coffee pot dates all way back to 1991, before the web even had pictures. We’ve come a long way since then. This week on the Hacklet we’re checking out some of the best coffee hacks on Hackaday.io!

coffee1We start with [opeRaptor] and CoffeeOfThings. [OpeRaptor] has created a wireless, internet connected coffee carafe. The carafe has three CdS cells which enable it to detect how much black gold is left in the pot. A TMP36 sensor reports the current coffee temperature. Data is sent out via a NRF24l01 radio. The brains of the coffee pot is an MSP430 microcontroller. All this runs from a simple CR2032 coin cell. A base station receives the coffee data, displays it on a very nice Vacuum fluorescent Display (VFD). An ESP8266 then passes the data on to the internet.


coffewarmerNext up is [magnustron] with quad-386 coffee heater. No one likes a cold cup of coffee. Everyone loves old CPUs. [Magnustron] turned these two shower thoughts into a the world’s first USB powered quad CPU coffee warmer with data logging capabilities. A simple ATtiny461 micro runs the show. PC connectivity is via USB using the V-USB library. [Magnustron] has gotten the CPUs to warm up, but is having some issues with switching. them on. Turning all four heaters on too quickly causes the rail to droop, leading to dropped USB connections. Those power-hungry 386 chips may be a bit too much for a single USB connection. It might be time to add an external power supply.

groundsNext is [kesh1030] with Using Waste Coffee As A Biodiesel Source. Coffee isn’t just liquid energy. There’s oil in them there grounds. Millions of pounds of used coffee grounds produced every year can be converted to biodiesel fuel. [Kesh1030] experimented with different coffee grounds, and different ways to prepare them. The oil was extracted from the coffee using hexane, which is a bit of a nasty solvent. [Kesh1030] used a fume hood to stay safe. He found that homogenized coffee grounds had an 11.87% oil yield. Used homogenized coffee grounds weren’t far behind, with 9.82% yield of oil. Nearly 10% per weight yield isn’t too shabby, considering this is all going into the trash.

dripperFinally, we have [saadcaffeine] with Caffeinator: gravity powered geek fuel dripper. This is a project of few words, but the images tell much of the story. [Saadcaffeine] created his own cold drip iced coffee maker using upcycled and found components. Three clothes hangers form an ingenious tripod. The tripod holds two soda bottles – the water reservoir and the brew pot. Water is restricted by small holes in the soda bottle caps. This allows it to drop slowly though the machine, giving it time to soak up all the caffeinated goodness. The result is a fresh cup of cold drip. Just add ice and enjoy a quick power up!

If you want to see more coffee hacks, check out our new coffee projects list. See a project I might have missed? Don’t be shy, just drop me a message on Hackaday.io. That’s it for this week’s Hacklet, As always, see you next week. Same hack time, same hack channel, bringing you the best of Hackaday.io!

Hacklet 119 – Retrogaming Console Hacks

If you haven’t heard, retrogaming is a thing. 40-somethings are playing the games of their youth alongside millennials who are just discovering these classic games. There are even folks developing new homebrew games for consoles as far back as the Nintendo Entertainment System and the Atari 2600. This week on the Hacklet, we’re highlighting some of the best retrogaming console hardware hacks on Hackaday.io. Note that I did say hardware hacks. The focus this week is on games played on the original hardware. Don’t worry though, I’ll give emulated projects some love in a future Hacklet.

bankerWe start with [danjovic] and Atari 2600 Bankswitch Cartridge. The Atari 2600 is a legendary system. Millions of hackers’ first exposure to gaming came through its one button joystick. To make the unit affordable, Atari used a MOS Technology 6507 processor. Essentially it’s a 6502 in a 28-pin package. This meant several features got nerfed, most notably the address space. The 6507 can only address 8KB of RAM. In the Atari, only 4KB is available to the cartridge. Games got around the 4KB limit by bank switching – write a value to a magic address, and the bank switching logic would swap in a whole different section of cartridge ROM. There were several different bank switching schemes used over the years. [Danjovic] has created his own version of this bank switching logic, using only classic 74 series logic chips.


nesmodNext up is [ThunderSqueak] with Top Loader NES composite mod. Toward the end of the NES’s life, Nintendo introduced a cost-reduced version known as the “top loader”. This version had a top loading cartridge and no DRM lock-out chip. Unfortunately it also did away with composite AV ports. The only way to hook this NES to your TV was through the RF modulated output. [ThunderSqueak] and a number of other intrepid hackers have fixed this problem. All it takes is a 2N3906 PNP transistor and a few jellybean parts. The video and audio outputs are pulled from the motherboard before they enter the RF modulator. One nice feature is the clean connectors. [ThunderSqueak] used connectors from modular in-wall AV boxes for a setup that looks as good as it works.

segaNext we have [makestuff] with USB MegaDrive DevKit. Sega’s MegaDrive, or Genesis as it was known here in the USA, was a groundbreaking console. It used a Motorola 68000 16-bit CPU while most other systems were still running a Z80 or a 6502. People loved this console, and there are plenty who still want to develop software for it. Enter [makestuff] with his development kit. On a card with a $40 USD bill of materials, he’s managed to fit SDRAM, an FPGA, and a USB interface. This is everything you need to load and debug software on an unmodified console. The FPGA had enough logic left over that [makestuff] was able to implement a continuous bus cycle tracer over USB. Nice work!

robbbFinally, we have our own [Joshua Vasquez] with R.O.B. 2.0. The original NES came in a deluxe version with a special pack in – a robot. Robotic Operating Buddy, or ROB for short, would play games with the player. Unfortunately ROB was a bit of a flop. It only worked with two games, Gyromite and Stack-Up Ice Climber. Most ROB units eventually found their way to the recycling bin. [Joshua] is building a new version of the ROB, with modern controls. He’s already modeled and 3D printed ROB’s head. I can’t wait to see this project come together!

If you want to see more retrogaming goodness, check out our new retrogaming hardware hacks list. See a project I might have missed? Don’t be shy, just drop me a message on Hackaday.io. That’s it for this week’s Hacklet, As always, see you next week. Same hack time, same hack channel, bringing you the best of Hackaday.io!

Hacklet 118 – Infrared And Universal Remote Controls

The first remote control for a TV was the Zenith Space Command back in the 1950’s. Space Command used sounds at ultrasonic frequencies to control the set. It wasn’t until the 1980’s and the Viewstar cable box that infrared entered the picture. Remote controls spread like wildfire. It wasn’t long before every piece of consumer electronics had one. Coffee tables were littered with the devices. It didn’t take long for universal remotes to hit the scene. [Woz] himself worked on the CL9 Core device, back in 1987. Even in today’s world of smart TV’s and the internet of things, universal remotes are still a big item. Hackers, makers, and engineers are always trying to build a device that works better for them. This week’s Hacklet is about some of the best universal and IR remote projects on Hackaday.io!

smoteWe start with [Harikrishna] and zmote. Zmote is an open source WiFi enabled, infrared,  360° remote control. That’s a mouthful. It might be easier to say it’s an ESP8266 and some IR LEDs. An ESP-01 module connects the device to WiFi and provides the 32-bit processor which runs the show. Learning functionality comes courtesy of a TSOP1738 modulated infrared receiver. The beauty of the Zmote is in the software. REST and MQTT connectivity are available. Everything is MIT licensed, and all the code is available on Github.


easton

Next up is [Benjamin Kenobi] with TV Remote Control, Limited. Not everyone can operate the tiny buttons on a modern remote. [Benjamin] built this device for Easton, a special kid with a disability that impairs his motor skills. The 3D printed case holds two buttons – one for power, and one to change the channel. An Arduino Nano running [Ken Shirriff’s] IR library is the brains of the operation. The IR signal timing is hard coded for simplicity. One problem [Ben] ran into was the Nano’s high current draw, even in sleep mode. Batteries wouldn’t last a week. A simple diode circuit with a reed relay keeps the Nano shut down until Easton presses a button.


openirNext we have [Nevyn] with OpenIR – Infrared Remote Control. A dead DSLR remote shutter release was all the motivation [Nevyn] needed to start work on his own universal remote control. OpenIR can be connected to (and controlled by) just about anything with a UART – a PC via an FTDI cable, a Bluetooth module, even an ESP8266. The module can be programmed by entering pulse length data through a custom Windows application. The Windows app even allows the user to view the pulses graphically, like a scope. The data is stored on an EEPROM on OpenIR’s PCB. Once programmed, the OpenIR board is ready to control the world.

onebuttonFinally, we have [facelessloser] with One button TV remote. This project may be the simplest open source remote control this side of TV-B-GONE. He wanted to build a simple remote control for his young daughter to scan between the various kids channels. A simple toggle switch turns the device on, and one button performs the rest of the magic. [Facelessloser] wanted to “move up” from an Arduino to an ATtiny85. This project became part of his ATtiny education. A custom PCB from OSH Park ties things together. A simple black project box keeps the electronics safe from tiny fingers – at least until she’s old enough to use a screwdriver.

If you want to see more IR and universal remote��projects, check out our new infrared and universal remote projects list. See a project I might have missed? Don’t be shy, just drop me a message on Hackaday.io. That’s it for this week’s Hacklet, As always, see you next week. Same hack time, same hack channel, bringing you the best of Hackaday.io!

Power Log Splitting: Trying (and Sometimes Failing) To Build A Better Ax

Wood. Humans have burned it for to heat their homes for thousands of years. It’s truly a renewable source of energy. While it may not be the most efficient or green method to warm a space, it definitely gets the job done. Many homes still have a fireplace or wood burning stove for supplemental heat. For those in colder climates, wood is more than just supplemental, it’s needed simply for survival.

Splitting maul by Chmee2 via Wikipedia

The problem with firewood is that it doesn’t come ready to burn. Perfect fireplace sized chunks don’t grow on trees after all. The trees have to be cut up into logs. The logs must be split. The split wood then needs to dry for 6 months or so.

Anyone who’s spent time manually splitting wood can tell you it’s back breaking work. Swinging an 8 pound maul for a few hours will leave your hands numb and your shoulders aching. It’s the kind of work that leaves the mind free to wander a bit. The hacker’s mind will always wander toward a better way to get the job done. Curiously we haven’t seen too many log splitting hacks here on the blog. [KH4] built an incredible cross bladed axe back in 2015, but that’s about it.

Continue reading “Power Log Splitting: Trying (and Sometimes Failing) To Build A Better Ax”