Hackaday Prize Entry: Real Life XEyes

There’s a lot of tech that goes into animatronics, cosplay, and costumes. For their Hackaday Prize entry, [Dasaki] and [Dylan] are taking the eyes in a costume or Halloween prop to the next level with animatronic eyes that look where the wearer of this crazy confabulation is looking. It’s XEyes in real life, and it promises to be a part of some very, very cool costumes.

The mechanics of this system are actually pretty simple — it’s just a few servos joined together to make a pair of robotic eyes move up and down, and left to right. This entire mechanism is mounted on a frame, to which is attached a very small camera pointed directly at the user’s (real) eye. The software is where things get fun. That’s a basic eye-tracking setup, with IR light illuminating the pupil, and a compute unit that can calculate where the user is looking.

For the software, [Dasaki] and [Dylan] have collected a bunch of links, but right now the best solutions are the OpenMV and the Eye of Horus project from last year’s Hackaday Prize. It’s a great project, and a really fun entry for the Automation portion of this year’s Hackaday Prize.

Weather-aware Shoe Rack Helps You Get Ready For The Day

If you’re anything like us, your complete shoe collection consists of a pair of work boots and a pair of ratty sneakers that need to wait until the next household haz-mat day to be retired. But some people have a thing for shoes, and knowing which pair is suitable for the weather on any given day is such a bother. And that’s the rationale behind this Raspberry Pi-driven weather-enabled shoe rack.

The rack itself is [zealen]’s first woodworking project, and for a serious shoeaholic it’s probably too small by an order of magnitude. But for proof of principle it does just fine. The rack holds six pairs, each with an LED to light it up. A PIR sensor on the top triggers the Raspberry Pi to light up a particular pair based on the weather, which we assume is scraped off the web somehow. [zealen] admits that the fit and finish leave a bit to be desired, but for a first Rasp Pi project, it’s pretty accomplished. There’s plenty of room for improvement, of course – RFID tags in the shoes to allow them to be placed anywhere in the rack springs to mind.

[via r/raspberry_pi]

Working In Peace With An Off-Grid Office Shed

Finding a good work space at home isn’t a trivial task, especially when you’ve got a wife and kid. A lot of us use a spare bedroom, basement, or garage as a space to work on our hobbies (or jobs). But, the lack of true separation from the home can make getting real work done difficult. For many of us, we need to have the mental distance between our living space and our working space in order to actually get stuff done.

This is the problem [Syonyk] had — he needed a quiet place to work that was separated from the rest of his house. To accomplish this, he used a Tuff Shed and set it up to run off-grid. The reason for going off-grid wasn’t purely environmental, it was actually more practical than trying to run power lines from the house. Because of the geology where he lives, burying power lines wasn’t financially feasible.

Continue reading “Working In Peace With An Off-Grid Office Shed”

Amazing Carbon Foam Doesn’t Take Much Bread

A lot of people knew the Space Shuttle had ceramic tiles to protect its nose from reentry heat. That’s mostly because the tiles fell off a lot and each one was a unique shape, so it got a lot of press coverage. However, you didn’t hear as much about the parts of the orbiter that got really hot: the forward part of the wings and the tip of the nose. For those, NASA used an exotic material called RCC or reinforced carbon-carbon. Other uses include missile nose cones and Formula One brakes. A similar material, carbon fiber-reinforced silicon carbide appears in some high-end car brakes. These materials can take high temperatures, easily.

[AvE] wanted to make some carbon foam for experiments. It does take a little bread, though. Not money, but literal bread. To create the foam, he burns bread slices in a chamber full of argon. The stuff has some amazing properties.

In the video below, you can see the foam protecting a thermocouple from a torch flame and even holding melting aluminum. Not bad for a few pieces of bread.

Continue reading “Amazing Carbon Foam Doesn’t Take Much Bread”

Hacklet 122 – Spectrometers

There is always something interesting to find when browsing the projects on Hackaday.io. I’m always amazed at how much hackers can get done in their basements and home labs. One surprising trend I’ve found is the sheer number of spectrometer projects people across the globe are working on. I’ve always known what a spectrometer is, but I never knew so many hackers would want them. The numbers don’t lie though – plenty of hackers around the world want to measure the spectra of light — be it to test out a new LED, or determine the structure of an object. This week we’re checking out some of the best spectrometer projects on Hackaday.io!

ramanpiWe start with [fl@C@] and ramanPi – Raman Spectrometer. RamanPi is one of the first spectrometer projects on Hackaday.io. [fl@C@] entered his project in the 2014 Hackaday Prize, and was one of 5 finalists. As the name implies, ramanPi is a raman spectrometer, a type often used in chemistry. [fl@C@’s] original use for the machine was determining atomic bond angles. RamanPi uses 3D printed parts created with standard desktop printers wherever possible. A Raspberry Pi runs the system, originally a model B, though now I’m sure a Pi 3 would fit the bill. The detector is a Toshiba linear CCD.


dh-specNext up is [David H Haffner Sr] with DH 4.0 Spectrometer V 4 ( upgrade 2 ). [David’s] project doesn’t give a lot of background in the description text – he dives right in to the technical details of designing and building a spectrometer. His sensor is a JDEPC-OV04, which is a webcam module intended for use in laptops. Much of [David’s] recent work has been on the optical path. Optical spectrometers can use a diffraction grating and a slit to split light into spectra. [David] is using a recordable DVD as his diffraction grating. The slit is a bit more home-made. Two Gillette razor blades and an acetate strip are used to form an optical slit only 0.11 mm wide. [David] has already used his spectrometer to analyze crude oil.

pure-engNext we have [Pure Engineering] with C12666MA Micro-Spectrometer. Electro-Optics manufacturer Hamamatsu has created an optical spectrometer in a fingertip sized can. Their C12666MA micro-spectrometer sounds like it must be magic — and it is. The magic of Microelectromechanical systems (MEMS) have brought this device to life. Bringing one of these devices up isn’t exactly an easy task though. [Pure Engineering] has designed a breakout board for the C12666MA. They’ve even included a 404nm laser diode and a white LED for illumination. The board can plug into a standard Arduino header.

adamFinally, we have [Adam] with Handheld VNIR Spectrometer. VNIR in this case stands for visible and near-infrared. [Adam] created this device so he could learn how spectrometers worked. That’s a noble purpose if I ever heard one. He is building his system to be portable, so he can take measurements outside the lab. The sensor is a Sony ILX511B linear CCD. An Arduino nano reads the CCD and passes the data on to a PC for analysis. [Adam’s] diffraction grating is a concave holographic affair from Public Lab. [Adam] is also using an acetate slit purchased from Public Lab. Illumination enters via a fiber optic bundle.

If you want to see more spectrometer projects, check out our new spectrometer projects list. See a project I might have missed? Don’t be shy, just drop me a message on Hackaday.io. That’s it for this week’s Hacklet, As always, see you next week. Same hack time, same hack channel, bringing you the best of Hackaday.io!

Roomba Now Able To Hunt Arnold Schwarzenegger

Ever since the Roomba was invented, humanity has been one step closer to a Jetsons-style future with robots performing all of our tedious tasks for us. The platform is so ubiquitous and popular with the hardware hacking community that almost anything that could be put on a Roomba has been done already, with one major exception: a Roomba with heat vision. Thanks to [marcelvarallo], though, there’s now a Roomba with almost all of the capabilities of the Predator.

The Roomba isn’t just sporting an infrared camera, though. This Roomba comes fully equipped with a Raspberry Pi for wireless connectivity, audio in and out, video streaming from a webcam (and the FLiR infrared camera), and control over the motors. Everything is wired to the internal battery which allows for automatic recharging, but the impressive part of this build is that it’s all done in a non-destructive way so that the Roomba can be reverted back to a normal vacuum cleaner if the need arises.

If sweeping a just the right time the heat camera might be the key to the messy problem we discussed on Wednesday.

The only thing stopping this from hunting humans is the addition of some sort of weapons. Perhaps this sentry gun or maybe some exploding rope. And, if you don’t want your vacuum cleaner to turn into a weapon of mass destruction, maybe you could just turn yours into a DJ.

Atari Archaeology Without Digging Up Landfill Sites

We are fortunate to live in an age of commoditized high-power computer hardware and driver abstraction, in which most up-to-date computers have the ability to do more or less anything that requires keeping up with the attention of a human without breaking a sweat. Processors are very fast, memory is plentiful, and 3D graphics acceleration is both speedy and ubiquitous.

Thirty years ago it was a different matter on the desktop. Even the fastest processors of the day would struggle to perform on their own all the tasks demanded of them by a 1980s teenager who had gained a taste for arcade games. The manufacturers rose to this challenge by surrounding whichever CPU they had chosen with custom co-processors, ASICs that would take away the heavy lifting associated with 2D graphics acceleration, or audio and music synthesis.

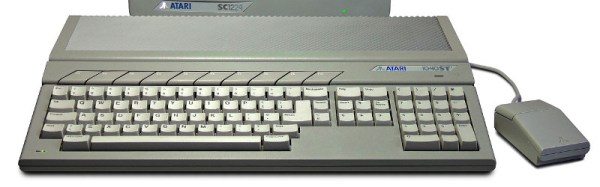
One of the 1980s objects of computing desire was the Atari ST, featuring a Motorola 68000 processor, a then-astounding 512k of RAM, a GUI OS, high-res colour graphics, and 3.5″ floppy drive storage. Were you to open up the case of your ST you’d have found those ASICs we mentioned as being responsible for its impressive spec.

Jumping forward three decades, [Christian Zietz] found that there was frustratingly little information on the ST ASIC internal workings. Since a trove of backed-up data became available when Atari closed down he thought it would be worth digging through it to see what he could find. His write-up is a story of detective work in ancient OS and backup software archaeology, but it paid off as he found schematics for not only an ASIC from an unreleased Atari product but for the early ST ASICs he was looking for. He found hundreds of pages of schematics and timing diagrams which will surely take the efforts of many Atari enthusiasts to fully understand, and best of all he thinks there are more to be unlocked.

We’ve covered a lot of Atari stories over the years, but many of them have related to their other products such as the iconic 2600 console. We have brought you news of an open-source ST on an FPGA though, and more recently the restoration of an ST that had had a hard life. The title of this piece refers to the fate of Atari’s huge unsold stocks of 2600 console cartridges, such a disastrous marketing failure that unsold cartridges were taken to a New Mexico landfill site in 1983 and buried. We reported on the 2013 exhumation of these video gaming relics.

A tip of the hat to Hacker News for bringing this to our attention.

Atari ST image, Bill Bertram (CC-BY-2.5) via Wikimedia Commons.